Table of Contents
- Introduction
- Create Prerequisites for Offers, Orders and Invoices
- Create Prerequisites for Team Use
- Create Prerequisites for Time Tracking and Activity Transfer
Introduction
With the help of the setup assistant you create step by step all the necessary requirements to be able to work productively with foreknown. When you log in to foreknown for the first time after registering, you will be offered the widget "Setup Assistant" on the "Overview - Home" page.

This widget shows you all the necessary steps divided into 3 areas, which are described in more detail below. A green checkbox in front of an entry shows you that the required activities have already been performed for the area.
NOTE: If you don't want to see the setup assistant anymore, you can use the button "Open Configuration" (gear icon on the top right of the widget) with the action "Hide" to hide the widget. Via the dialog under System Administration / Settings you can undo this action as account administrator.
Create Prerequisites for Offers, Orders and Invoices
Create Tax Rates
For the creation of offers, orders and invoices, at least one VAT rate must be stored in foreknown. If you have not yet maintained any tax rates, the setup assistant will appear in the "Tax Rates" dialog, as shown below.
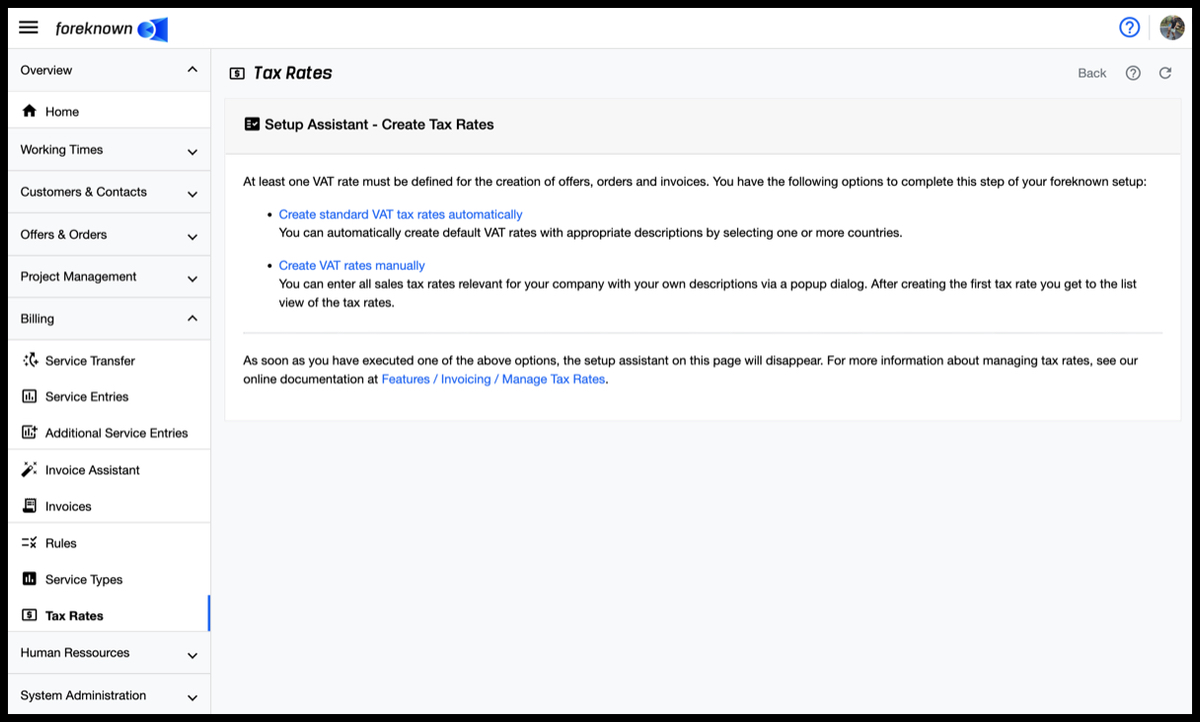
You will be offered 2 options to create the tax rates:
-
Create standard VAT rates automatically: A popup dialog "Create standard VAT rates" opens.
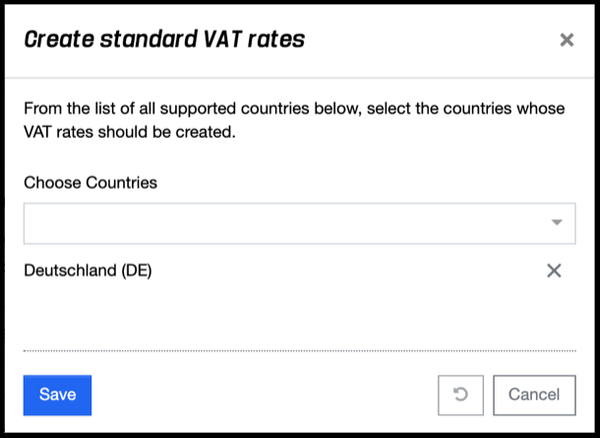
There you can select from the drop-down list "Select Countries", from all currently supported countries, the countries for which you want to have automatically generated all VAT tax rates. Clicking on "Save" closes the dialog and displays the list of all generated tax rates.
With this action, the setup assistant for tax rates is closed and this step is completed. All created tax rates can be adjusted afterwards if necessary.
- Create VAT rates manually: The popup dialog "Create tax rate" opens, through which a tax rate can be created individually by entering a name and a percentage. When the first tax rate is saved, the tax rate setup assistant disappears and the created tax rate appears in the list. The "New" button can then be used to create additional tax rates.
If you have done one of the above and return to the home page, e.g. by clicking on the foreknown logo, you will see a checkbox ticked in green for the "Create Tax Rates" step.
Documentation-Link: Detailed information about the maintenance of tax rates can be found in the documentation at Features / Invoice / Manage Tax Rates.
Create Service Types
With the service types you define which working time-dependent services you want to offer in your company. You could also speak of roles such as developer, analyst, system administrator, designer, or project manager. Service types are therefore an important part of your offers, orders, invoices and activity reports and should therefore be chosen wisely.
If you have not yet maintained any service types, the setup assistant appears in the "Service Types" dialog, as shown below.

You will be offered 2 options to create service types:
-
Create standard service types automatically: A popup dialog "Create standard Service Types" opens.
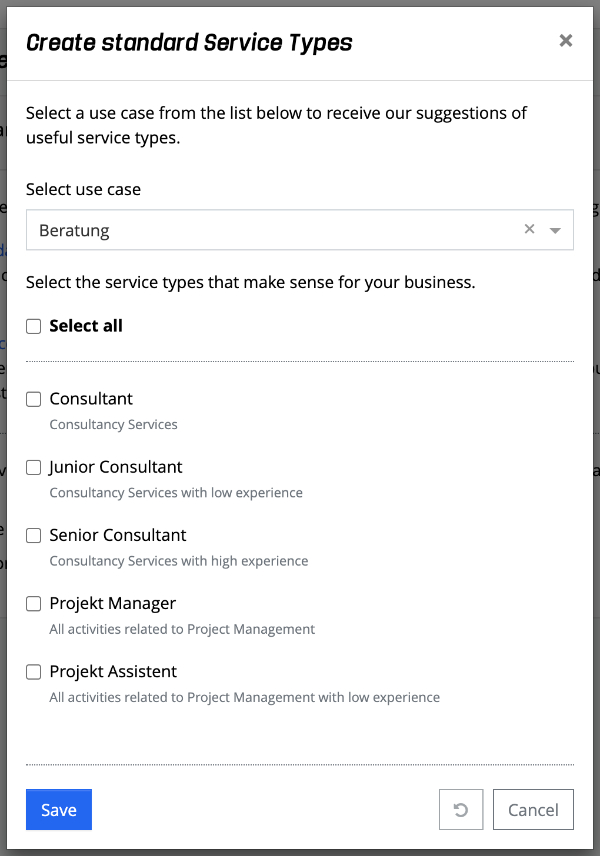
There you can select a suitable use case for your company from a list of different use cases in the drop-down list "Select use case". Subsequently, a list of useful service types will be suggested to you and you can select the service types relevant for you via a checkbox. With the action "Select all" you can select all service types with one click.
Click "Save" to close the dialog and display the list of all created service types. With this action, the setup assistant for service types is hidden and this step is considered as completed. All created service types should be edited afterwards to store your individual standard hourly or daily rates.
- Create service types manually: The popup dialog "Create Service Type" opens, via which a service type can be created individually by entering a name, a description, a code, a currency and the billing rates. When the first service type is saved, the service type setup assistant disappears and the created service type appears in the list. The "+ New" button can then be used to create additional service types.
If you have done one of the above options and return to the home page, e.g. by clicking on the foreknown logo, you will see a green ticked checkbox for the "Create Service Types" step.
Documentation-Link: Detailed explanations to this topic can be found in the documentation under:
Customize Number Ranges
With the number ranges you define the structure of your offer, order, invoice and customer numbers. Therefore, before you start with foreknown, you should think about their structure. In the documentation links you will find a best practice article, which describes a recommended structure at the end. This structure is also preset in your foreknown account.
When you open the "Number Ranges" dialog for the first time, you will see the number range setup assistant.
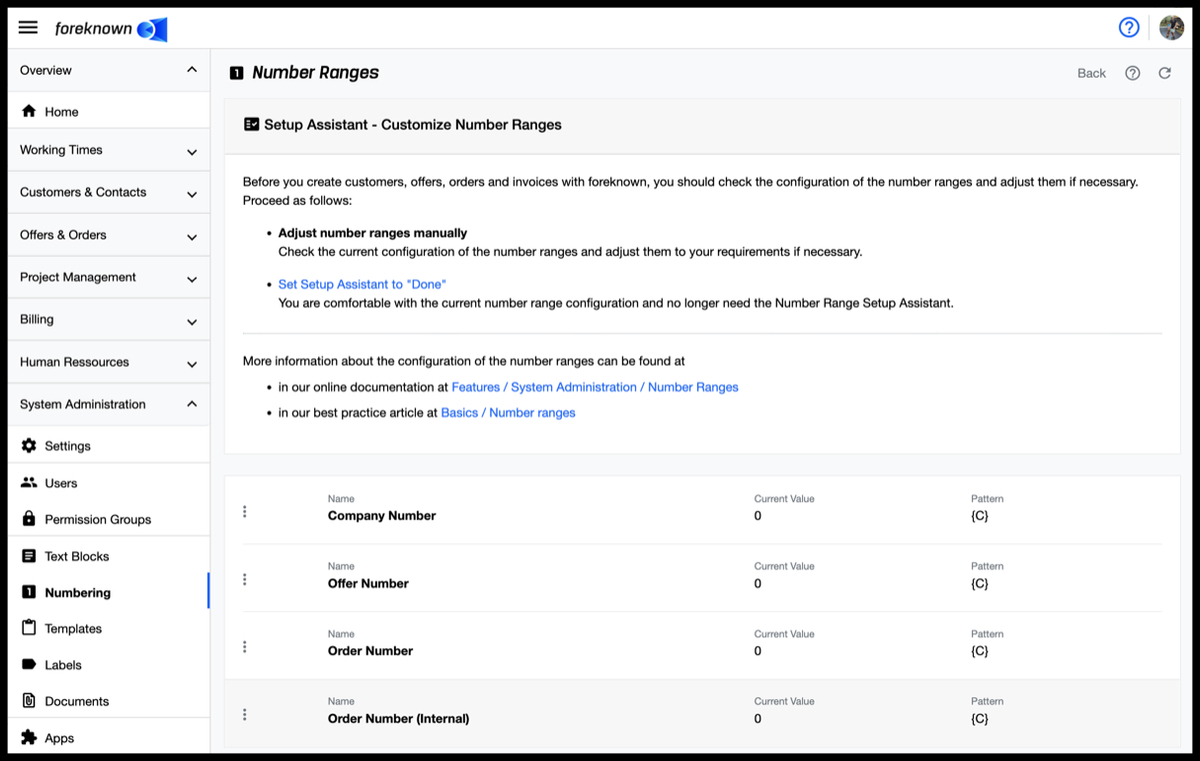
The assistant indicates that the current settings should be checked and adjusted if necessary. When you have finished checking and adjusting the number ranges, you only need to perform the "Set Setup Assistant to Done" action, which closes the setup assistant.
Clicking on the foreknown logo will take you back to the home page, where you will find a checkbox ticked in green for the "Customize Number Ranges" step.
Documentation-Link: Detailed explanations to this topic can be found in the documentation under:
Customize Templates
For each document that you can create with foreknown, i.e. offers, orders, invoices, activity reports, there is an MS Word or MS Excel template that you can individually adapt to your company. Be it to insert a logo, to change descriptions or to adjust all variables for standard information (bank details, tax number, address, ...).
Therefore, before the first offers, orders, invoices and activity reports are created, you should download all templates once, adjust them and upload them again.
When you open the Templates dialog for the first time, you will see the Template Setup Assistant.
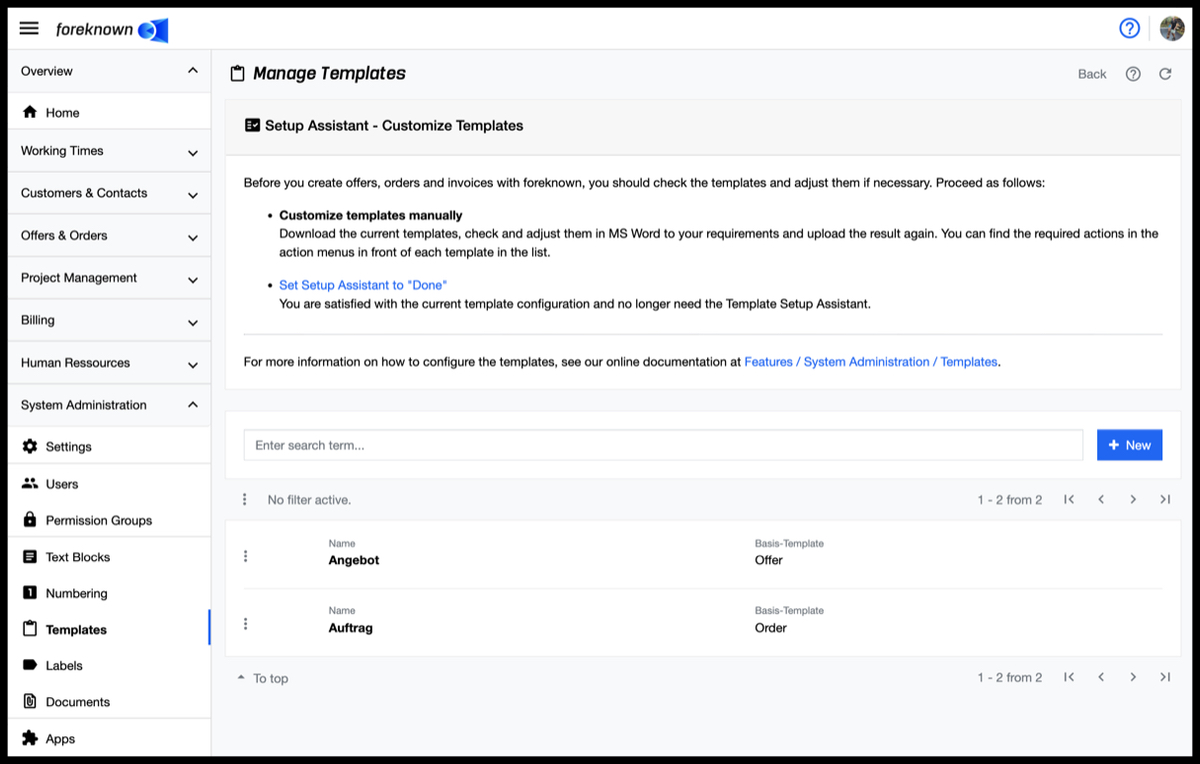
The assistant will indicate that the current templates should be checked and adjusted if necessary. When you are done checking and adjusting the templates, you only need to perform the "Set Setup Assistant to Done" action, which will close the setup assistant.
Clicking on the foreknown logo will take you back to the home page, where you will find a checkbox ticked in green for the "Customize Templates" step.
Documentation link: For template customization, it is imperative that you familiarize yourself with the instructions in the documentation, as there are certain restrictions that must be taken into account. Detailed explanations on this topic can be found in the documentation under Functions / System Administration / Templates.
Create Prerequisites for Team Use
This section of the setup assistant is intended to ensure that all users and employees are set up in foreknown. This is the prerequisite for taking over working hours and for all relevant employees to work in foreknown.
Add User
To ensure that every employee in your company can use foreknown with the correct role, users can be created here. If you enter the "Users" dialog the first time, the setup assistant will appear as shown below.
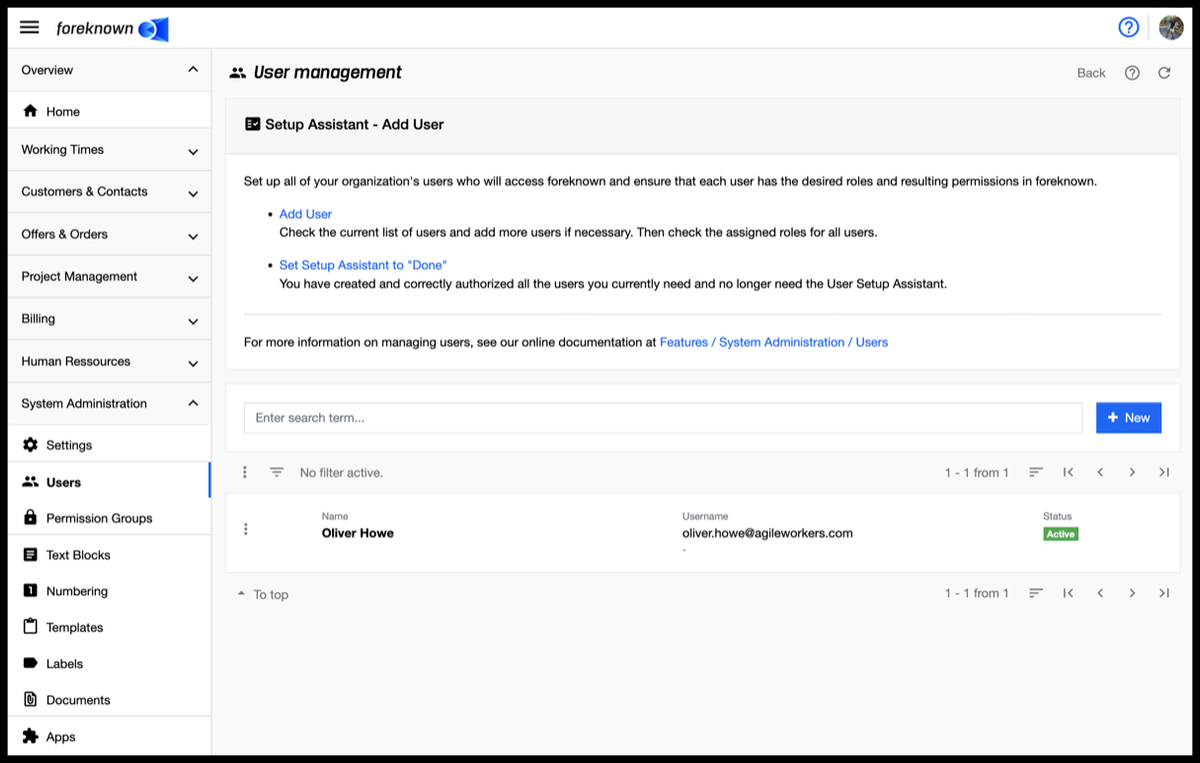
The setup assistant instructs you to check the completeness of the user list and then the assigned roles. If you find that one or more users are missing, the "Add User" option can be used to open the "Create User" dialog. Each newly created user will also be displayed in the list.
If all missing users have been added or were already present and all roles have been assigned correctly, you only need to perform the action "Set Setup Assistant to Done", which will close the setup assistant.
Clicking on the foreknown logo will take you back to the home page, where you will find a checkbox ticked in green for the "Add User" step.
Documentation-link: Detailed explanations to this topic can be found in the documentation under:
Create Employee
In order to use foreknown dynamically in the team, all employees must be entered in the system. If you enter the "Employees" dialog the first time, the setup assistant will appear as shown below.
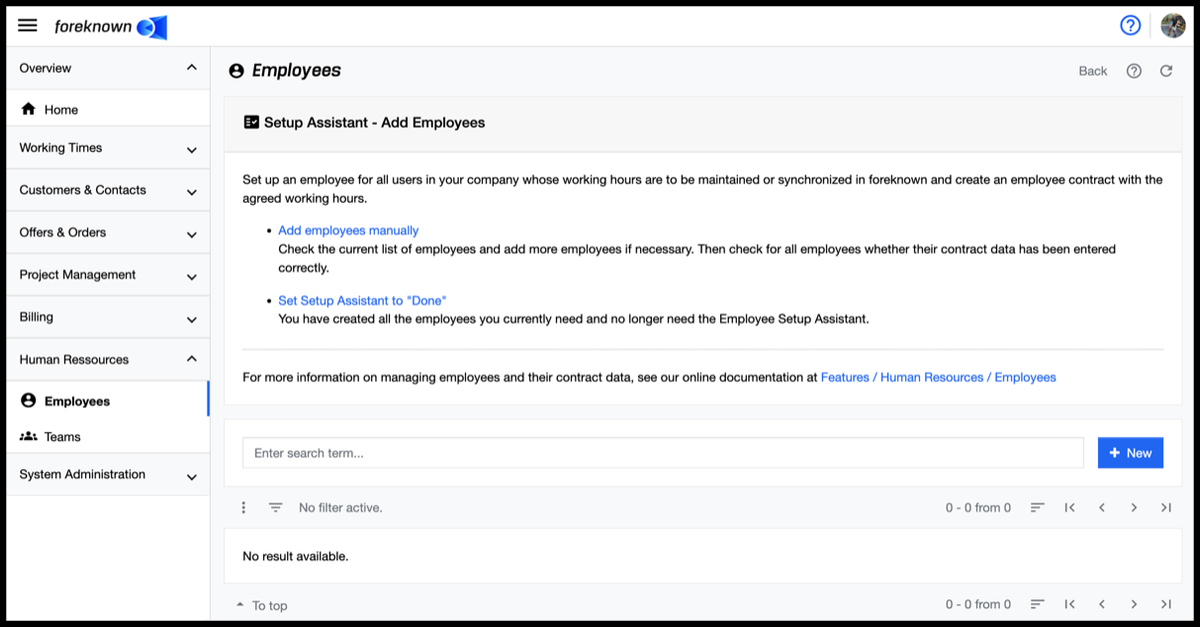
The setup assistant will prompt you to check the completeness of the employee list. If you notice that one or more employees are missing, the "Add employees manually" option can be used to open the "Create Employee" dialog. Each newly created employee will also be displayed in the list.
If all missing employees have been added or were already present, you only need to perform the "Set Setup Assistant to Done" action, which will close the setup assistant.
Clicking on the foreknown logo will take you back to the home page, where you will find a checkbox ticked in green for the "Create Employee" step.
Documentation-Link You can find detailed explanations on this topic in the documentation under:
Create Prerequisites for Time Tracking and Activity Transfer
Create Rules
Rules can be used to generate billable expenses or payment schedules semi- or fully automatically.
When you open the Rules dialog for the first time, you will see the Rules Setup Assistant.
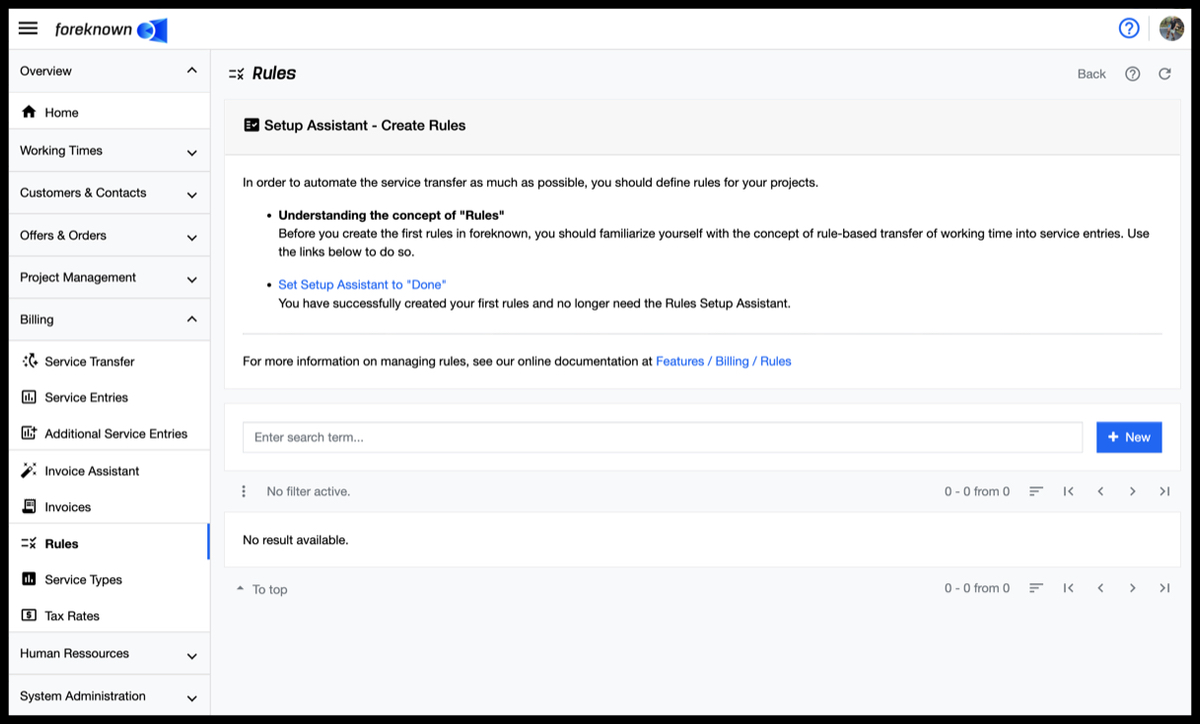
The assistant points out that you should first familiarize yourself with the principle of rule-based transfer of working times.
You can read an explanation of the topic in our documentation under Functions / Billing / Manage Rules.
If you have sufficiently studied the topic in the documentation, you only need to perform the "Set Setup Assistant to Done" action, which will close the setup assistant.
Clicking on the foreknown logo will take you back to the home page, where you will find a checkbox ticked in green for the "Create Rules" step.