Table of Contents
Basic Rules
Detail Rules
General
Introduction
The rules in foreknown represent an important function for the automated transfer of working times to service entries. Rules are used to identify working times on the basis of specific criteria, with the aim of assigning them to a specific order position and service type.
Ideally, this is done completely automatically, so that each working time entry of an employee can be assigned directly to a related order and has an immediate influence on further evaluations and KPIs.
All working times that should not or cannot be automatically transferred to services are listed in the dialog "Service Transfer" and it can be decided manually how to handle those working times.
Basic rules
A rule always consists of a basic rule and one or more detailed rules. The basic rule defines a simple criteria (a label), which represents a certain list of working time bookings in order to divide the quantity of all incoming working time bookings into rough areas (e.g. projects).
Search Basic Rule
If you open the "Manage Rules" dialog, you will see the following:
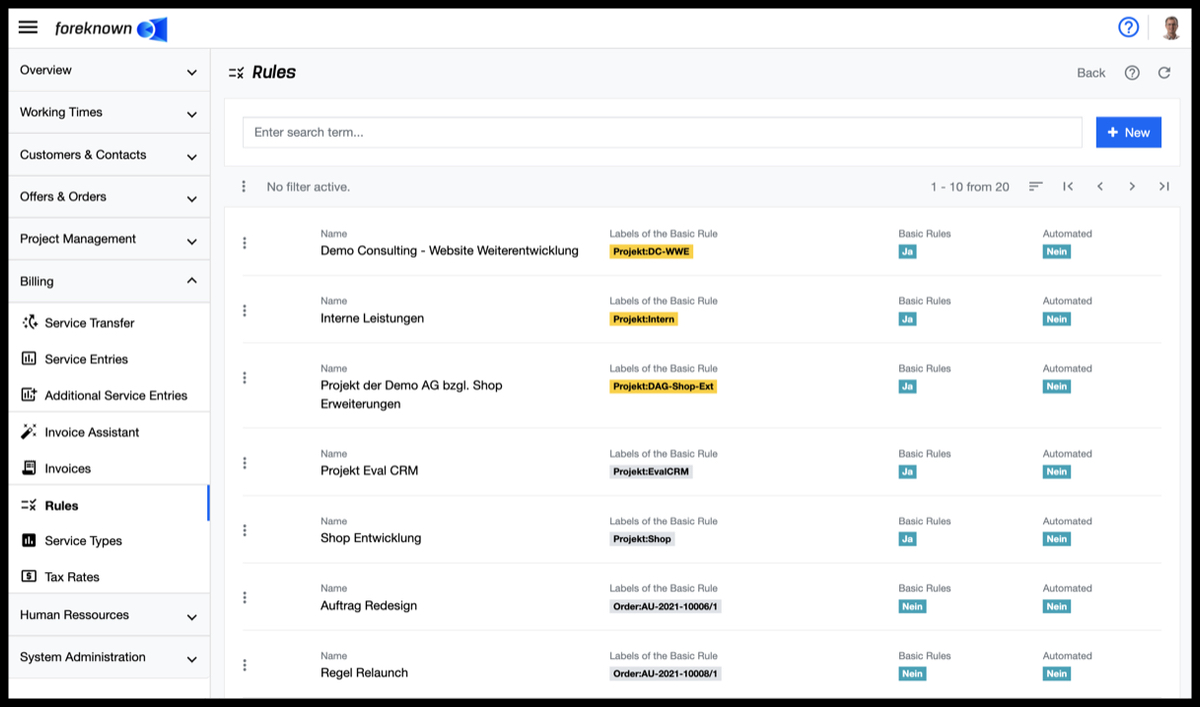
In the upper area of the dialog is the search field and the "+ New" button (see also Create Basic Rule). Below this area all already created basic rules are displayed in form of a scrollable, sortable and filterable list.
If you enter a search term in the input field, the list will only show the basic rules that contain the entered search term in the name. In this way, individual basic rules can be found and edited quickly.
Filter Basic Rules
In addition to the search function, the rule management also offers a filter dialog. A filter dialog is located at foreknown as a fold-out dialog on the right side. By clicking on the button on the left above the list with the three dashes can be used to expand and collapse the filter dialog.
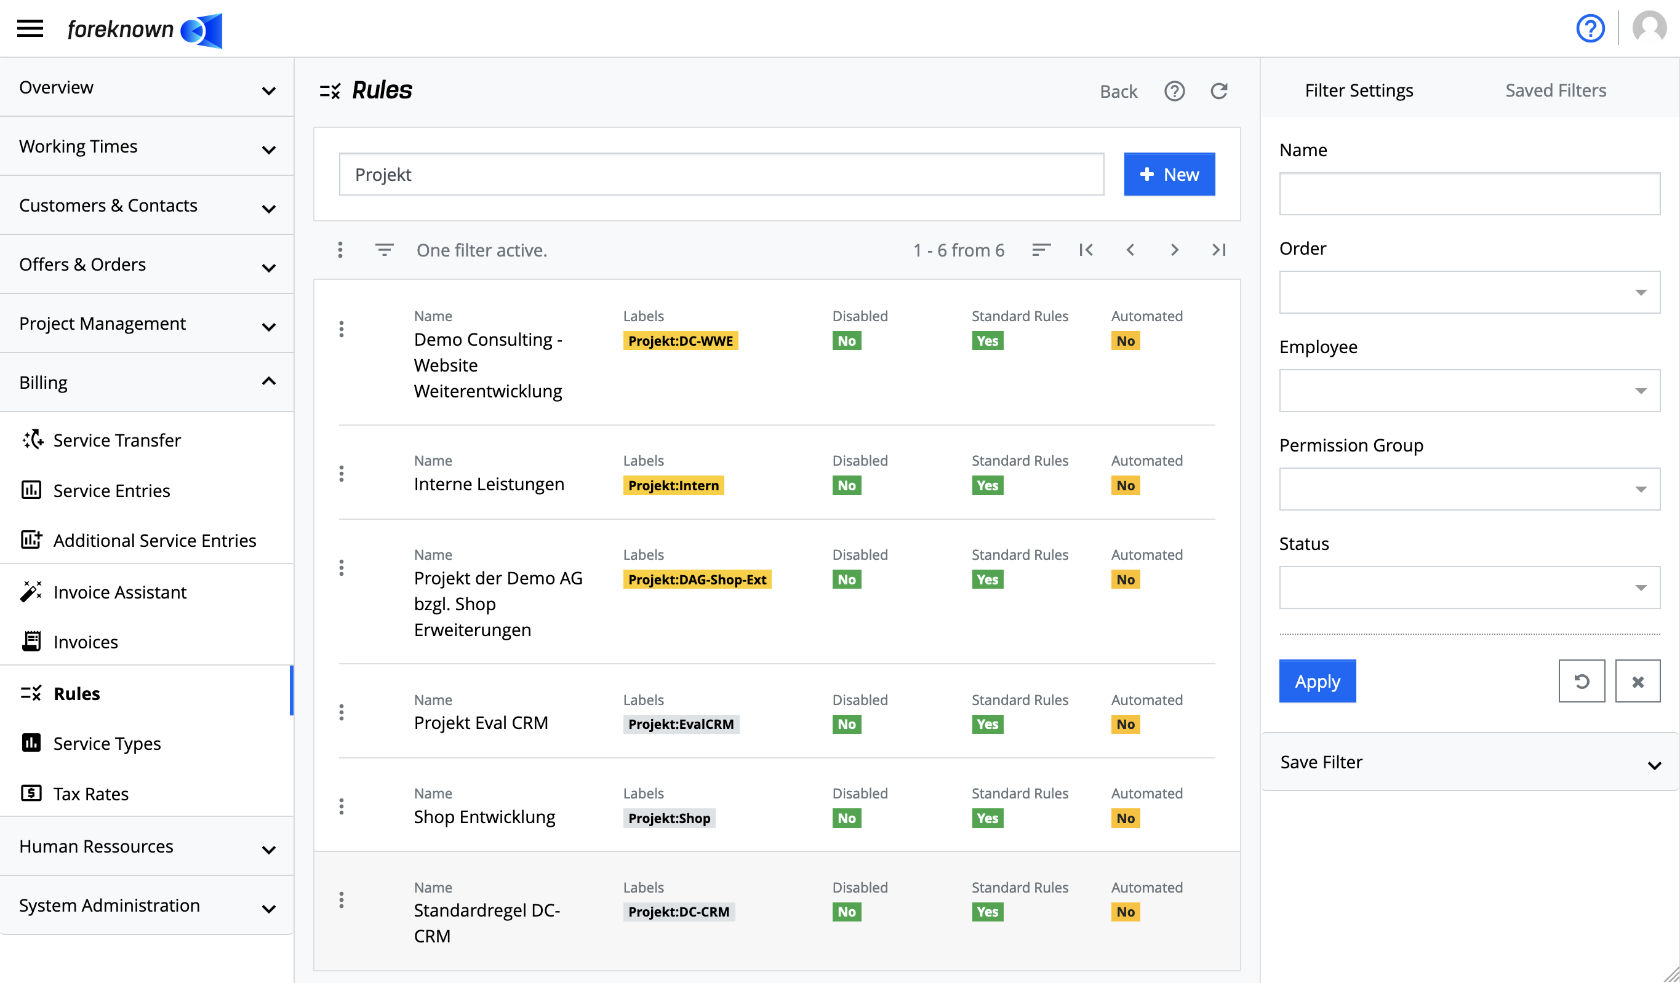
The following filter options are offered for basic rules:
- Name: A search term can be entered, which is searched for in the name of the basic rules.
- Order: Via a drop-down field with auto-completion, one or more orders can be searched for and selected. All rules that use the order in a detail rule are displayed.
- Order position: A drop-down field with auto-completion can be used to search for and select an order position. This field only appears if exactly one order has been selected before. All rules are displayed that use the order position in a detail rule.
- Employee: One or more employees can be searched for and selected via a drop-down field with auto-completion. All rules that use the employees in a detail rule will be displayed.
- Authorization Group: One or more authorization groups can be searched for and selected via a drop-down field with autocomplete. All rules that use the authorization group(s) in a detail rule are displayed.
- Status: The status "Activated" or "Deactivated" can be selected via a drop-down field.
The "Apply" action displays all rules in the list that match the filter criteria. With the action "x" removes all filter settings and the list shows all rules again. The "Reset" action (symbol: arrow in a circle) discards all changes that may have been made to a saved filter.
Documentation Note: For general information about the filter options see also in chapter Basics: Filters.
Create Basic Rule
To create a new basic rule, click on the "+ New" button located at the top right of the search box. This button opens the "Create Rule" popup dialog.
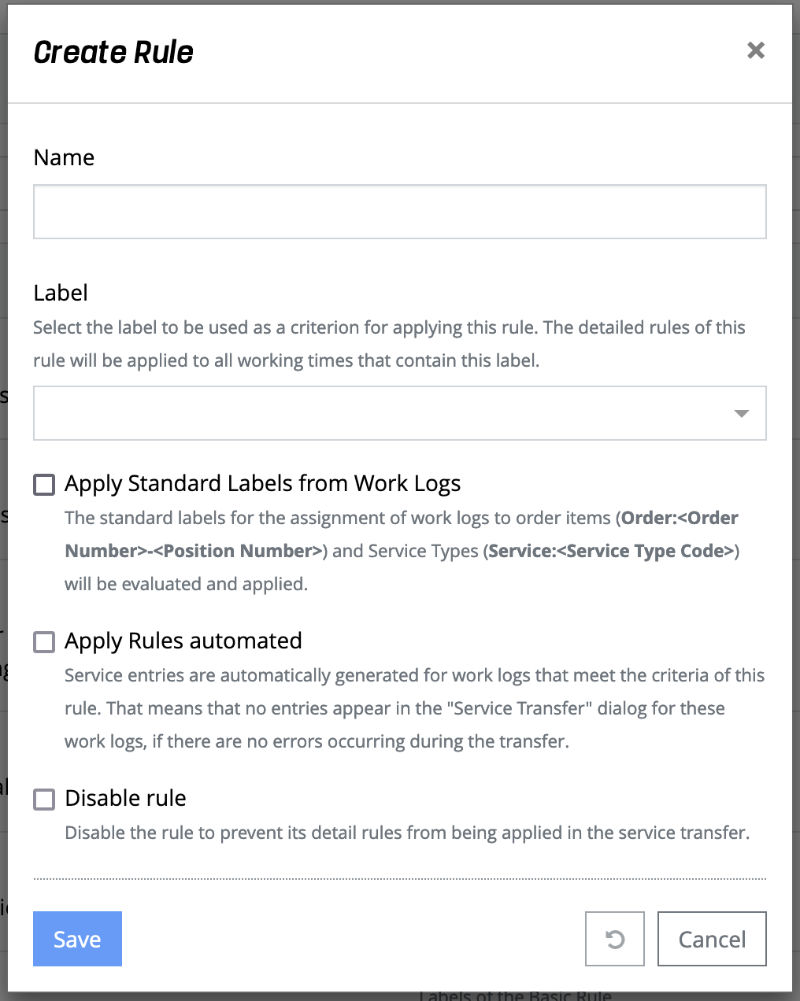
The following properties must be specified for a new rule:
- Name: A name for the rule that is as self-explanatory as possible should be entered here so that it can be easily identified.
- Label: Via a label input field, one label can be selected, which will be applied as the first criteria for the basic rule.
- Apply Standard Labels from Work Logs: If this checkbox is selected, all work logs that meet the criteria of the basic rule will be checked for the presence of certain standard labels. These standard labels allow a direct assignment to an order, an order item and an activity type. Read more under Standard labels.
- Apply Rule automated: If this checkbox is selected, working times that meet the criteria of this rule and can thus be assigned to an order, an order position and a service type are directly transferred to service entries and therefore no longer appear in the "Service Transfer" dialog.
- Disable Rule: If this checkbox is activated, the basic rule will not be used for the service transfer. Initial a basic rule is always enabled.
The "Save" action creates a new basic rule. With the action "Reset" and "Cancel" the entries are discarded and in case of the action "Cancel" the dialog is closed.
Note: When a project is created, a basic rule is also always created that is permanently linked to the project. This basic rule is initially deactivated. The label of this basic rule cannot be changed. Let a basic rule deactivated if it should not be used for the service transfer.
Example: If you have defined an individual basic rule which holds all relevant detailed rules for work logs booked on tasks of a specific project, the related project basic rule should be deactivated. This avoids that two basic rules are found for one work log during the service transfer.
Edit Basic Rule
The properties of a basic rule can be edited via a popup dialog. This is opened from the list of basic rules by clicking on the action menu (three dots symbol) and on the "Edit Basic Rule" action.
In the dialog "Update Rule" all properties of a basic rule can be changed. See also the description of the dialog Create Basic Rule.

The "Save" action saves the changes to the basic rule. With the action "Reset" and "Cancel" the entries are discarded and in case of the action "Cancel" the dialog is closed.
By clicking on the action menu (three dots symbol) at the beginning of each line and then "Delete Rule", a rule can be removed again. A confirmation dialog opens, which must be confirmed with the action "Delete".
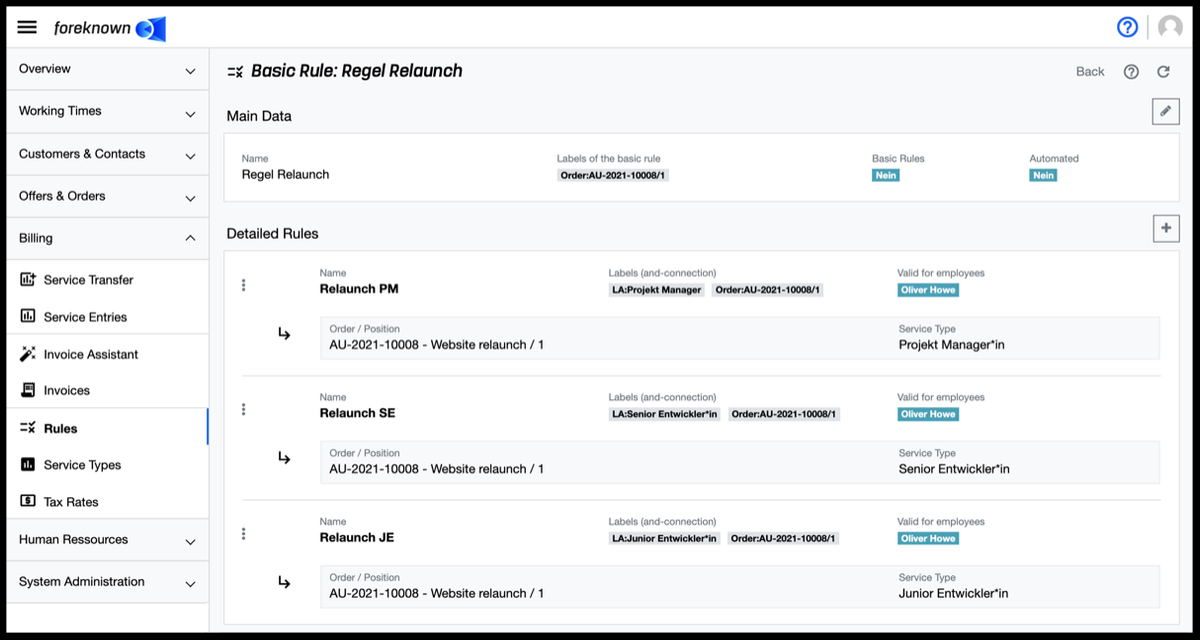
Detailed Rules
With the detailed rules all criteria can be defined to assign working times to specific orders, order positions and service types. Certain labels but also specific employees can be used as criteria.
Manage detailed Rules
Detailed rules can be added in the detail view of the respective basic rule via the "+" at the end of the "Detail Rules" line and edited and deleted via the action menu (three dots symbol) at the beginning of each line.
Create detailed Rule
To create a detailed rule, click on the "+" at the end of the "Detailed Rules" line in the detail view of the respective basic rule. This opens the "Create detailed Rule" dialog:
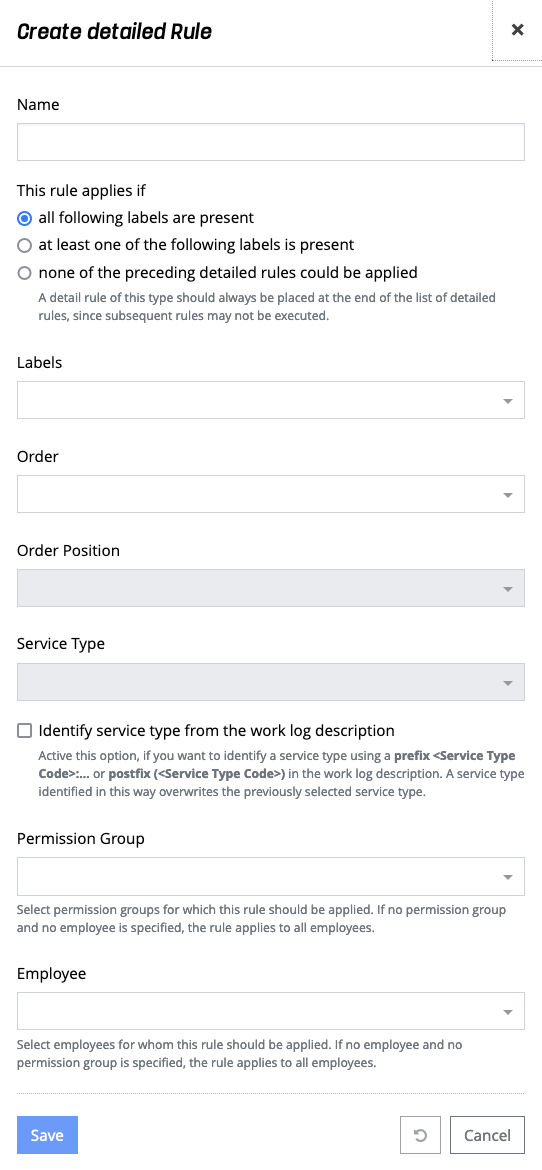
The following properties must/could be specified for a new detailed rule:
-
Name: A specific name for the detailed rule must be entered here.
-
Define Rule Type: The following three options can be set.
- "...all following labels are present": All labels specified in the "Labels" field must be present in a working time entry for this rule to apply.
- "...at least one of the following labels is present": At least one of the specified labels must be present in the working time entry for the rule to apply.
- "...none of the preceding detailed rules could be applied": This detail rule applies regardless of the presence of certain labels.
NOTE: It is important that detailed rules with this type are always positioned at the end of the list, since further rules might not apply after that. Only the restriction to employees could still leave work logs for further detailed rules.
Use this type of detailed rules, e.g. to transfer all work logs to an order item and service item regardless labels. Several rules of this type can be specified with different Employee lists e.g. to serve different service types.
-
Labels: Labels are selected or directly created and assigned via an intelligent input field. This field is not displayed if the 3rd option is selected for the rule type.
-
Valid from: Optional / Specifies a date from which the detailed rule may be applied. The validity period refers to the date of the activity booking.
-
Valid until: Optional / Specifies a date until which the detailed rule may be applied. The validity period refers to the date of the activity booking.
-
Order: Here the order is selected which will be assigned to the service entry when the detailed rule is fulfilled.
-
Order Position: Here the order position of the order is selected, which will be assigned to the service entry when the detailed rule is fulfilled.
-
Service Type: Here the service type is selected, which is assigned to the service entry when the detailed rule is fulfilled.
-
Identify service type from the work log description: Activate this option to search for a service type in the work log description via a prefix
:... or a postfix () to be searched for. A service type identified in this way overwrites the service type selected in the field "Service Type".EXAMPLES
- Work log description with prefix: "CON: Here is the text" => becomes the service type "Consultant".
- Work log description with postfix: "Here is the text (BED)" => becomes the service type "Backend Developer".
The abbreviation is assigned in the administration of the service types.
-
Permission Groups: Here you can enter one or more permission groups. The detail rule is only applied if the employee of the working time booking is included in the permission group.
NOTE
Use the permission groups if you want to create detailed rules that should always apply to a certain group of employees, e.g. all developers of a team.
-
Employee: Here optionally individual employees can be selected. The detailed rule will then only be applied to working times of these employees.
With the action "Save" a new detailed rule is created. With the action "Reset" and "Cancel" the entries are discarded and in case of the action "Cancel" the dialog is closed.
Edit detailed Rule
To edit a detailed rule, you can either select the "Edit detailed Rule" action from the action menu of each detailed rule (button with three dots) or click on the detailed rule. This opens the "Update detailed Rule" dialog:
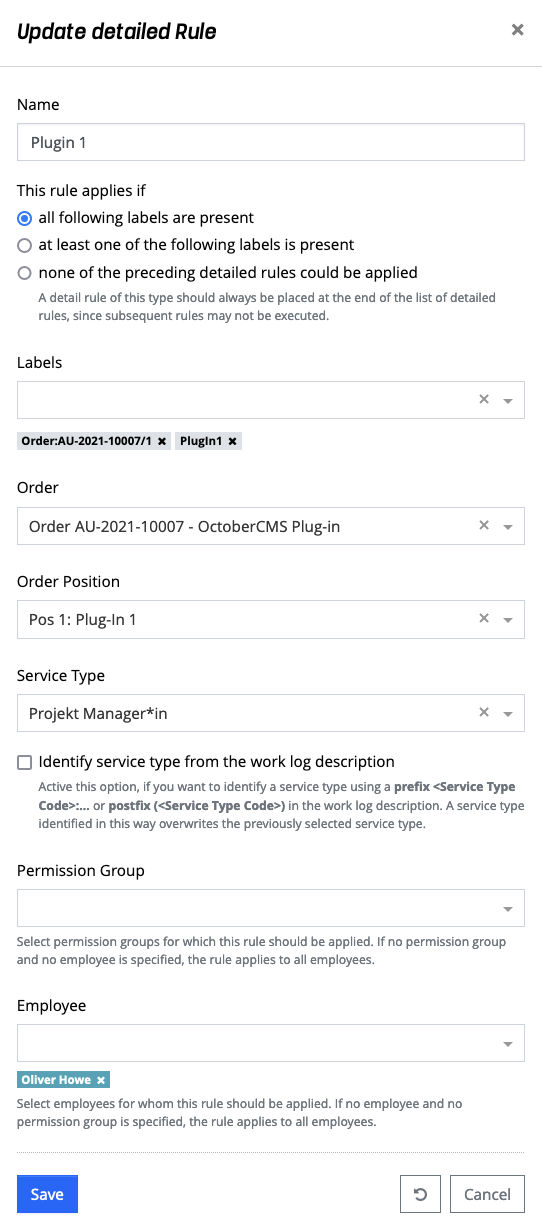
Here all properties from the "Create detailed Rule" dialog can be edited.
To delete a detailed rule, select the action "Delete detailed Rule" from the action menu of the desired detailed rule. A pop-up dialog opens in which this action must be confirmed again with the "Delete" button.
Copy detailed Rule
To copy a detailed rule, the action "Copy Detail Rule" can be selected via the action menu of each individual detail rule (button with three dots). This opens the "Copy detailed Rule" dialog, which is similar to the "Create detailed Rule" Dialog, and initializes all fields(except order position and service type) with the values of the source detail rule.
General
Standard Labels
In foreknown, labels with a defined format can be used for the transfer of working times to services, to ensure a direct assignment to an order, an order position and a service type.
- Order: <Order-No-Position>
- Example: Order:AI-2022-10001-1
- Service: <Service type abbreviation>
- Example: Service:CON e.g. for Consultant
Working time bookings, which have been provided with these labels, can, if the basic rule allows the execution of the standard rules, be assigned directly to an order, an order position and a service type, without further criteria having to be fulfilled.
Jira / Tempo Labels
When synchronizing tasks and work logs from Jira or working times from Tempo Timesheets, among other things, information from certain Jira task properties is also transferred to foreknown in the form of labels. The following describes all labels that might be created during synchronization:
- All labels of Jira tasks: If in Jira labels are maintained at tasks, then these are taken over
in foreknown as "Label:
" at the task. - Assignments to Sprints: When using a Scrum project in Jira, Sprints can be managed and assigned to tasks.
These sprints are taken over in foreknown as a label (Sprint:
) at the task. - Assignments to Releases: For Jira projects in Jira, releases can be managed and tasks can be assigned.
These releases are taken in foreknown as a label (Release:
) on the task. - Priorities: A priority can be assigned to a Jira task via a standard field. These priorities are taken over in foreknown as label (Priority:...) at the task.
- Task Types: The type of Jira tasks (e.g. Epic, Task, Sub-Task) will be taken over in foreknown with the label Type:<Jira task type> on the task.
- Relationships to Epics: If you use Epics in Jira and assign tasks to them, then these tasks get in foreknown a label "Epic:<ID of Epic task>".
- Tasks ID: All tasks in foreknown get a label "Task:<ID of Jira task>".
All work logs or tempo work time entries get also assigned all labels of the associated task during synchronization in foreknown.
If you use the "Tempo Timesheets" plug-in in Jira, you may receive additional labels, which are described below:
- Tempo Customer: In Tempo Timesheets customers can be managed. All working time bookings that are assigned to a
customer get the label "Customer:
" in foreknown during synchronization. - Tempo-Account: In Tempo Timesheets accounts can be managed below a customer. All working time entries, which are
assigned to an account, get the label "Account:
" in foreknown during synchronization.
These labels are written directly to the working time entries in foreknown and are available together with the above-mentioned task-related labels to define rules for the service transfer.