Table of Contents
General Functions
Action Menu
- Preview
- Download current Template
- Download Base Template
- Upload edited Template
- Set as Default
- Edit Master Data
- Edit Variables
- Delete Template
Customize Templates
- Customize Freemarker Templates (Offers, Orders, Invoices, Activity Reports, E-Mails)
- Customize Excel Templates (Service Entry Exports / Employee Reports)
Introduction
In foreknown, documents such as offers, orders, invoices, activity reports, and exports of services are managed, which later also need to be exported for the customer, e.g. to be sent as a PDF document by e-mail. To ensure that these documents meet the requirements and the common design (CD) of your company, individual customization will be ensured.
Therefore, all documents created with foreknown are always based on a Freemarker (HTML, CSS) file for offers, orders and invoices and on Microsoft Excel files for activity reports.
Note: Freemarker is a template engine that allows you to dynamically fill HTML pages with data. In foreknown we use Freemarker templates (.fmt files) to insert the offer, order, invoice and service data into the HTML/CSS designed templates. More information and a comprehensive documentation on Freemarker can be found on the website https://freemarker.apache.org.
These templates can be downloaded via the template management in the system administration for an individual design. It is also possible to create several variants per document type (offer, order, invoice, activity report, e-mail) e.g., to provide templates in multiple languages or for fixed-price and effort-based offers.
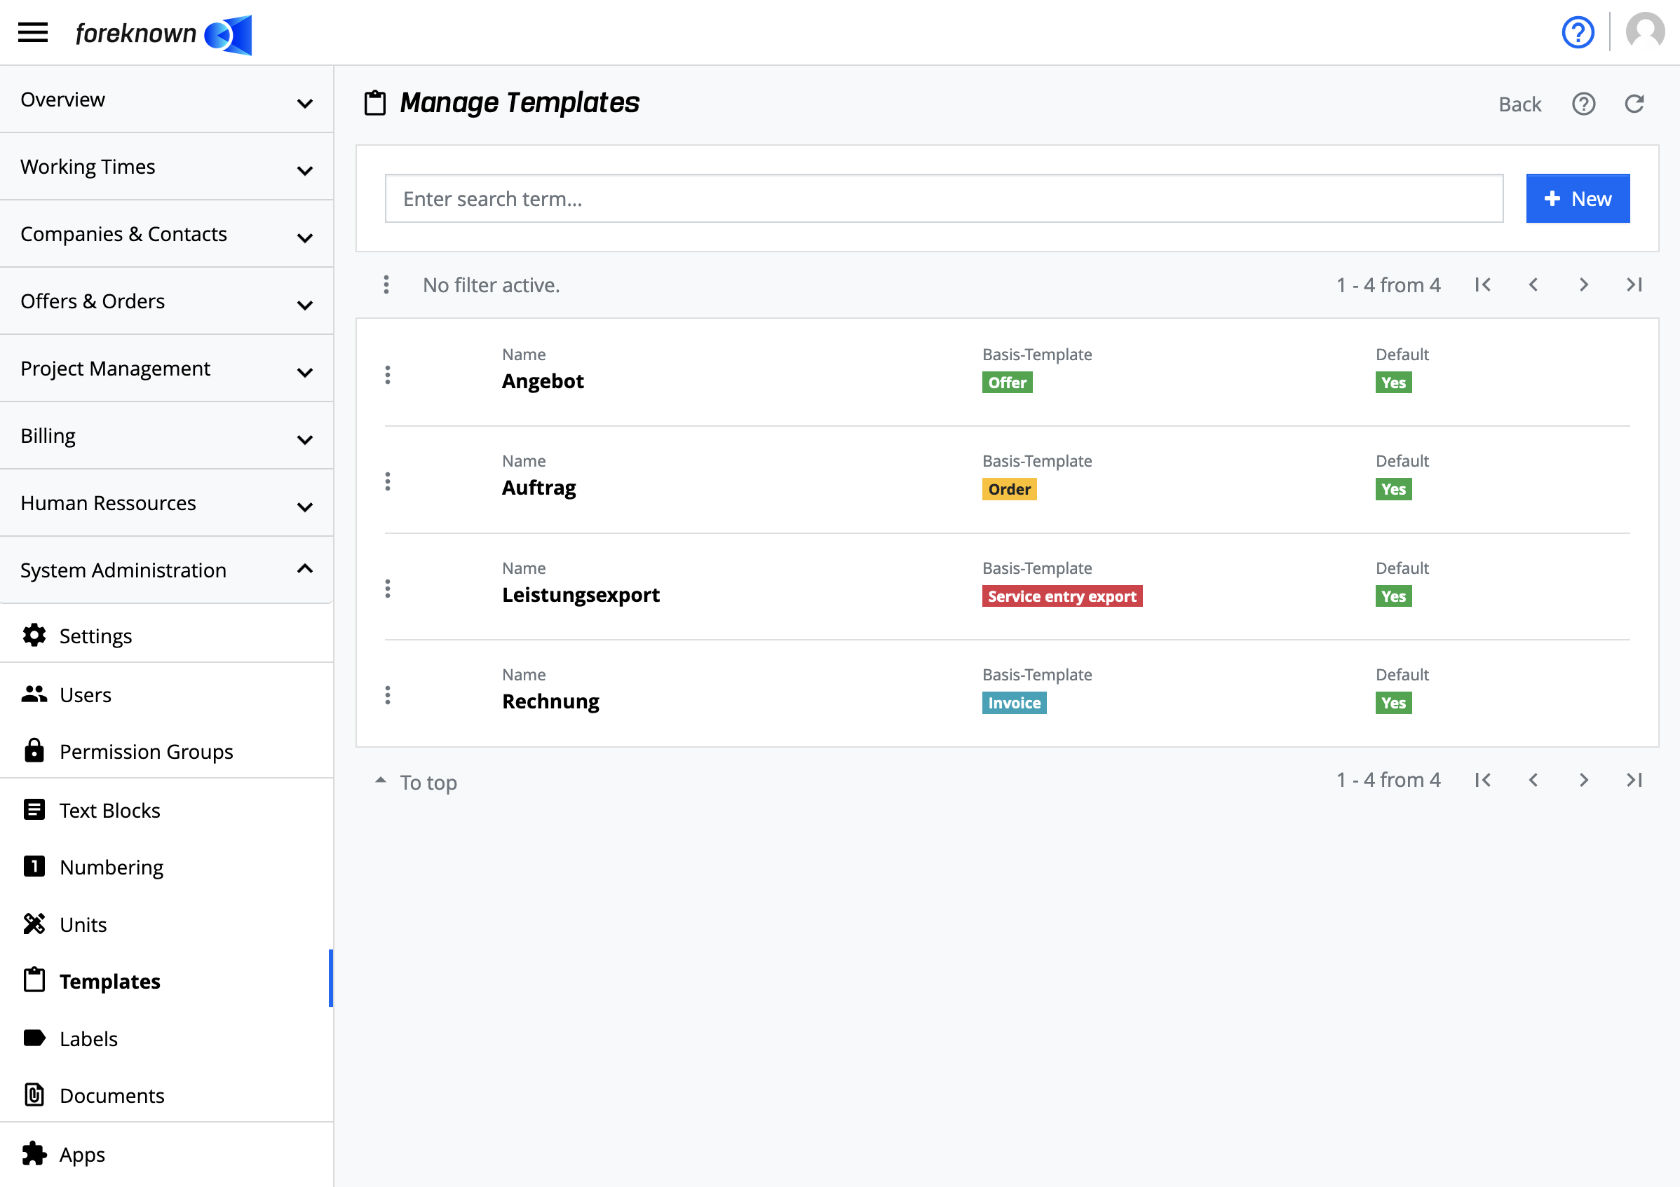
The administration of the templates is opened via the menu item "System Administration / Templates". Only users with the "Account Administrator" role can access this area.
General Functions
Search Template
In the upper area of the "Manage Templates" dialog is the search field and the "+ New" button (see also Create Template). Below this area all already created templates are displayed in form of a scrollable and sortable list.
If you now enter a search term in the input field, the list will only show the templates that contain the entered search term in the name. In this way, individual templates can be found and edited quickly.
Create Template
To create a new template, click on the "+ New" button located at the top right of the search box. This button opens the "Create Template" popup dialog.
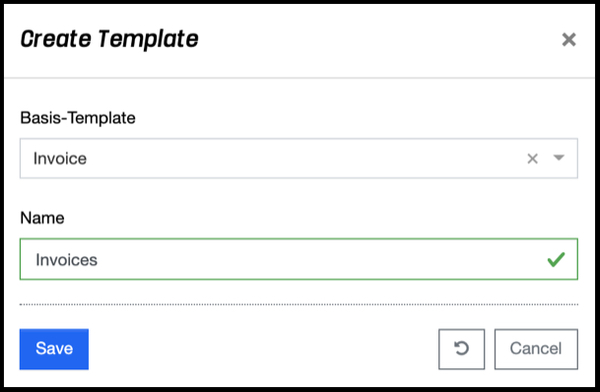
The following properties must be specified for a new template:
- Base Template: A base template must be selected from a drop-down list. This also determines the
purpose of the template. A template can be created for following areas:
- Offer (PDF)
- Order (PDF)
- Invoice (PDF)
- Activity Report (PDF)
- Service Entry Export (Excel)
- E-Mail (E-Mail Body)
- Employee Report (Excel)
- Name: Here the name of the template is entered, which should be as self-explanatory as possible, in order to be able to recognize the desired variant later when selecting a template.
With the action "Save" a new template is created. With the action "Reset" and "Cancel" the entries are discarded and in case of the action "Cancel" the dialog is closed.
Action Menu
In front of each entry in the list of templates is an action menu (button with 3 dots), which offers all actions available for a template.
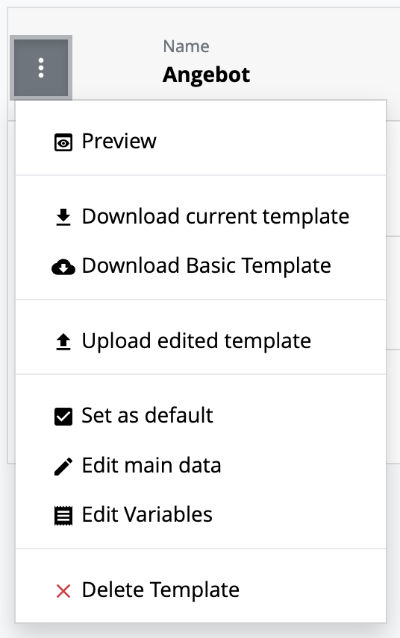
All actions are described in detail below.
Preview
The "Preview" action opens the selected template, fills it with the values currently stored in the variables and some sample data, and creates a PDF document from it. This is then made available for opening or saving locally.
In this way, you can quickly get an impression of whether the current version of the template meets your company's requirements.
Note: This function is not available for a template of the type "Service Entry Export".
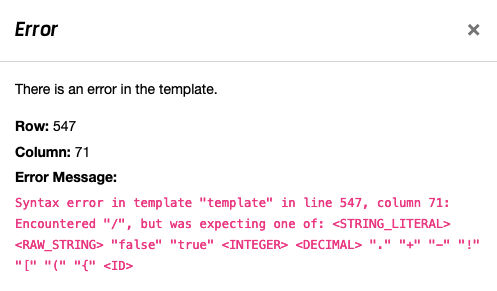
Note: If the template contains an error, e.g. errors in the HTML or in the Freemarker placeholders, then the error is displayed in a pop-up window with the specification of a row and column. If there is an error because, for example, a variable is not filled in some cases, e.g. contact person, and this value was not checked for NULL, no row/column information can be output because the error only occurs in the rendered HTML.
Download current Template
This action downloads the current version of the template as Freemarker file (.fmt) or for service entry exports as MS Excel (.xlsx) file, so that it can be adapted if necessary and uploaded again with the action "Upload edited template".
Download Base Template
This action downloads the basic version of the template as a Freemarker file (.fmt) or, for service entry exports, as an MS Excel (.xlsx) file so that it can be customized if necessary and uploaded again. Basic version means that it is the original version of the template provided by foreknown and not yet customized.
Upload edited Template
This action uploads a customized version of the Freemarker file (.fmt) or, for service entry exports, the MS Excel (.xlsx) file. Thus, it overwrites the current version of the template.
NOTE: This action overwrites the current version of the template and is irrevocably!
Set as default
This action sets the selected template as the default template of the underlying document type. This means that you can specify for offers, orders, invoices, activity reports, and service entry exports which of the respective templates should be preset when creating a new document.
Edit Master Data
This action opens the "Edit Master Data" dialog, which can only be used to change the name of the template. The base template can no longer be changed for an existing template.
A descriptive name should always be chosen so that when a template is assigned to an offer, an order, an invoice, an activity report, and an service entry export, it is immediately apparent which template it is.
Edit Variables
The variables offer on the one hand the option of transferring static values to a template. On the other hand, variables can be used to control the creation of the PDF document.
The "Edit variables" action opens the dialog of the same name, where name/value pairs can be managed.
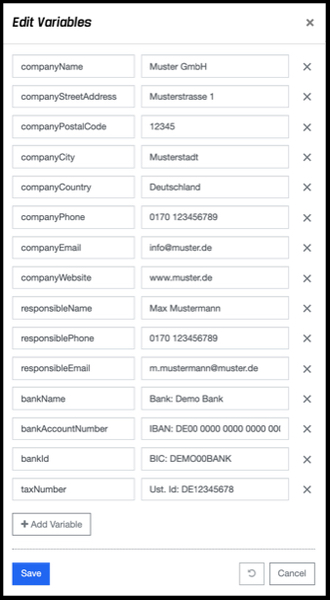
Important: Initially, all variables are filled with demo data and should therefore be adapted to your own company data.
The "Add Variable" action can be used to add additional variables of your own. However, to appear in the template, a new placeholder referencing this variable must be added to the template. The customization of the templates is described below.
The following variables are used as control parameters in the supplied templates:
- showVatPerPosition: Relevant for invoice, offer and order templates. Flag that determines whether the VAT rate should be displayed for each position. Initial: false
- showServiceEntryData: Only relevant for invoice templates. Flag that determines whether the services and additional services should also be output on the invoice as additional pages in landscape format. Initial: false
- showHeaderPerPosition: Only relevant for invoice templates. Flag that determines whether each invoice item has its own column header. Initial: false
- showPaymentPlan: Only relevant for offer and order templates. Flag that determines whether a payment plan, if stored, should also be displayed. Initial: false
- sectionPageBreak: Only relevant for activity report templates. Flag that determines whether a page break is to be inserted for each type of service (partial payments, additional service entries, service entries).
- language: Defines whether the template should be created for the German (de) or English (en) language. The value "de" is the default and does not need to be set. If the value is set to "en" all values provided by foreknown are output in English, e.g., for the standard units.
The "Save" action saves the changes. With the action "Reset" and "Cancel" the entries are discarded, and in case of the action "Cancel" the dialog is closed.
Placeholder of the MS Excel Base Templates
Exactly one variable is currently already created for the "Activity Reports" template, as it is used in the base template:
- companyName: Contains the name of your company. Is used in the footer area of the base template.
However, as already mentioned, any other variables can be added.
Placeholders of the Freemarker Base Templates
The base templates supplied for offers, orders, invoices, activity reports and e-mails already contain a number of variables, which can be pre-assigned centrally with your company's values via the company profile.
To overwrite these centrally maintained values, simply create a variable with the same name in the template. For example, the central contact person for offers or orders can be set individually on the templates.
-
Contact and Address Data of your Company
- companyName: Name of the company; will be displayed in the header and in the sender of the template; Initial: Muster GmbH.
- companyAddressLine1: Address suffix 1st line. This is not used in the base templates.
- companyAddressLine2: Address suffix 2nd line. This is not used in the base templates.
- companyStreetAddress: Street and house number of the company; will be displayed in the header and in the sender of the template; Initial: Musterstrasse 1
- companyPostalCode: Postal code of the company; will be displayed in the header and in the sender of the template; Initial: 12345
- companyCity: City of the company; will be displayed in the header area and in the sender of the template; Initial: Sample City
- companyRegion: Region / federal state of the company. This is not used in the base templates.
- companyCountry: Country of the company; not used in the standard templates
-
Contact Data of your Company
- companyEmail: E-Mail address of the company. This is displayed in the header area of the base templates.
- companyPhone: Phone number of the company.This is displayed in the header area of the base templates.
- companyFax: Fax number of the company. This is displayed in the header area of the base templates.
- companyWebsite: Website of the company. This is displayed in the header area of the base templates.
-
Data of the Standard Contact Person
- responsibleName: General contact person of the company. This variable is displayed in the header area of the basic templates. If available, it is overwritten by the value of a responsible person of the respective document (offer, order, invoice).
- responsibleDepartment: Department of the company's general contact person. This variable is only filled if a contact person has been entered in the respective document (offer, order, invoice) and this person has specified a department in their profile.
- responsiblePosition: Position of the company's general contact person. This variable is only filled if a contact person has been entered for the respective document (offer, order, invoice) and this person has specified a position in their profile.
- responsibleEmail: Email address of the company's general contact person. This variable is used in the header area of the basic templates. If available, it is overwritten by the value of a corresponding contact person of the respective document (offer, order, invoice).
- responsiblePhone: Telephone number of the company's general contact person. This variable is used in the header area of the basic templates. If available, it is overwritten by the value of a corresponding contact person of the respective document (offer, order, invoice).
-
Bank Details
- bankName: Name of the company's bank; displayed in the header of the base template.
- bankId: BIC of the company's account; will be displayed in the header of the base template.
- bankAccountNumber: IBAN of the company's account; will be displayed in the header of the base template.
-
Legal Information
- management: Names of the managing directors of the company, which will be displayed in the header of the template.
- salesTaxNumber: Sales Tax Identification Number of the company, which will be displayed in the header of the template.
- commercialRegister: Commercial register number of the company, which will be displayed in the header of the template.
- jurisdiction: Jurisdiction of the company, which will be displayed in the header of the template.
-
Images
- companyImage1: Base64 string e.g. of a logo image. This is displayed in the header on the right in the base templates.
- companyImage2: Base64 string e.g. of another image. This can be used in individual templates.
- companyImage3: Base64 string e.g. of another image. This can be used in customised templates.
-
Fonts
- companyFontFamily: Name of the font family, which can refer to one of the supported fonts from foreknown or to a Google font.
- companyGoogleFontUrl: URL of the Google font to be used. In this case, the value under companyFontFamily must match the referenced Google Font.
Notes: Via the company profile, all variables (except "Settings") can be centrally pre-assigned with values for all base templates. If a base template shoud overwrite a specific value, a variable with the same name must be created for the template.
The responsible person data is overwritten by the profile data of the "responsible person" of an offer, order or invoice, if this is maintained. Here too, variables with the same name on the template can overwrite the values.
Delete Template
An existing template can be deleted using this action. A confirmation dialog opens where the template is finally deleted by clicking on the delete button.
Customise templates
The aim of the templates in foreknown is to make it possible to create a customised design for all documents that can be created with foreknown. The following describes how you can customise the different template types. A distinction is made between Freemarker and Excel templates, as these are different technologies that are used for those templates.
Customise Freemarker Templates
A Freemarker template is used to generate offers, orders, invoices and activity reports as a PDF document. A base template is available for each of these types, which is used as the basis for creating a customised template.template.
The various customisation options are described in more detail below.
Customized Templates via Company Profile
The easiest way to customise a template is via the company profile, which can be accessed via the navigation under "System Administration / Company Profile". In addition to some company data for the letterhead a logo can also be uploaded and a font customised.
In this way, the base templates supplied can already be customised without "programming".
Documentation: Take a look at the detailed description of the company profile to be able to create customised offer, orders, invoices and activity reports within a few minutes.
If you want to make structural changes to the templates, there is no way around the Freemarker templates.
Customize Design
The first step for creating a custom template is to download a base template of the desired template type e.g. of the offer. This Freemarker .fmt file can then be edited in an editor. It is helpful to use an editor that supports the .fmt (Freemarker) format and thus allows text highlighting.
Note: The freemarker file uploaded to a foreknown template must have the extension ".fmt" and not the ".ftl" extension, which is also common.
The base template is an HTML file with embedded CSS, which also has freemarker instructions. If only certain changes are needed to the base template, in the simplest case only the CSS and the logo need to be adjusted.
CSS Adjustments
Some changes regarding font sizes, spacing and colors can also be made only through CSS adjustments, if no fundamental structural changes are necessary.
All CSS instructions are located in the head section of the .fmt (html) file and can be adjusted there.
Customize HTML Structure
To make structural changes to a base template, there are a few aspects to consider:
- The current templates are based on the sizes of a DIN A4 page as a portrait. Many width and height specifications are given in millimeters (mm) to ensure that the dimensions correspond to the DIN A4 format. Therefore, when table structures used, make sure that the sum of column widths are within the range of a DIN A4 page. Furthermore, some CSS instructions are used, which are used dedicated to a print output, in order to e.g. output a footer with page number.
- With the offer and order templates it is to be noted that there are different position types and settings in foreknown. Each type, whether "Fixed price", "Time & Material" or "Other Position" has other data that are displayed differently. Furthermore, there are variants that result from the properties of a position, e.g. if no quantity specification is required or if a price range has been activated. For this reason each variation has its own HTML area in the base template. These should all be considered individually when making adjustments to the presentation of positions.
- Besides the positions there are also text positions. In the base template you can see how to differentiate between a offer, order, invoice position and a text position and how to identify and print lines above and below a position.
- There are some variables that control the display of certain information e.g. the variable showHeaderPerPosition makes sure that the column headers per position are repeated in an invoice if the value is set to "true".
- The data of an offer, order or invoice and the related customer data are also integrated using the notation
${offer | order | invoice.
}. The base templates of each document type provides all necessary variables. Ensure that all data, which could have null or empty values, are surrounded by an if-statement, which checks this e.g., with the ...?has_content notation.
Generally spoken, the base templates can be fully customized in terms of HTML and CSS which gives you full freedom designing your individual templates.
Recommendation: If major changes are to be made to a base template, developers should be available with HTML and CSS knowledge and a good understanding of a template engine like Freemarker. To test the structure (without Freemarker statements) during development, the following service can be used: https://sandbox.openhtmltopdf.com/
To test templates with Freemarker expressions, a new version of a .fmt file must be uploaded to foreknown via the template management with the action "Upload edited template" and can be tested by printing e.g. a draft offer.
If you want support in designing your individual templates, please contact us via support@foreknown.io.
Insert data
Each template type (offer, order, invoice) is provided with all the necessary data in the form of a hierarchical structure. This data is usually accessed using the following Freemarker commands (examples):
- Reading a property: e.g. ${offer.termsOfPayment.paymentDiscountDeadline}
- Evaluating a property for content: e.g. <#if offer.termsOfPayment.paymentDiscountDeadline?has_content>...</#if>
- Iterate through a list: e.g. <#list offer.introductoryTextItems as introductoryTextItem>...</#list>
Which properties are provided with which data type for each template type is described below.
Access Offer Data
The following data is provided for a template of the type "Offer":
| Name | Formate | Description |
|---|---|---|
| offer.creator | Object | |
| -- offer.creator.id | long | Unique id of the creator |
| -- offer.creator.name | String | Creator name |
| offer.creationDate | String | Date of technical creation |
| offer.offerDate | String | Maintained offer date |
| offer.offerNumber | String | Offer number |
| offer.periodOfValidity | String | Binding period (date) |
| offer.status | String | Offer status |
| offer.customerId | String | Unique ID of the customer |
| offer.vatNumber | String | VAT number given by the customer |
| offer.supplierNumber | String | Supplier number given by the customer |
| offer.customer | Object | |
| -- offer.customer.salutationType | String | Type of salutation (DEFAULT, MR, MS) |
| -- offer.customer.salutation | String | Salutation without name |
| -- offer.customer.salutationWithName | String | Salutation by name |
| -- offer.customer.streetAddress | String | Street and house number of the customer |
| -- offer.customer.postalCode | String | Customer address zip code |
| -- offer.customer.city | String | City of customer address |
| -- offer.customer.postalCodeAndCity | String | Zip code and city of the customer address |
| -- offer.customer.region | String | Customer address region |
| -- offer.customer.country | String | Country of customer address |
| -- offer.customer.addressLine1 | String | Address addition 1 of the customer address |
| -- offer.customer.addressLine2 | String | Address addition 2 of the customer address |
| -- offer.customer.phone | String | Customer phone number |
| -- offer.customer.email | String | Customer email address |
| -- offer.customer.website | String | Customer's website |
| offer.customerContact | Object | |
| -- offer.customerContact.salutationType | String | Type of salutation (DEFAULT, MR, MS) |
| -- offer.customerContact.salutation | String | Salutation without name |
| -- offer.customerContact.salutationWithName | String | Salutation by name |
| -- offer.customerContact.streetAddress | String | Street and house number of the customer contact |
| -- offer.customerContact.postalCode | String | Customer contact address postal code |
| -- offer.customerContact.city | String | City |
| -- offer.customerContact.postalCodeAndCity | String | Zip code and city of the customer contact address |
| -- offer.customerContact.region | String | Customer contact address region |
| -- offer.customerContact.country | String | Country |
| -- offer.customerContact.addressLine1 | String | Address supplement 1 of the customer contact address |
| -- offer.customerContact.addressLine2 | String | Address addition 2 of the customer contact address |
| -- offer.customerContact.phone | String | Customer contact phone number |
| -- offer.customerContact.email | String | Email address of the customer contact |
| -- offer.customerContact.website | String | Customer contact website |
| offer.billingAddressText | String | Full offer address (DEPRECATED!) |
| offer.serviceRecipientText | String | Full address of service recipient |
| offer.serviceRecipient | Object | Address of service recipient |
| -- offer.serviceRecipient.salutationType | String | Type of salutation (DEFAULT, MR, MS) |
| -- offer.serviceRecipient.salutation | String | Salutation without name |
| -- offer.serviceRecipient.salutationWithName | String | Salutation by name |
| -- offer.serviceRecipient.streetAddress | String | Street and house number |
| -- offer.serviceRecipient.postalCode | String | Postal code |
| -- offer.serviceRecipient.city | String | City |
| -- offer.serviceRecipient.postalCodeAndCity | String | Zip code and city |
| -- offer.serviceRecipient.region | String | Region |
| -- offer.serviceRecipient.country | String | Country |
| -- offer.serviceRecipient.addressLine1 | String | Address supplement 1 address |
| -- offer.serviceRecipient.addressLine2 | String | Address addition 2 address |
| offer.documentRecipientDiffers | boolean | Flag, to identify a different document recipient address. |
| offer.documentRecipientText | String | Full address of document recipient |
| offer.documentRecipient | Object | Address of document recipient |
| -- offer.documentRecipientText.salutationType | String | Type of salutation (DEFAULT, MR, MS) |
| -- offer.documentRecipientText.salutation | String | Salutation without name |
| -- offer.documentRecipientText.salutationWithName | String | Salutation by name |
| -- offer.documentRecipientText.streetAddress | String | Street and house number |
| -- offer.documentRecipientText.postalCode | String | Postal code |
| -- offer.documentRecipientText.city | String | City |
| -- offer.documentRecipientText.postalCodeAndCity | String | Zip code and city |
| -- offer.documentRecipientText.region | String | Region |
| -- offer.documentRecipientText.country | String | Country |
| -- offer.documentRecipientText.addressLine1 | String | Address supplement 1 |
| -- offer.documentRecipientText.addressLine2 | String | Address addition 2 |
| offer.deliveryAddressText | String | Full address of the delivery |
| offer.deliveryAddress | Object | Address of the delivery |
| -- offer.deliveryAddress.salutationType | String | Type of salutation (DEFAULT, MR, MS) |
| -- offer.deliveryAddress.salutation | String | Salutation without name |
| -- offer.deliveryAddress.salutationWithName | String | Salutation by name |
| -- offer.deliveryAddress.streetAddress | String | Street and house number |
| -- offer.deliveryAddress.postalCode | String | Postal code |
| -- offer.deliveryAddress.city | String | City |
| -- offer.deliveryAddress.postalCodeAndCity | String | Zip code and city |
| -- offer.deliveryAddress.region | String | Region |
| -- offer.deliveryAddress.country | String | Country |
| -- offer.deliveryAddress.addressLine1 | String | Address supplement 1 |
| -- offer.deliveryAddress.addressLine2 | String | Address addition 2 |
| offer.offerReference | String | Offer reference number |
| offer.name | String | Offer name |
| offer.currency | String | Offer Currency |
| offer.currencySymbol | String | Currency symbol of the currency of the offer |
| offer.reverseCharge | boolean | Flag whether Reverse Charge procedure is used for this offer. |
| offer.introductoryTextItems | List | List of introductory texts |
| -- itItem.textItem | Object | |
| ---- itItem.textItem.sortIndex | int | Index for sorting |
| ---- itItem.textItem.lineTop | boolean | Flag whether a line should be displayed above |
| ---- itItem.textItem.lineBottom | boolean | Flag whether a line should be displayed below |
| ---- itItem.textItem.text | String | HTML formatted text |
| offer.items | List | List of offer and text positions |
| -- item.position | int | Position number |
| -- item.sortIndex | int | Index for sorting |
| -- item.lineItem | Object | Contains the data of an offer item |
| ---- item.lineItem.description | String | Description text |
| ---- item.lineItem.type.name | String | Technical name of the item category (TIME_AND_MATERIALS, FIXED_PRICE, STANDARD) |
| ---- item.lineItem.type.displayName | String | Position type display name |
| ---- item.lineItem.itemReference | String | ... |
| ---- item.lineItem.taxRate | String | Sales tax rate in percent |
| ---- item.lineItem.taxRateValue | String | Sales tax amount with currency symbol |
| ---- item.lineItem.renderAmount | boolean | Flag whether quantity should be displayed |
| ---- item.lineItem.amountNotSpecified | boolean | Flag whether "No quantity specification" has been set |
| ---- item.lineItem.amountRange | boolean | Flag whether a price range has been selected |
| ---- item.lineItem.amountMin | String | Quantity (min) |
| ---- item.lineItem.amount | String | Quantity |
| ---- item.lineItem.unit | String | Unit |
| ---- item.lineItem.pricePerUnit | String | Price per unit with currency symbol |
| ---- item.lineItem.priceTotalMin | String | Total price net (min) |
| ---- item.lineItem.priceTotal | String | Total price net |
| ---- item.lineItem.discounted | boolean | Flag whether a discount was specified |
| ---- item.lineItem.discountType | String | Type of discount (percent, amount) |
| ---- item.lineItem.discountValue | String | Percentage or absolute value of the discount |
| ---- item.lineItem.discountTotalMin | String | Calculated discount based on percentage value (Min) |
| ---- item.lineItem.discountTotal | String | Calculated discount based on percentage |
| ---- item.lineItem.itemTotalMin | String | ... |
| ---- item.lineItem.itemTotal | String | ... |
| ---- item.lineItem.priceTotalGrossMin | String | Total price gross (min) |
| ---- item.lineItem.priceTotalGross | String | Total price gross |
| ---- item.lineItem.billable | boolean | Flag whether the position is billable |
| ---- item.lineItem.lineTop | boolean | Flag whether a line should be displayed above |
| ---- item.lineItem.lineBottom | boolean | Flag whether a line should be displayed below |
| ---- item.lineItem.items | List | List of all benefit type items |
| -- item.textItem | Object | Contains the text position data |
| ---- item.textItem.sortIndex | int | Index for sorting |
| ---- item.textItem.lineTop | boolean | Flag whether a line should be displayed above |
| ---- item.textItem.lineBottom | boolean | Flag whether a line should be displayed below |
| ---- item.textItem.text | String | HTML formatted text |
| offer.closingTextItems | List | List of final texts |
| -- ctItem.textItem | Object | |
| ---- ctItem.textItem.sortIndex | int | Index for sorting |
| ---- ctItem.textItem.lineTop | boolean | Flag whether a line should be displayed above |
| ---- ctItem.textItem.lineBottom | boolean | Flag whether a line should be displayed below |
| ---- ctItem.textItem.text | String | HTML formatted text |
| offer.termsOfPayment | Object | Contains the payment terms |
| -- offer.termsOfPayment.paymentDeadline | int | Payment term in days |
| -- offer.termsOfPayment.paymentDiscountDeadline | int | Discount period in days |
| -- offer.termsOfPayment.paymentDiscountPercent | String | Discount in percent |
| -- offer.termsOfPayment.paymentDiscountAmount | String | Calculated discount amount |
| -- offer.termsOfPayment.totalGrossAfterPaymentDiscount | String | Offer amount after discount |
| -- offer.termsOfPayment.paymentDiscountExists | boolean | Flag whether a discount amount > 0 exists |
| offer.showTotals | boolean | Flag whether offer totals can be displayed |
| offer.totals | Object | Offer totals |
| -- offer.totals.range | boolean | Flag whether a price range has been activated |
| -- offer.totals.priceTotalNetMinUndiscounted | String | Net amount excluding total discounts (min) |
| -- offer.totals.priceTotalNetUndiscounted | String | Net amount excluding total discounts |
| -- offer.totals.positionDiscounts | boolean | Flag whether position discounts exist |
| -- offer.totals.totalDiscounts | boolean | Flag whether total discounts exist |
| -- offer.totals.discounts | List | List of all total discounts |
| ---- discount.type | String | Discount Type (AMOUNT, PERCENTAGE) |
| ---- discount.value | String | Percentage or absolute discount value |
| ---- discount.amountMin | String | Negative monetary value of the discount (Min) |
| ---- discount.amount | String | Negative monetary value of the discount |
| -- offer.totals.priceTotalNetMin | String | Net amount including total discounts (min) |
| -- offer.totals.priceTotalNet | String | Net amount including total discounts |
| -- offer.totals.taxTotals | List | List of sales tax amounts |
| ---- offer.totals.taxTotals.taxRate | String | Sales tax rate in percent with designation |
| ---- offer.totals.taxTotals.value | String | Sales tax rate in percent |
| ---- offer.totals.taxTotals.totalSumMin | String | Net Offer Amount (Min) |
| ---- offer.totals.taxTotals.totalSum | String | Net amount of the offer |
| ---- offer.totals.taxTotals.taxSumMin | String | Total of all sales tax amounts (min) |
| ---- offer.totals.taxTotals.taxSum | String | Total of all sales tax amounts |
| offer.paymentPlan | Object | |
| -- offer.paymentPlan.currency | String | Payment plan currency |
| -- offer.paymentPlan.items | List | List of all payment plan entries |
| ---- ppItem.description | String | Description text |
| ---- ppItem.dueDate | String | Due Date |
| ---- ppItem.status | String | Status (NOT_INVOICED, INVOICE_IN_PROGRESS, INVOICED) |
| ---- ppItem.taxRate | String | Sales tax rate in percent |
| ---- ppItem.amount | String | Quantity |
| ---- ppItem.unit | String | Unit |
| ---- ppItem.pricePerUnit | String | Price per unit |
| ---- ppItem.paymentTotal | String | Amount of the advance payment |
| ---- ppItem.invoicedTotal | String | Billed amount |
Access Order Data
The following data is provided to a template of type "Order":
| Name | Format | Description |
|---|---|---|
| order.creator | Object | |
| -- order.creator.id | long | Unique id of the creator |
| -- order.creator.name | String | Creator name |
| order.creationDate | String | Date of technical creation |
| order.orderDate | String | Maintained order date |
| order.orderNumber | String | Order number |
| order.internal | boolean | Flag whether this is an internal order. |
| order.status | String | Status of the order |
| order.customerId | String | Unique ID of the customer |
| order.vatNumber | String | VAT number given by the customer |
| order.supplierNumber | String | Supplier number given by the customer |
| order.customer | Object | |
| -- order.customer.salutationType | String | Type of salutation (DEFAULT, MR, MS) |
| -- order.customer.salutation | String | Salutation without name |
| -- order.customer.salutationWithName | String | Salutation by name |
| -- order.customer.streetAddress | String | Street and house number of the customer |
| -- order.customer.postalCode | String | Customer address zip code |
| -- order.customer.city | String | City of customer address |
| -- order.customer.postalCodeAndCity | String | Zip code and city of the customer address |
| -- order.customer.region | String | Customer address region |
| -- order.customer.country | String | Country of customer address |
| -- order.customer.addressLine1 | String | Address supplement 1 of the customer address |
| -- order.customer.addressLine2 | String | Address supplement 2 of the customer address |
| -- order.customer.phone | String | Customer phone number |
| -- order.customer.email | String | Customer email address |
| -- order.customer.website | String | Customer's website |
| order.customerContact | Object | |
| -- order.customerContact.salutationType | String | Type of salutation (DEFAULT, MR, MS) |
| -- order.customerContact.salutation | String | Salutation without name |
| -- order.customerContact.salutationWithName | String | Salutation by name |
| -- order.customerContact.streetAddress | String | Street and house number of the customer contact |
| -- order.customerContact.postalCode | String | Customer contact address postal code |
| -- order.customerContact.city | String | City of customer contact address |
| -- order.customerContact.postalCodeAndCity | String | Zip code and city of the customer contact address |
| -- order.customerContact.region | String | Customer contact address region |
| -- order.customerContact.country | String | Country of customer contact address |
| -- order.customerContact.addressLine1 | String | Address supplement 1 of the customer contact address |
| -- order.customerContact.addressLine2 | String | Address supplement 2 of the customer contact address |
| -- order.customerContact.phone | String | Customer contact phone number |
| -- order.customerContact.email | String | Email address of the customer contact |
| -- order.customerContact.website | String | Customer contact website |
| order.billingAddressText | String | Full offer address (DEPRECATED!) |
| order.serviceRecipientText | String | Full address of service recipient |
| order.serviceRecipient | Object | Address of service recipient |
| -- order.serviceRecipient.salutationType | String | Type of salutation (DEFAULT, MR, MS) |
| -- order.serviceRecipient.salutation | String | Salutation without name |
| -- order.serviceRecipient.salutationWithName | String | Salutation by name |
| -- order.serviceRecipient.streetAddress | String | Street and house number |
| -- order.serviceRecipient.postalCode | String | Postal code |
| -- order.serviceRecipient.city | String | City |
| -- order.serviceRecipient.postalCodeAndCity | String | Zip code and city |
| -- order.serviceRecipient.region | String | Region |
| -- order.serviceRecipient.country | String | Country |
| -- order.serviceRecipient.addressLine1 | String | Address supplement 1 address |
| -- order.serviceRecipient.addressLine2 | String | Address supplement 2 address |
| order.documentRecipientDiffers | boolean | Flag, to identify a different document recipient address. |
| order.documentRecipientText | String | Full address of document recipient |
| order.documentRecipient | Object | Address of document recipient |
| -- order.documentRecipientText.salutationType | String | Type of salutation (DEFAULT, MR, MS) |
| -- order.documentRecipientText.salutation | String | Salutation without name |
| -- order.documentRecipientText.salutationWithName | String | Salutation by name |
| -- order.documentRecipientText.streetAddress | String | Street and house number |
| -- order.documentRecipientText.postalCode | String | Postal code |
| -- order.documentRecipientText.city | String | City |
| -- order.documentRecipientText.postalCodeAndCity | String | Zip code and city |
| -- order.documentRecipientText.region | String | Region |
| -- order.documentRecipientText.country | String | Country |
| -- order.documentRecipientText.addressLine1 | String | Address supplement 1 |
| -- order.documentRecipientText.addressLine2 | String | Address supplement 2 |
| order.deliveryAddressText | String | Full address of the delivery |
| order.deliveryAddress | Object | Address of the delivery |
| -- order.deliveryAddress.salutationType | String | Type of salutation (DEFAULT, MR, MS) |
| -- order.deliveryAddress.salutation | String | Salutation without name |
| -- order.deliveryAddress.salutationWithName | String | Salutation by name |
| -- order.deliveryAddress.streetAddress | String | Street and house number |
| -- order.deliveryAddress.postalCode | String | Postal code |
| -- order.deliveryAddress.city | String | City |
| -- order.deliveryAddress.postalCodeAndCity | String | Zip code and city |
| -- order.deliveryAddress.region | String | Region |
| -- order.deliveryAddress.country | String | Country |
| -- order.deliveryAddress.addressLine1 | String | Address supplement 1 |
| -- order.deliveryAddress.addressLine2 | String | Address supplement 2 |
| order.orderReference | String | Order reference number |
| order.relatedOfferNumber | String | Number of the related offer |
| order.relatedOfferTitle | String | Deprecated - Name of the related offer |
| order.relatedOfferName | String | Name of the related offer |
| order.relatedOfferDate | String | Date of the related offer |
| order.relatedOfferReference | String | Reference number of the related offer |
| order.name | String | Name of the order |
| order.currency | String | Currency of the order |
| order.currencySymbol | String | Currency symbol of the order currency |
| order.reverseCharge | boolean | Flag whether Reverse Charge procedure is used for this order. |
| order.introductoryTextItems | List | List of introductory texts |
| -- itItem.textItem | Object | |
| ---- itItem.textItem.sortIndex | int | Index for sorting |
| ---- itItem.textItem.lineTop | boolean | Flag whether a line should be displayed above |
| ---- itItem.textItem.lineBottom | boolean | Flag whether a line should be displayed below |
| ---- itItem.textItem.text | String | HTML formatted text |
| order.items | List | List of order and text positions |
| -- item.position | int | Position number |
| -- item.sortIndex | int | Index for sorting |
| -- item.lineItem | Object | Contains the data of an order item |
| ---- item.lineItem.description | String | Description text |
| ---- item.lineItem.type.name | String | Technical name of the item category (TIME_AND_MATERIALS, FIXED_PRICE, STANDARD) |
| ---- item.lineItem.type.displayName | String | Position type display name |
| ---- item.lineItem.itemReference | String | ... |
| ---- item.lineItem.taxRate | String | Sales tax rate in percent |
| ---- item.lineItem.taxRateValue | String | Sales tax amount with currency symbol |
| ---- item.lineItem.renderAmount | boolean | Flag whether quantity should be displayed |
| ---- item.lineItem.amountNotSpecified | boolean | Flag whether "No quantity specification" has been set |
| ---- item.lineItem.amountRange | boolean | Flag whether a price range has been selected |
| ---- item.lineItem.amountMin | String | Quantity (min) |
| ---- item.lineItem.amount | String | Quantity |
| ---- item.lineItem.unit | String | Unit |
| ---- item.lineItem.pricePerUnit | String | Price per unit with currency symbol |
| ---- item.lineItem.priceTotalMin | String | Total price net (min) |
| ---- item.lineItem.priceTotal | String | Total price net |
| ---- item.lineItem.discounted | boolean | Flag whether a discount was specified |
| ---- item.lineItem.discountType | String | Type of discount (percent, amount) |
| ---- item.lineItem.discountValue | String | Percentage or absolute value of the discount |
| ---- item.lineItem.discountTotalMin | String | Calculated discount based on percentage value (Min) |
| ---- item.lineItem.discountTotal | String | Calculated discount based on percentage |
| ---- item.lineItem.itemTotalMin | String | ... |
| ---- item.lineItem.itemTotal | String | ... |
| ---- item.lineItem.priceTotalGrossMin | String | Total price gross (min) |
| ---- item.lineItem.priceTotalGross | String | Total price gross |
| ---- item.lineItem.billable | boolean | Flag whether the position is billable |
| ---- item.lineItem.lineTop | boolean | Flag whether a line should be displayed above |
| ---- item.lineItem.lineBottom | boolean | Flag whether a line should be displayed below |
| ---- item.lineItem.items | List | List of all benefit type items |
| -- item.textItem | Object | Contains the text position data |
| ---- item.textItem.sortIndex | int | Index for sorting |
| ---- item.textItem.lineTop | boolean | Flag whether a line should be displayed above |
| ---- item.textItem.lineBottom | boolean | Flag whether a line should be displayed below |
| ---- item.textItem.text | String | HTML formatted text |
| order.closingTextItems | List | List of final texts |
| -- ctItem.textItem | Object | |
| ---- ctItem.textItem.sortIndex | int | Index for sorting |
| ---- ctItem.textItem.lineTop | boolean | Flag whether a line should be displayed above |
| ---- ctItem.textItem.lineBottom | boolean | Flag whether a line should be displayed below |
| ---- ctItem.textItem.text | String | HTML formatted text |
| order.termsOfPayment | Object | Contains the payment terms |
| -- order.termsOfPayment.paymentDeadline | int | Payment term in days |
| -- order.termsOfPayment.paymentDiscountDeadline | int | Discount period in days |
| -- order.termsOfPayment.paymentDiscountPercent | String | Discount in percent |
| -- order.termsOfPayment.paymentDiscountAmount | String | Calculated discount amount |
| -- order.termsOfPayment.totalGrossAfterPaymentDiscount | String | Order amount after discount |
| -- order.termsOfPayment.paymentDiscountExists | boolean | Flag whether a discount amount > 0 exists |
| order.showTotals | boolean | Flag whether order totals can be displayed |
| order.totals | Object | Order totals |
| -- order.totals.range | boolean | Flag whether a price range has been activated |
| -- order.totals.priceTotalNetMinUndiscounted | String | Net amount excluding total discounts (min) |
| -- order.totals.priceTotalNetUndiscounted | String | Net amount excluding total discounts |
| -- order.totals.positionDiscounts | boolean | Flag whether position discounts exist |
| -- order.totals.totalDiscounts | boolean | Flag whether total discounts exist |
| -- order.totals.discounts | List | List of all total discounts |
| ---- discount.type | String | Discount Type (AMOUNT, PERCENTAGE) |
| ---- discount.value | String | Percentage or absolute discount value |
| ---- discount.amountMin | String | Negative monetary value of the discount (Min) |
| ---- discount.amount | String | Negative monetary value of the discount |
| -- order.totals.priceTotalNetMin | String | Net amount including total discounts (min) |
| -- order.totals.priceTotalNet | String | Net amount including total discounts |
| -- order.totals.taxTotals | List | List of sales tax amounts |
| ---- order.totals.taxTotals.taxRate | String | Sales tax rate in percent with designation |
| ---- order.totals.taxTotals.value | String | Sales tax rate in percent |
| ---- order.totals.taxTotals.totalSumMin | String | Net amount of the order (min) |
| ---- order.totals.taxTotals.totalSum | String | Net amount of the order |
| ---- order.totals.taxTotals.taxSumMin | String | Total of all sales tax amounts (min) |
| ---- order.totals.taxTotals.taxSum | String | Total of all sales tax amounts |
| order.paymentPlan | Object | |
| -- order.paymentPlan.currency | String | Payment plan currency |
| -- order.paymentPlan.items | List | List of all payment plan entries |
| ---- ppItem.description | String | Description text |
| ---- ppItem.dueDate | String | Due Date |
| ---- ppItem.status | String | Status (NOT_INVOICED, INVOICE_IN_PROGRESS, INVOICED) |
| ---- ppItem.taxRate | String | Sales tax rate in percent |
| ---- ppItem.amount | String | Quantity |
| ---- ppItem.unit | String | Unit |
| ---- ppItem.pricePerUnit | String | Price per unit |
| ---- ppItem.paymentTotal | String | Amount of the payment plan entry |
| ---- ppItem.invoicedTotal | String | Billed amount |
Access Invoice Data
The following data is provided for an "Invoice" type template:
| Name | Format | Description |
|---|---|---|
| invoice.creator | Object | |
| -- invoice.creator.id | long | Unique Creator Id |
| -- invoice.creator.name | String | Creator Name |
| invoice.creationDate | String | Date of creation |
| invoice.invoiceDate | String | Date of the Invoice |
| invoice.invoiceNumber | String | Invoice Number |
| invoice.servicePeriodStartDate | String | Start date of the service period |
| invoice.servicePeriodEndDate | String | End date of the service period |
| invoice.servicePeriodMonth | String | Month of the service period |
| invoice.servicePeriodYear | String | Year of the service period |
| invoice.status | String | Invoice status |
| invoice.customerId | String | Unique Customer Id |
| invoice.vatNumber | String | VAT number given by the customer |
| invoice.supplierNumber | String | Supplier number given by the customer |
| invoice.directDebitEnabled | boolean | Flag to identify the payment method "Direct Debit" |
| invoice.directDebitData.creditorReferenceNumber | String | Creditor reference number for direct debit |
| invoice.directDebitData.mandateReferenceNumber | String | Mandate reference for direct debit |
| invoice.directDebitData.bankName | String | Name of the bank for direct debit |
| invoice.directDebitData.bankId | String | ID of the bank (BIC) for direct debit |
| invoice.directDebitData.bankAccountId | String | Bank account id (IBAN) for direct debit |
| invoice.customer | Object | |
| -- invoice.customer.salutationType | String | Typ of Salutation (DEFAULT, MR, MS) |
| -- invoice.customer.salutation | String | Salutation without the name |
| -- invoice.customer.salutationWithName | String | Salutation with name |
| -- invoice.customer.streetAddress | String | Street and house number |
| -- invoice.customer.postalCode | String | Zip Code |
| -- invoice.customer.city | String | City |
| -- invoice.customer.postalCodeAndCity | String | Zip Code and City |
| -- invoice.customer.region | String | Region |
| -- invoice.customer.country | String | Country |
| -- invoice.customer.addressLine1 | String | Address supplement 1 |
| -- invoice.customer.addressLine2 | String | Address supplement 2 |
| -- invoice.customer.phone | String | Phone Number |
| -- invoice.customer.email | String | E-Mail Address |
| -- invoice.customer.website | String | Website |
| invoice.customerContact | Object | |
| -- invoice.customerContact.salutationType | String | Typ of Salutation (DEFAULT, MR, MS) |
| -- invoice.customerContact.salutation | String | Salutation without a name |
| -- invoice.customerContact.salutationWithName | String | Salutation with name |
| -- invoice.customerContact.streetAddress | String | Street and House Number |
| -- invoice.customerContact.postalCode | String | Zip Code |
| -- invoice.customerContact.city | String | City |
| -- invoice.customerContact.postalCodeAndCity | String | Zip Cpode and City |
| -- invoice.customerContact.region | String | Region |
| -- invoice.customerContact.country | String | Country |
| -- invoice.customerContact.addressLine1 | String | Address supplement 1 |
| -- invoice.customerContact.addressLine2 | String | Address supplement 2 |
| -- invoice.customerContact.phone | String | Phone Number |
| -- invoice.customerContact.email | String | E-Mail Address |
| -- invoice.customerContact.website | String | Website |
| invoice.billingAddressText | String | Full offer address (DEPRECATED!) |
| invoice.serviceRecipientText | String | Full address of service recipient |
| invoice.serviceRecipient | Object | Address of service recipient |
| -- invoice.serviceRecipient.salutationType | String | Type of salutation (DEFAULT, MR, MS) |
| -- invoice.serviceRecipient.salutation | String | Salutation without name |
| -- invoice.serviceRecipient.salutationWithName | String | Salutation by name |
| -- invoice.serviceRecipient.streetAddress | String | Street and house number |
| -- invoice.serviceRecipient.postalCode | String | Postal code |
| -- invoice.serviceRecipient.city | String | City |
| -- invoice.serviceRecipient.postalCodeAndCity | String | Zip code and city |
| -- invoice.serviceRecipient.region | String | Region |
| -- invoice.serviceRecipient.country | String | Country |
| -- invoice.serviceRecipient.addressLine1 | String | Address supplement 1 address |
| -- invoice.serviceRecipient.addressLine2 | String | Address supplement 2 address |
| invoice.documentRecipientDiffers | boolean | Flag, to identify a different document recipient address. |
| invoice.documentRecipientText | String | Full address of document recipient |
| invoice.documentRecipient | Object | Address of document recipient |
| -- invoice.documentRecipientText.salutationType | String | Type of salutation (DEFAULT, MR, MS) |
| -- invoice.documentRecipientText.salutation | String | Salutation without name |
| -- invoice.documentRecipientText.salutationWithName | String | Salutation by name |
| -- invoice.documentRecipientText.streetAddress | String | Street and house number |
| -- invoice.documentRecipientText.postalCode | String | Postal code |
| -- invoice.documentRecipientText.city | String | City |
| -- invoice.documentRecipientText.postalCodeAndCity | String | Zip code and city |
| -- invoice.documentRecipientText.region | String | Region |
| -- invoice.documentRecipientText.country | String | Country |
| -- invoice.documentRecipientText.addressLine1 | String | Address supplement 1 |
| -- invoice.documentRecipientText.addressLine2 | String | Address supplement 2 |
| invoice.deliveryAddressText | String | Full address of the delivery |
| invoice.deliveryAddress | Object | Address of the delivery |
| -- invoice.deliveryAddress.salutationType | String | Type of salutation (DEFAULT, MR, MS) |
| -- invoice.deliveryAddress.salutation | String | Salutation without name |
| -- invoice.deliveryAddress.salutationWithName | String | Salutation by name |
| -- invoice.deliveryAddress.streetAddress | String | Street and house number |
| -- invoice.deliveryAddress.postalCode | String | Postal code |
| -- invoice.deliveryAddress.city | String | City |
| -- invoice.deliveryAddress.postalCodeAndCity | String | Zip code and city |
| -- invoice.deliveryAddress.region | String | Region |
| -- invoice.deliveryAddress.country | String | Country |
| -- invoice.deliveryAddress.addressLine1 | String | Address supplement 1 |
| -- invoice.deliveryAddress.addressLine2 | String | Address supplement 2 |
| invoice.offerReference | String | Reference Number of related Offer |
| invoice.offerNumber | String | Number of related Offer |
| invoice.offerName | String | Title of related Offer |
| invoice.offerDate | String | Date of related Offer |
| invoice.orderReference | String | Reference Number of related Order |
| invoice.orderNumber | String | Number of related Order |
| invoice.orderName | String | Title of related Order |
| invoice.orderDate | String | Date of related Order |
| invoice.invoiceReference | String | Reference Number of the Invoice |
| invoice.name | String | Title of the Invoice |
| invoice.costCenterId | String | Cost Center ID |
| invoice.currency | String | Currency |
| invoice.currencySymbol | String | Currency Symbol |
| invoice.reverseCharge | boolean | Flag whether Reverse Charge procedure is used for this invoice. |
| invoice.invoiceNumberCancelled | String | Invoice Number of Cancellation Invoice |
| invoice.invoiceDateCancelled | String | Date of Cancellation Invoice |
| invoice.invoiceNameCancelled | String | Title of Cancellation Invoice |
| invoice.cancellationInvoice | boolean | Flag, if invoice is a cancellation invoice |
| invoice.introductoryTextItems | List | List of introductory Text Items |
| -- itItem.textItem | Object | |
| ---- itItem.textItem.sortIndex | int | Sort Index |
| ---- itItem.textItem.lineTop | boolean | Flag, if there is a top line |
| ---- itItem.textItem.lineBottom | boolean | Flag, if there is a bottom line |
| ---- itItem.textItem.text | String | HTML-formatted Text |
| invoice.items | List | List of Invoice- and Text Positions |
| -- item.position | int | Position Nummer |
| -- item.sortIndex | int | Sort Index |
| -- item.lineItem | Object | Provide the date for an Invoice Position |
| ---- item.lineItem.description | String | Description |
| ---- item.lineItem.type.name | String | Position Type Identifier (TIME_AND_MATERIALS, FIXED_PRICE, STANDARD) |
| ---- item.lineItem.type.displayName | String | Display Name of Position Type |
| ---- item.lineItem.taxRate | String | Tax Rate in Percentage |
| ---- item.lineItem.taxRateValue | String | Tax Rate Value |
| ---- item.lineItem.renderAmount | boolean | Flag, if amount should be rendered |
| ---- item.lineItem.amountNotSpecified | boolean | Flag, if no amounts are required |
| ---- item.lineItem.amountRange | boolean | Flag, if a price range is configured |
| ---- item.lineItem.amount | String | Amount |
| ---- item.lineItem.unit | String | Unit |
| ---- item.lineItem.pricePerUnit | String | Price per Unit |
| ---- item.lineItem.priceTotal | String | Total Price Net |
| ---- item.lineItem.discounted | boolean | Flag, if discount exists |
| ---- item.lineItem.discountType | String | Type of Discount (Percentage, Value) |
| ---- item.lineItem.discountValue | String | Percentage or absolute value of discount |
| ---- item.lineItem.discountTotal | String | Monetary value of the percentage discount |
| ---- item.lineItem.itemTotal | String | ... |
| ---- item.lineItem.priceTotalGross | String | Total Price Gross |
| ---- item.lineItem.billable | boolean | Flag, if position is billable |
| ---- item.lineItem.lineTop | boolean | Flag, if there is a top line |
| ---- item.lineItem.lineBottom | boolean | Flag, if there is a bottom line |
| ---- item.lineItem.items | List | List of all service type entries |
| ------ serviceItem.pos | String | Number of the position |
| ------ serviceItem.amountMin | String | Minimal amount (price range is activated) |
| ------ serviceItem.amount | String | Amount |
| ------ serviceItem.unit | String | Unit |
| ------ serviceItem.billRate | String | Bill rate |
| ------ serviceItem.priceTotalMin | String | Minimal total amount (price range is activated) |
| ------ serviceItem.priceTotal | String | Total Amount |
| ---- item.lineItem.serviceEntryData | List | List of all service entries related to the invoice position. |
| ------ serviceEntryData... | ... | See description below "invoice.serviceEntryData" |
| -- item.textItem | Object | Provide data for a text position |
| ---- item.textItem.sortIndex | int | Index für die Sortierung |
| ---- item.textItem.lineTop | boolean | Flag, if there is a top line |
| ---- item.textItem.lineBottom | boolean | Flag, if there is a bottom line |
| ---- item.textItem.text | String | HTML-formatted Text |
| invoice.closingTextItems | List | List of closing tests |
| -- ctItem.textItem | Object | Provide data for the text item |
| ---- ctItem.textItem.sortIndex | int | Sort Index |
| ---- ctItem.textItem.lineTop | boolean | Flag, if there is a top line |
| ---- ctItem.textItem.lineBottom | boolean | Flag, if there is a bottom line |
| ---- ctItem.textItem.text | String | HTML-formatted Text |
| invoice.termsOfPayment | Object | Terms of Payment |
| -- invoice.termsOfPayment.paymentDeadline | int | Payment Deadline |
| -- invoice.termsOfPayment.paymentDiscountDeadline | int | Payment Discount Deadline |
| -- invoice.termsOfPayment.paymentDiscountPercent | String | Payment Discount percentage value |
| -- invoice.termsOfPayment.paymentDiscountAmount | String | Payment Discount monetary value |
| -- invoice.termsOfPayment.totalGrossAfterPaymentDiscount | String | Total Gross after Payment Discount |
| -- invoice.termsOfPayment.paymentDiscountExists | boolean | Flag, if payment discount monetary value is > 0 |
| invoice.totals | Object | Invoice Totals |
| -- invoice.totals.range | boolean | Flag, if price range is activated |
| -- invoice.totals.priceTotalNetUndiscounted | String | Total Net exclusive discounts |
| -- invoice.totals.positionDiscounts | boolean | Flag, if position discounts exist |
| -- invoice.totals.totalDiscounts | boolean | Flag, if total discounts exist |
| -- invoice.totals.discounts | List | List of all total discounts |
| ---- discount.type | String | Discount Type (AMOUNT, PERCENTAGE) |
| ---- discount.value | String | Discount Value |
| ---- discount.amount | String | Negative monetary discount value |
| -- invoice.totals.priceTotalNet | String | Total Net inclusive total discounts |
| -- invoice.totals.taxTotals | List | List of tax rates |
| ---- invoice.totals.taxTotals.taxRate | String | Tax Rate in percentage with description |
| ---- invoice.totals.taxTotals.value | String | Tax Rate in Percentage |
| ---- invoice.totals.taxTotals.totalSum | String | Total Net of the Invoice |
| ---- invoice.totals.taxTotals.taxSum | String | Total Tax Rate Values |
| invoice.serviceEntryData | List | Provides the service and additional service entries of the invoice |
| ---- seItem.id | long | Id of service or additional service entry |
| ---- seItem.name | String | Title |
| ---- seItem.date | String | Date |
| ---- seItem.amount | String | Amount |
| ---- seItem.unit | String | Unit |
| ---- seItem.pricePerUnit | String | Price per Unit |
| ---- seItem.priceTotal | String | Total Price |
| ---- seItem.type | String | Type der Data Structure - DefaultPaymentPlanEntryExportData - DefaultAdditionalServiceEntryExportData - DefaultServiceEntryExportData |
| ---- seItem.data | HashMap | Data Structure (see description below) |
Three different data structures are currently provided in the "seItem.Data" hashmap, which are shown below as a JSON structure. This data is accessed using the following exemplary notation in Freemarker:
<#list invoice.serviceEntryData?filter(d -> d.type == 'DefaultServiceEntryExportData') as serviceEntryData>
    <tr>
        <td>${(serviceEntryData.date)!}</td>
        <td>${(invoice.items[serviceEntryData.data.invoiceItemIndex].lineItem.name)!}</td>
        <td>${(serviceEntryData.data['taskKey'])!}</td>
        <td>${(serviceEntryData.name)!}</td>
        <td>${(serviceEntryData.amount)!}</td>
        <td>${(serviceEntryData.unit)!}</td>
        <td>${(serviceEntryData.pricePerUnit)!}</td>
        <td>${(serviceEntryData.priceTotal)!}</td>
    </tr>
</#list>
In the first line, the set of services from working times is filtered out of the set of all data records below ServiceEntryData and iterated through via a list element.
<#list invoice.serviceEntryData?filter(d -> d.type == 'DefaultServiceEntryExportData') as serviceEntryData>
The following notation is used to access a property of the data under seItem.data:
${(serviceEntryData.data['taskKey'])!}
The "data.invoiceItemIndex" property is used to read out the associated invoice item.
<td>${(invoice.items[serviceEntryData.data.invoiceItemIndex].lineItem.name)!}</td>
DefaultServiceEntryExportData
This type describes a service entry that has arisen through the transfer of working hours. The following data is provided:
"data" : {
    "date" : "2022-06-27",
    "serviceType" : "Junior Frontend Developer",
    "taskKeyWithName" : "WD-1: Create Workshop Concept",
    "employeeWithCostCenter" : "Max Mustermann (KS1234)",
    "orderNumber" : "AU-2022-10001",
    "projectKeyWithName" : "WD: Website Development",
    "taskKey" : "WD-1",
    "description" : "Develop a concept for a workshop (WD-1)",
    "typeHint" : "DefaultServiceEntryExportData",
    "employee" : "Max Mustermann",
    "descriptionWithTaskKey" : "Create Workshop Conzept (WD-1)",
    "projectDetails" : "WD: Website Development",
    "pricePerUnit" : 110.0000,
    "amountRecorded" : 8,
    "projectKey" : "WD",
    "invoiceItemIndex" : 0,
    "customerId" : "KD-2022-10001",
    "currency" : "EUR",
    "id" : 90,
    "priceBillTotal" : 880.0000,
    "orderName" : "Website Relaunch",
    "amount" : 8.0000,
    "unitName" : "Hour",
    "customerName" : "Demo AG",
    "orderDetails" : "AU-2022-10001 / Website Relaunch / Concept Workshop / Junior Frontend Developer",
    "unit" : {
        "id" : 1,
        "name" : "HOURLY_RATE",
        "additionalAttributes" : { },
        "displayName" : "Hour"
    },
    "name" : "Website Relaunch",
    "taskName" : "Create Workshop Concept",
    "projectName" : "Website Development"
}
DefaultAdditionalServiceEntryExportData
This type describes an additional service entry. The following data is provided:
"data" : {
  "date" : "2023-10-18",
  "amount" : 4.0000,
  "orderNumber" : "AU-2022-10005",
  "employeeWithCostCenter" : "Max Mustermann (AB1234)",
  "unitName" : "Piece",
  "description" : "<p>Licence costs</p>",
  "typeHint" : "DefaultAdditionalServiceEntryExportData",
  "employee" : "Max Mustermann",
  "customerName" : "Demo AG",
  "pricePerUnit" : 120.0000,
  "orderDetails" : "AU-2022-10005 / Website Relaunch / Licence Costs",
  "unit" : {
    "id" : 0,
    "name" : "PIECE",
    "additionalAttributes" : { },
    "displayName" : "Stück"
  },
  "invoiceItemIndex" : 0,
  "customerId" : "KD-2022-10001",
  "name" : "Licence Costs",
  "currency" : "EUR",
  "id" : 41,
  "priceBillTotal" : 480.0000,
  "orderName" : "Website Relaunch"
}
DefaultPaymentPlanEntryExportData
This type describes payments plan entry. The following data is provided:
"data" : {
  "date" : "2022-07-31",
  "amount" : 1.0000,
  "orderNumber" : "AU-2022-10002",
  "employeeWithCostCenter" : "Max Mustermann",
  "unitName" : "Piece",
  "description" : "<p>Final Payment Rate</p>",
  "typeHint" : "DefaultPaymentPlanEntryExportData",
  "employee" : "Max Mustermann",
  "customerName" : "Demo AG",
  "pricePerUnit" : 110.0000,
  "orderDetails" : "AU-2022-10002 / Website Relaunch / -",
  "unit" : {
    "id" : 0,
    "name" : "PIECE",
    "additionalAttributes" : { },
    "displayName" : "Stück"
  },
  "invoiceItemIndex" : 0,
  "customerId" : "KD-2022-10001",
  "name" : "Final Payment Rate",
  "currency" : "EUR",
  "id" : 27,
  "priceBillTotal" : 110.0000,
  "orderName" : "Website Relaunch"
}
Access Data for Activity Reports
The same data is provided for the creation of a activity report as for an invoice, as an activity report is always in the context of an invoice. Accessing this data from an activity report template differs only in the prefix.
Example: Instead of ${invoice.invoiceNumber}, ${activity_report.invoiceNumber} is used.
Access Data for E-Mails
The following additional data is provided for the creation of frame templates of type "e-mail":
| Name | Format | Description |
|---|---|---|
| sender.email | String | E-Mail address of current foreknown user |
| sender.name | String | Complete name of current foreknown user |
| subject | String | Subject of the E-Mail |
| content | String | Text of the E-Mail (including HTML) |
Use of Template Variables
To include the value of a variable in a freemarker template the following expression is used for example:
<# if var.companyName?has_content>
  <div>${var.<name-der-variable>}</div>
</#if>
The if-statement ensures that the company name is only output if the variable has a value. If a variable was accessed that did not exist, the Freemarker process would get an error and no printed offer, order or invoice would appear.
Customize Excel Template (Service Entry Exports / Employee Reports)
An Excel template is used to export filtered data for service entries and employees in the form of a table. The concept of Excel templates is based on different types of placeholders that you can place within an Excel spreadsheet in the header, footer and table. However, there are a few rules to follow.
The following screenshot shows how an Excel template in case of a service entry export can look like.

We see the header line with the static heading "Activity Report" and the placeholder [#FILTER#monthYear#]. Below that is the actual table with various placeholders and at the end the footer, where a placeholder [#VARIABLE#companyName#] and standard fields of Excel are used.
Special Features & Restrictions
In Excel tables, a distinction is made between the header, the table and the footer. Not all placeholders can be used in all areas. There are the following restrictions to consider.
- The header and footer of an Excel table are divided into three fields. Only placeholders of type "FILTER" and "VARIABLE" can be used in these fields. However, several placeholders can be inserted per field.
- All placeholder types can be used in the table. However, only one placeholder can be inserted in a cell. Placeholder may not be combined with other text in a cell. The "LIST" placeholder may only be used once and all "LIST" placeholders must be in exactly one row of the table. No other placeholders can be used in this row. However, columns with formulas or static values can be inserted, which are then transferred to each generated service line.
- The Excel sheet is responsible for correct display of values in the cells of the table that contain placeholders. Although a "text" has been inserted by inserting a placeholder, the cell must be assigned the correct type and format in Excel in order to correctly display the inserted value. For example, the cell with the date of a service must also be set as "date" with the desired format in Excel.
- If you want to be able to provide Excel tables in different country-specific versions (DE, US), you must create separate templates for each country in which the cells are formatted accordingly.
foreknown Placeholder for Service Entry Exports
In order to be able to insert the data from foreknown into an Excel table, a variety of placeholders of different types are provided, which are described below. A placeholder is always structured as follows:
[#<TYPE>#<name>#]
There are 5 different placeholder types: FILTER, LIST, VARIABLE, SUM, AVG
FILTER Placeholder
These placeholders essentially provide the information resulting from the currently selected filter settings. These placeholders can be used in the header, table and footer.
- [#FILTER#accountName#]: Returns the name of your foreknown account.
- [#FILTER#createdAt#]: Returns the current date. The date format is set in the cell of the excel sheet. The cell must be assigned a date format in Excel.
- [#FILTER#monthYear#]: Returns the month and year of the period selected in the filter. The following rules apply:
- If no time period has been set in the filter, "month/year" will be determined from the current date.
- If a period was selected that is within a month, "month/year" of the period is returned.
- If a period was selected that covers several months, "Month/Year - Month/Year" will be determined from the first and last month.
- The cell must be assigned a text format in Excel.
- [#FILTER#amount#]: Returns the number of found entries resulting from the filter settings. The cell must be assigned a numeric format in Excel.
- [#FILTER#startDate#]: Returns the start date of the period selected in the filter. If no period is set, the text "No start date selected" is displayed. The cell must be assigned a date format in Excel.
- [#FILTER#endDate#]: Returns the end date of the period selected in the filter. If no period is set, the text "No end date selected" is displayed. The cell must be assigned a date format in Excel.
- [#FILTER#period#]: Returns the start and end date as text e.g. "01-01-2021 - 31-01-2021". The cell in the Excel table must therefore have the format "Text". The date format is generated in foreknown depending on the set language. If no period is set, the text "No period selected" will be displayed.
- [#FILTER#status#]: Returns a text with all statuses that were selected in the filter settings. If the filter was not set, the text "No status selected" will appear. The cell must be assigned a text format in Excel.
- [#FILTER#orders#]: Returns a text with all the order numbers that were selected in the filter settings. If the filter was not set, the text "No order selected" will appear. The cell must be assigned a text format in Excel.
- [#FILTER#employees#]: Returns a text with all employees selected in the filter settings. If the filter was not set, the text "No employee selected" appears. The cell must be assigned a text format in Excel.
- [#FILTER#customers#]: Returns a text with all customers numbers selected in the filter settings. If the filter has not been set, the text "No customer selected" will appear. The cell must be assigned a text format in Excel.
- [#FILTER#serviceTypes#]: Returns a text with all service types selected in the filter settings. If the filter was not set, the text "No service type selected" will appear. The cell must be assigned a text format in Excel.
- [#FILTER#invoices#]: Returns a text with all invoices selected in the filter settings. If the filter was not set, the text "No invoice selected" will appear. The cell must be assigned a text format in Excel.
- [#FILTER#summary#]: Returns a text dynamically composed of the filter settings for status, orders, employees, customers, invoices, and service types, and outputs only the selected filters in a multiline text. If no filters are set, the text "No filters selected" is displayed. The cell must be assigned a text format in Excel.
LIST Placeholder
These placeholders provide the data of the services resulting from the currently selected filter settings. These placeholders can only be used in the table and must be on one row.
- [#LIST#employee#]: Provides the name of the employee that the service is based on. The cell must be assigned a text format in Excel.
- [#LIST#employeeWithCostCenter#]: Returns the name of the employee with the cost center behind it.
- [#LIST#date#]: Returns the date of the service. The cell must be assigned a date format in Excel.
- [#LIST#duration#]: Returns the billable duration in hours or days depending on the unit. The cell must be assigned a numeric format in Excel.
- [#LIST#durationBooked#]: Returns the booked duration in hours or days depending on the unit. The cell must be assigned a numeric format in Excel.
- [#LIST#orderName#]: Returns the name of the order assigned to the service. The cell must be assigned a text format in Excel.
- [#LIST#orderNumber#]: Returns the order number of the order assigned to the service. The cell must be assigned a text format in Excel.
- [#LIST#orderDetails#]: Returns in a text the order number, order description, item number and service type assigned to the service. The cell must be assigned a text format in Excel. "Text break" should also be set.
- [#LIST#serviceType#]: Returns the name of the service type assigned to the service. The cell must be assigned a text format in Excel.
- [#LIST#task#]: Returns the key and name of the task for which a service was created. Since a task can also consist of several working time entries (daily rates), several key/name pairs maybe output comma-separated.
- [#LIST#taskKey#]: Returns the key of the task for which a service was created. Since a task can also consist of several working time entries (daily rates), several keys may be output comma-separated.
- [#LIST#taskName#]: Returns the name of the task for which a service was created. Since a task can also consist of several working time entries (daily rates), several names may be output comma-separated.
- [#LIST#customerId#]: Returns the customer number of the customer assigned to the service. The cell must be assigned a text format in Excel.
- [#LIST#customerName#]: Returns the name of the customer assigned to the service. The cell must be assigned a text format in Excel.
- [#LIST#description#]: Returns the description of the service. The cell must be assigned a text format in Excel.
- [#LIST#descriptionWithTaskKey#]: Provides the description of the working time and the key of the task, for which a service was created. Since a service can also consist of several working time entries (daily rates), several description/key pairs may be output comma-separated.
- [#LIST#rate#]: Provides the hourly or daily rate of the service. The cell must be assigned an accounting format in Excel.
- [#LIST#unit#]: Returns the unit of the service e.g. hours, days. The cell must be assigned a text format in Excel.
- [#LIST#priceTotal#]: Returns the amount of the service (duration * rate). The cell must be assigned an accounting format in Excel.
- [#LIST#accountLabel#]: Returns the value of the label with the prefix "Account:". If the service entry has multiple working time entries, the values are provided as a comma-separated list. The cell must be assigned a text format in Excel.
- [#LIST#customerLabel#]: Returns the value of the label with the prefix "Customer:". If the service entry has multiple working time entries, the values are provided as a comma-separated list. The cell must be assigned a text format in Excel.
- [#LIST#projectLabel#]: Returns the value of the label with the prefix "Project:". If the service entry has multiple working time entries, the values are provided as a comma-separated list. The cell must be assigned a text format in Excel.
- [#LIST#epicLabel#]: Returns the value of the label with the prefix "Epic:". If the service entry has multiple working time entries, the values are provided as a comma-separated list. The cell must be assigned a text format in Excel.
- [#LIST#project#]: Returns the project key and project name for a service entry if it is based on a project task.
- [#LIST#projectKey#]: Returns the project key for a service entry if it is based on a project task.
- [#LIST#projectName#]: Returns the project name for a service entry if it is based on a project task.
- [#LIST#projectNumber#]: Returns the project number for a service entry if it is based on a project task.
- [#LIST#projectDetails#]: Returns the project key, project name and project number for a service entry,
if this is based on a project task. Format:
: ( )
VARIABLE Placeholder
This placeholder can insert the values of the variables that can be maintained at the template. The placeholder can be used in the header, footer and table. It is not possible to use it in the line that contains the LIST placeholder. An example is shown below.
- [#VARIABLE#companyName#]: Returns the value of the variable "companyName" maintained at the template.
All cells containing a VARIABLE placeholder must be given the format "Text".
Documentation-Link: For detailed information on how to maintain variables on templates, see "Edit Variables" on this page.
SUM Placeholder
This placeholder is used to be able to insert sums into the Excel sheet for certain performance properties.
- [#SUM#duration#]: Returns a formula that sums all rows in the "Billable Duration" column as a partial result. The cell must be given a numeric format in Excel.
- [#SUM#durationBooked#]: Returns a formula that sums all rows in the "Booked Duration" column as a partial result. The cell must be given a numeric format in Excel.
- [#SUM#priceTotal#]: Returns a formula that sums all rows of the "Amount" column as a partial result. The cell must be given an accounting format in Excel.
Note: For each SUM placeholder used, there must always be a column with the corresponding LIST placeholder. Example: If you use the placeholder [#SUM#duration#], you must also use the placeholder [#LIST#duration#] in the row for the LIST placeholders.
foreknown Placeholders for Employee Reports
The templates for employee reports are divided into two types: "Employee report" and "Monthly employee report". Both template types have the following placeholders in common. But the monthly employee report also has additional placeholders, which are described below under "Monthly Placeholders".
FILTER Placeholders
These placeholders essentially provide the information that results from the currently selected filter settings. These placeholders can be used in the header, in the table and in the footer.
- [#FILTER#accountName#]: Returns the name of your foreknown account. The cell must be assigned a text format in Excel.
- [#FILTER#templateName#]: Returns the name of the template selected for the employee report. The cell must be assigned a text format in Excel.
- [#FILTER#createdAt#]: Returns the current date. A date format must be assigned to the cell in Excel.
- [#FILTER#year#]: Returns the current year. A text format must be assigned to the cell in Excel.
- [#FILTER#period#]: Returns the start and end date as text, e.g. "01.01.2021 - 31.01.2021". The cell in the Excel table must therefore have the format "Text". The date format is generated depending on the language set in foreknown. If no period is set, the text "No period selected" is displayed.
- [#FILTER#amount#]: Returns the number of entries found resulting from the filter settings. The cell must be assigned a numerical format in Excel. Alternatively, [#FILTER#totalElements#] also works.
- [#FILTER#summary#]: Returns a text that is dynamically composed of the filter settings for user status, employment, time recording and only outputs the selected filters in a multi-line text. If no filters are set, the text "No filters selected" is displayed. The cell must be assigned a text format in Excel.
LIST Placeholders
These placeholders provide the service data resulting from the currently selected filter settings. These placeholders can only be used in the table and must be in exactly one row.
Employee Data
- [#LIST#id#]: Outputs a unique ID of the employee. The cell must be assigned a numerical format in Excel.
- [#LIST#name#]: Displays the name (first name and surname) of the employee. The cell must be assigned a text format in Excel.
- [#LIST#costCenter#]: Displays the value of the employee's cost centre, if available. A text format must be assigned to the cell in Excel.
- [#LIST#email#]: Displays the employee's e-mail address. A text format must be assigned to the cell in Excel.
- [#LIST#country#]: Displays the selected country of an employee. A text format must be assigned to the cell in Excel.
- [#LIST#region#]: Displays the selected region of an employee. A text format must be assigned to the cell in Excel.
Placeholders on Activity Bookings
NOTE: The values of the following placeholders only take into account the values that have accrued up to the blocking date (released days).
-
Selected Period
- [#LIST#periodWorkingTimeActual#]: Gibt die Anzahl der gebuchten Tätigkeiten des Mitarbeiters für den ausgewählten Zeitraum aus. Der Zelle muss ein numerisches Format in Excel zugewiesen werden.
- [#LIST#periodWorkingTimeTarget#]: Gibt die Anzahl der Soll-Arbeitszeit des Mitarbeiters für den ausgewählten Zeitraum aus. Der Zelle muss ein numerisches Format in Excel zugewiesen werden.
- [#LIST#periodWorkingTimeDifference#]: Gibt die Anzahl der angefallenen Über- bzw. Unterstunden des Mitarbeiters für den ausgewählten Zeitraum aus. Der Zelle muss ein numerisches Format in Excel zugewiesen werden.
- [#LIST#periodWorkingTimePercentage#]: Gibt den prozentualen Anteil von gebuchten Tätigkeiten gegenüber den Soll-Arbeitszeiten des Mitarbeiters für den ausgewählten Zeitraum aus. Der Zelle muss ein numerisches Format in Excel zugewiesen werden.
- [#LIST#periodWorkingTimeBalance#]: Gibt den Kontosaldo unter Berücksichtigung zusätzlicher Zeitkontobuchungen des Mitarbeiters für den ausgewählten Zeitraum aus. Der Zelle muss ein numerisches Format in Excel zugewiesen werden.
-
Selected Year
- [#LIST#totalWorkingTimeActual#]: Gibt die Anzahl der gebuchten Tätigkeiten des Mitarbeiters für das ausgewählte Jahr aus. Der Zelle muss ein numerisches Format in Excel zugewiesen werden.
- [#LIST#totalWorkingTimeTarget#]: Gibt die Anzahl der Soll-Arbeitszeit des Mitarbeiters für das ausgewählte Jahr aus. Der Zelle muss ein numerisches Format in Excel zugewiesen werden.
- [#LIST#totalWorkingTimeDifference#]: Gibt die Anzahl der angefallenen Über- bzw. Unterstunden des Mitarbeiters für das ausgewählte Jahr aus. Der Zelle muss ein numerisches Format in Excel zugewiesen werden.
- [#LIST#totalWorkingTimePercentage#]: Gibt den prozentualen Anteil von gebuchten Tätigkeiten gegenüber den Soll-Arbeitszeiten des Mitarbeiters für das ausgewählte Jahr aus. Der Zelle muss ein numerisches Format in Excel zugewiesen werden.
- [#LIST#totalWorkingTimeBalance#]: Gibt den Kontosaldo unter Berücksichtigung zusätzlicher Zeitkontobuchungen des Mitarbeiters für das ausgewählte Jahr aus. Der Zelle muss ein numerisches Format in Excel zugewiesen werden.
Placeholders on On-Call Service Data
-
Selected Period
- [#LIST#periodOnCallServiceTimePlanned#]: Returns the number of scheduled on-call service times of the employee for the selected period. The cell must be assigned a numeric format in Excel.
- [#LIST#periodOnCallServiceTimeLogged#]: Returns the number of the employee's booked, inactive on-call service times for the selected period. The cell must be assigned a numeric format in Excel.
- [#LIST#periodOnCallServiceTimeIncident#]: Returns the number of booked, active on-call service times of the employee for the selected period. The cell must be assigned a numerical format in Excel.
-
Selected Year
- [#LIST#totalOnCallServiceTimePlanned#]: Returns the number of scheduled on-call service times of the employee for the selected year. The cell must be assigned a numeric format in Excel.
- [#LIST#totalOnCallServiceTimeLogged#]: Returns the number of the employee's booked, inactive on-call service times for the selected year. The cell must be assigned a numeric format in Excel.
- [#LIST#totalOnCallServiceTimeIncident#]: Returns the number of booked, active on-call service times of the employee for the selected year. The cell must be assigned a numerical format in Excel.
Placeholders on Vacations
-
Selected Period
- [#LIST#periodVacationTimeTaken#]: Returns the number of days of vacation taken by the employee for the selected period. The cell must be assigned a numeric format in Excel.
- [#LIST#periodVacationTimePlanned#]: Returns the number of days of vacation planned by the employee for the selected period. The cell must be assigned a numeric format in Excel.
-
Selected Year
- [#LIST#totalVacationTimeEntitlement#]: Returns the number of the employee's contractual vacation days for the selected year. The cell must be assigned a numeric format in Excel.
- [#LIST#totalVacationTimeTaken#]: Returns the number of days of vacation already taken by the employee for the selected year. The cell must be assigned a numerical format in Excel.
- [#LIST#totalVacationTimePlanned#]: Returns the number of days of vacation already planned for the employee for the selected year. The cell must be assigned a numeric format in Excel.
- [#LIST#totalVacationTimeOpen#]: Returns the number of unplanned vacation days for the employee for the selected year. The cell must be assigned a numeric format in Excel.
Placeholders on Absences
-
Selected Period
- [#LIST#periodAbsentTimeTotal#]: Returns the total of all absences of the employee for the selected period. The cell must be assigned a numeric format in Excel.
- [#LIST#periodAbsentTimeVacation#]: Returns the total of all the employee's leave days taken for the selected period. The cell must be assigned a numerical format in Excel.
- [#LIST#periodAbsentTimeSickLeave#]: Returns the total of all sick days taken by the employee for the selected period. The cell must be assigned a numerical format in Excel.
- [#LIST#periodAbsentTimeOther#]: Returns the total of all other absences of the employee for the selected period. The cell must be assigned a numeric format in Excel.
- [#LIST#periodAbsentTimeOvertime#]: Returns the sum of the employee's overtime for the selected period. The cell must be assigned a numeric format in Excel.
-
Selected Year
- [#LIST#totalAbsentTimeTotal#]: Returns the total of all absences of the employee for the year of the selected period. The cell must be assigned a numeric format in Excel.
- [#LIST#totalAbsentTimeVacation#]: Returns the total of all days of leave taken by the employee for the year of the selected period. The cell must be assigned a numeric format in Excel.
- [#LIST#totalAbsentTimeSickLeave#]: Returns the total of all sick days taken by the employee for the year of the selected period. The cell must be assigned a numeric format in Excel.
- [#LIST#totalAbsentTimeOther#]: Returns the total of all other absences of the employee for the year of the selected period. The cell must be assigned a numeric format in Excel.
- [#LIST#totalAbsentTimeOvertime#]: Returns the sum of the employee's overtime for the year of the selected period. The cell must be assigned a numeric format in Excel.
VARIABLE Placeholders
This placeholder can insert the values of the variables that can be maintained in the template. The placeholder can be used in the header and footer and in the table. It cannot be used in the line that contains the LIST placeholder. An example is shown below.
- [#VARIABLE#companyName#]: Provides the value of a variable called "companyName", which has been added to a certain template.
All cells that contain a VARIABLE placeholder must have the format "Text".
SUM Placeholders
This placeholder is used to insert certain total values into the Excel table. The following notation applies to all of the above placeholders, except percentage values, in order to insert a total:
- [#SUM#
Sum#] e.g., [#SUM#totalAbsentTimeTotalSum#]
Only percentage values like "periodWorkingTimePercentage" and "totalWorkingTimePercentage" have following syntax:
- [#AVG#
Avg#] e.g., [#AVG#periodWorkingTimePercentageAvg#]
NOTE: For each SUM placeholder used, there must always be a column with the corresponding LIST placeholder. Example: If the placeholder [#SUM#totalAbsentTimeTotalSum#] is used, the placeholder [#LIST#totalAbsentTimeTotal#] must also be used in the listing row and totals column.
Monthly Placeholders
The following placeholders are only available for the template type "Monthly Employee Report" and used to create the day columns.
- [#VAR#day01#] - [#VAR#day31#]: These variable placeholders are used to generate the day numbers for the title line of a month.
Columns for all 31 days should always be created in the Excel template in order to be able to display the data for all
months. If a month has fewer days, the placeholder for the 31 day, for example, is replaced by an empty value and
the cell is given a gray background (#f2f2f2). A light blue background color (#DCEAF7) is used for weekends and public
holidays. Both color values can be overwritten via variables on the template:
- disabledColBackgroundColor: for non-existent days (default: #f2f2f2)
- nonBusinessBackgroundColor: for weekends or public holidays (default: #DCEAF7)
- [#LIST#day01#] - [#LIST#day31#]: These list placeholders are used to insert the abbreviations of the absences
determined on the respective day into the Excel template. The abbreviations are derived from the absence reasons, which
can be managed via the "System Administration / Absence Reasons". If there is no absence reason for an absence type,
the following abbreviations are used:
- U: Vacation
- K: Illness
- A: Other absences
- O: Overtime reduction
- [#LIST#code
#]: This list placeholder can be used to output the totals for each absence reason in a column. The list placeholders "codeU", "codeK", "codeA" and "codeO" would therefore be available for the above-mentioned standard abbreviations. If you create a reason for absence e.g. "Sick Leave with Medical Certificate" and the abbreviation "MC", the list placeholder is "codeMC".
NOTE: Templates for the monthly employee report should therefore always have 2 lines, of which the first line contains the [#VAR#day01#] - [#VAR#day31#] placeholders and the second line contains the [#LIST#day01#] - [#LIST#day31#] and behind it the [#LIST#code...#] placeholders. See also the Excel file supplied, which you can download from the template.
If you only want to consider certain absence reasons for a template, you can use the template variable "allowedCodes" to specify a comma-separated list of allowed codes. Example: allowedCodes = U,K would only take into account vacation and sick leave. If individual reasons for absence are used, their abbreviations must be used.