Table of Contents
Introduction
The invoice management of foreknown offers an overview of all invoices in the form of a list. In the detailed view of an invoice all required actions like update master data, add introductory and closing text, add positions and discounts and copying and printing invoices are available.
Invoices can be accessed through the menu item "Billing / Invoices" as a user with the role "Accountant".
Manage Invoices
Below you will be introduced to all the functions available in the Invoice Management section.
Search Invoice
If you open the "Invoices" dialog, you will see the following:

In the upper part of the dialog is the search field and the "+ New" button. Below this area, all invoices that have already been created are displayed in the form of a pageable list.
If you now enter a search term in the input field, the list will only show the invoices that contain the entered search term in the title, invoice number, customer name or customer number. In this way, individual invoices can be found quickly.
Filter Invoices
In addition to the search function, invoice management also offers a filter dialog. A filter dialog in foreknown is always located on the right side as a fold-out dialog. The filter dialog can be expanded and collapsed by clicking on the button with the three dashes above the list on the left.
The following filter options are offered for invoices:
- Period: Here you can freely select a period from which invoices will be displayed.
- Customer: One or more customers can be searched and selected via a field with auto-completion.
- Order: One or more orders can be searched and selected via a drop-down field with auto-completion. All invoices are displayed that have invoice positions resulting from services or additional services of the selected orders.
- Status: One or more statuses can be selected via a field with auto-completion.
- Invoice Amount (Net): Two input fields can be used to filter invoices whose net amount is between the two specified values. If only a "from" or "to" value is specified, all invoices are displayed, whose net amounts are greater than the "from" or less than the "to" value.
- Show due invoices only: Activate this checkbox if you only want to filter the invoices that are in the status "final" or "sent" and the current date is already after the due date, which is calculated from the invoice date and the payment term granted.
The action "Apply" displays all invoices in the list that match the filter criteria. The "x" action removes all filter settings and the list shows all invoices again. The "Reset" action (icon: arrow in a circle) discards all changes that may have been made to a saved filter.
For general information about the filter options, see also the chapter Basics: Filters.
Create Invoice
To create a new invoice, click on the "+ New" button located at the top right of the search box. This button will open the "Create Invoice" pop-up dialog.
Basic Data
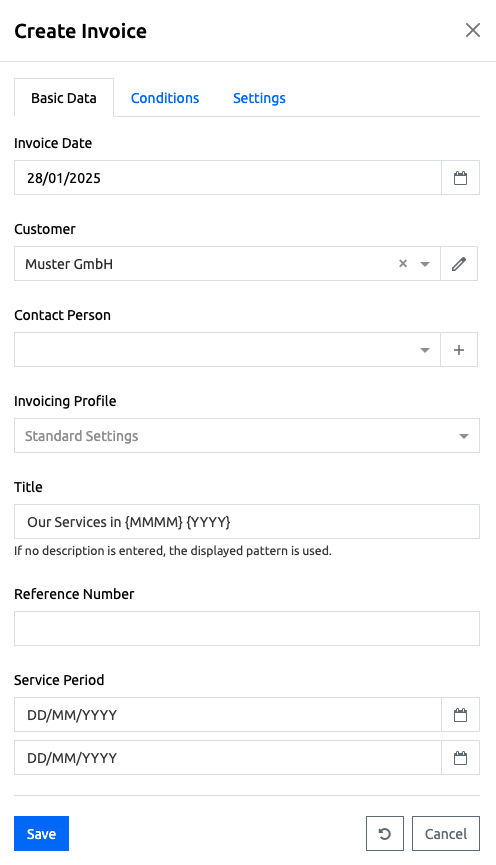
- Invoice Date: From a calendar, the creation date of the invoice can be selected.
- Customer: From an auto-fill field a customer must be selected. With the "+" in the line, a new customer can also be created directly.
- Contact Person: If a customer has been selected, a contact person can be selected from a drop-down list with auto-completion. Clicking on the "+" symbol in the same line opens the "Create Contact" dialog.
- Invoicing Profile: Specifies the profile with which this invoice is to be created. As soon as a customer is selected, the list of invoicing profiles stored for the customer appears in addition to the standard profile.
- Title: Here a title for the invoice can be assigned.
- Reference Number: Here a reference number can be entered manually. This is usually a number provided by the customer and serves the allocation on the part of the customer.
- Service Period: Defines the period for which services will be billed in this invoice. When creating an invoice via the invoice assistant, the period selected there will be included in the invoice.
Conditions

- Payment Target (in days): The value defines the duration in days in which the customer should have paid the invoice, based on the invoice date.
- Payment Discount Period (in days): The value defines the period in days from the invoice date in which the customer may deduct the payment discount.
- Payment Discount: The value defines the payment discount in percent.
Settings
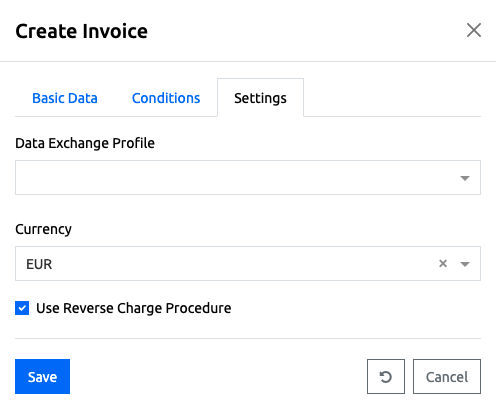
- Data Exchange Profile: Specifies the XML format to be used for the electronic invoice. The formats “EN 16931” and “XRechnung” are supported. The XML is inserted into the PDF invoice as an attachment.
- Currency: Here a currency must be selected from an auto-fill field.
- Flag "Apply Reverse Charge Procedure": Determines whether invoices for this company should be created using the reverse charge procedure and therefore only allow a value-added tax rate of 0%.
If you click on the button with the round "arrow" symbol, all data in the dialog will be reset to the initial state. To cancel the process, click on the "Cancel" button.
Click on the blue "Save" button to create the new invoice and return to the list view. The newly created invoice now appears in the list with the status "Draft" and can be selected for further processing. Invoices in the status "Draft" can still be edited completely. Only with the action "Finalize Invoice" an official invoice is created and an invoice number is generated.
Edit Invoice
When switching to the detail view of an invoice, all master data and actions, that change the status of an invoice, are displayed in the upper area. The properties of an invoice can be edited via an "Update Invoice" popup dialog. This is opened via the button with the pencil icon, which is always located at the top right of the detail view.
For details on the input fields see Create Invoice.
The "Save" action saves the changes made to the invoice. The "Reset" and "Cancel" actions discard the entries, and in the case of the "Cancel" action, the dialog is closed.
The fields "Service Recipient", "Document Recipient" and "Delivery Address" can be edited via a joint dialog "Edit Address" dialog.
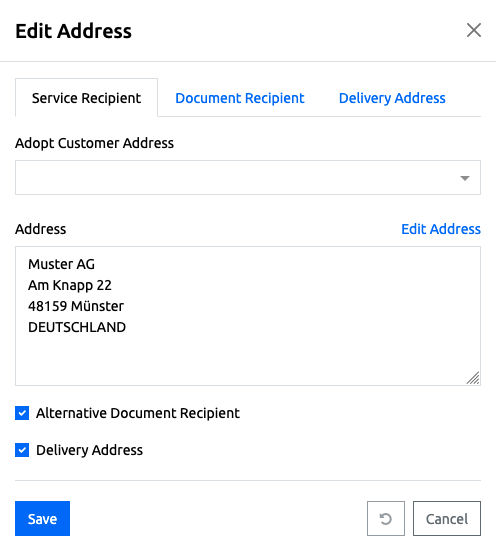
A distinction is made between three address types:
- Service Recipient: This address determines who receives the service and thus also bears the VAT burden in terms of tax law.
- Document Recipient: This optional address determines who should receive the document in order to process it if the address differs from the service recipient.
- Delivery Address: This optional address determines who should receive the goods if the address differ from the service recipient.
Corresponding addresses may already have been stored at the company (customer) so that they can simply be selected or may have already been pre-assigned as the default. Each document has a "Service Recipient" address. The flags "Alternative Document Recipient" and “Delivery Address” are used to activate the “Document Recipient” and “Delivery Address” tabs.
Documentation Note: See also the management of addresses at the company
A distinction is made between the payment methods ‘bank transfer’ and ‘direct debit’.
- Bank Transfer: This payment method is used if the customer is to pay an invoice by transferring the invoice amount. No further details are required. The necessary information about the bank account should be maintained via the company profile and be output in the invoice template.
- Direct Debit: This payment method is used if the customer has given authorisation for direct debit.
In this case, some additional information is required:
- Creditor Reference Number: Unique reference that identifies your company as the payee of the SEPA Direct Debit procedure. This information should be stored centrally in the company profile in the administration of foreknown. A value stored there is always used as the standard for invoices with direct debit payment type.
- Mandate Reference: Contains the mandate reference which, in combination with the creditor reference number, clearly identifies the mandate on which the direct debit is based. This value should be stored at the company (customer) so that this value can be used directly for invoices.
- Bank Name: Contains the name of the bank to be used for the direct debit procedure. This value should be stored at the company (customer) so that this value can be used directly for invoices.
- Bank ID (BIC): Optional; Contains the unique ID of the bank (BIC) to be used for the direct debit procedure. This value should be stored at the company (customer) so that this value can be used directly for invoices.
- Account Number (IBAN): Contains the account number (IBAN) of the account to be used for the direct debit procedure. This value should be stored at the company (customer) so that this value can be used directly for invoices.
Note: When "Direct Debit" has been selected as payment method, all described data needs to be maintained for an invoice. If that is not the case on finalizing an invoice, an error is shown and the invoice cannot be finalized.
The fields "Responsible", "Paid at" and "Template" can be edited directly by clicking on the pencil icon next to the corresponding field in the detailed view. A template must always be selected to finalise the invoice. The "Paid on" field only appears if an invoice is already in "Paid" status.
Furthermore, for invoices that have invoice items generated on the basis of service entries, a link "Show Service Entries" is displayed below the action "Activity Report". This link leads directly to the list of service entries on which the selected invoice is based.
Create Invoice Position
In the bottom half of the detail view, you can see the invoice and text positions in the area "Positions & Texts".
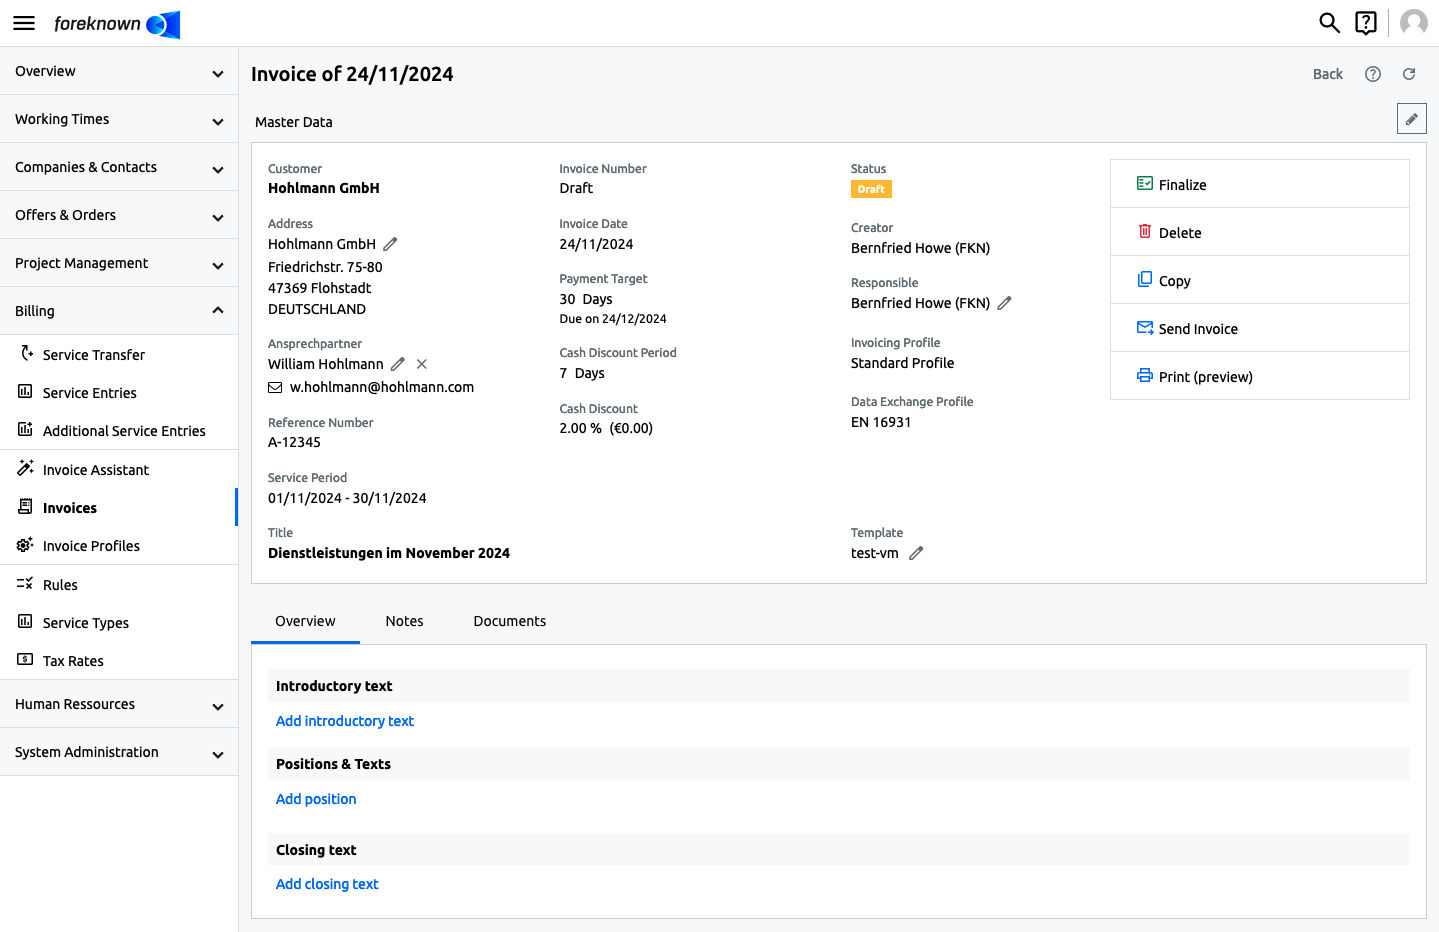
Clicking the "Add position" link will open the "Create Invoice Position" dialog.
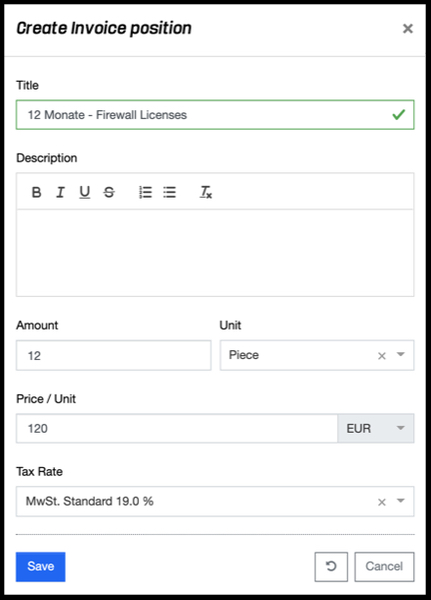
- Title: The title of the position is entered here.
- Description: A more detailed explanation of the position can be entered here.
- Amount: Here you have to enter the quantity of the selected unit.
- Unit: From a drop-down list you have to choose between "piece", "hour", "day", "month", or "flat rate".
- Price/Unit: Here the price of a single unit is indicated.
- Tax Rate: A VAT rate must be selected from an auto-fill field.
With the action "Save" the invoice position will be saved. With the action "Reset" and "Cancel" the entries are discarded and in case of the action "Cancel" the dialog is closed.
Edit Invoice Position
An invoice position can be edited as long as the invoice is still in draft. Each position has an action menu which offers the action "Edit invoice position". Clicking on this action opens the corresponding dialog.
All properties can be changed as already described under Create Invoice Position.
Copy Invoice Position
An existing invoice item can be copied, provided that the invoice is still in a "draft" status. Click via the action menu on action "Copy invoice position" which opens the corresponding dialog. This dialog shows all position data of the selected position in order to adapt them for the new position. See also the descriptions under Create invoice position.
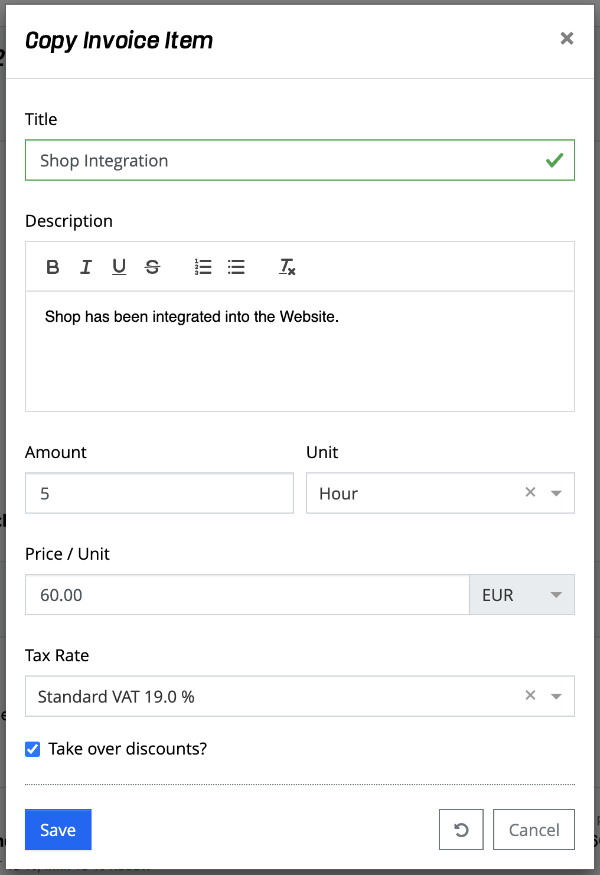
In addition, a checkbox "Take over discounts?" is offered. Activate this checkbox if discounts of the selected invoice item are to be included in the new invoice item.
With the action "Save" the new invoice position is created with the corresponding values. With the action "Reset" the values specified from the selected invoice item are restored. The action "Cancel" cancels the copying process and closes the popup dialog.
Create Text Position
An invoice might consist not only of invoice items that define services, but can also contain additional descriptive texts. Therefore, foreknown offers the possibility to create not only introductory and closing texts, but also explanatory texts between the invoice positions.
In an empty invoice you will find for the areas "Introductory text" and "Closing text" respectively the action "Add introductory text" and "Add closing text".
As soon as a text position has been created in an area, the actions "Create text above" or "Create text below" can be used to add further text position. These actions are also available in the action menu of an invoice position and thus allow the insertion of text positions there as well.
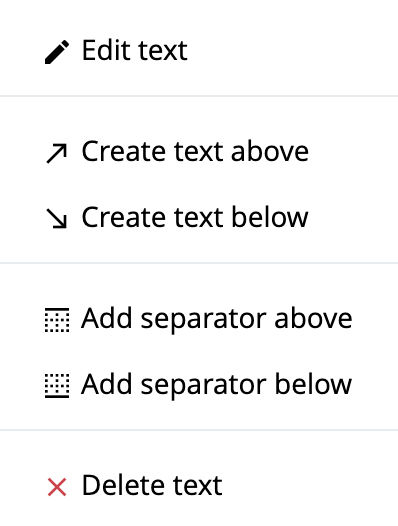
The action menu of a text position contains the following actions:
- Edit text: This action opens a dialog that allows you to enter an individual text via an editor with simple formatting options. Alternatively, a text based on a pre-defined text block can be copied into the text position. Placeholders (drop-down list) can be used to integrate data of the customer and the invoice.
- Create text above: This action opens a dialog for creating a new text position, which will be inserted above the selected text position.
- Create text below: This action opens a dialog for creating a new text position, which will be inserted below the selected text position.
- Add/Remove separator above: With this action a separator line can be added/removed above a text position.
- Add/Remove separator below: This action adds or removes a separator line below a text position.
- Delete text: This action deletes the currently selected text position if deletion has been confirmed before.
The action menu of the invoice position also has actions to create text positions.
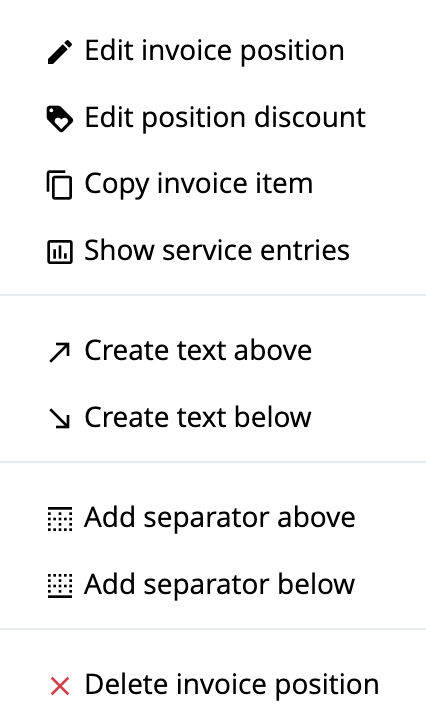
Again, it can be decided whether a text is to be inserted above or below an invoice position.
Deposit Discounts
Discounts can also be stored in an invoice. These discounts can be applied to individual positions as well as to the entire invoice.
Position Discounts
Clicking via the action menu on the action "Edit position discount" dialog opens the corresponding dialog which allows you to enter a discount in the form of a percentage value or a fixed amount.
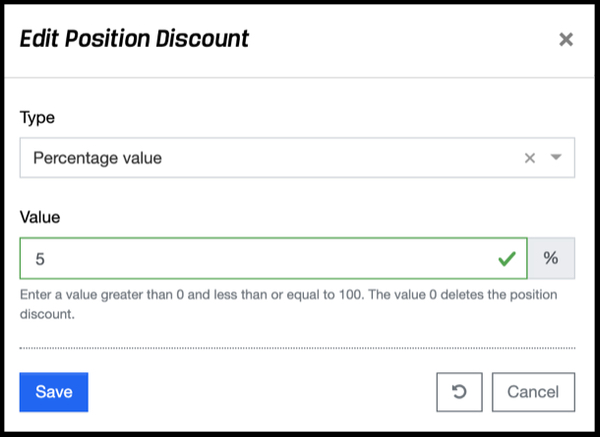
Percentage values can be > 0 and <= 100. For a fixed amount, you can enter all values > 0. If the value is greater than the value of the position, it will result in a minus value, which is equivalent to a credit.
You can see if a position contains a discount by the fact that on the one hand the "Label" symbol is displayed in green and on the other hand the discount is displayed in green letters below the title.
If you want to delete a position discount, you can also do this via the "Edit Position Discount" dialog. By clicking on the red "Delete Discount" button, which appears next to the "Save" button, as soon as a position discount exists, the discount will be removed immediately.
Total Discount
Clicking on the "Add Discount" link opens the "Edit total Discount" dialog. Since multiple total discounts can be specified, a descriptive name for the total discount must be specified first, e.g. "10% loyalty discount". Total discounts can also be specified as a percentage or as a fixed amount.
Percentage values can be > 0 and <= 100. For a fixed amount, you can enter all values > 0. If the fixed amount is greater or even the total of discounts is greater than the invoice total, it will result in a minus amount, which is equivalent to a credit.
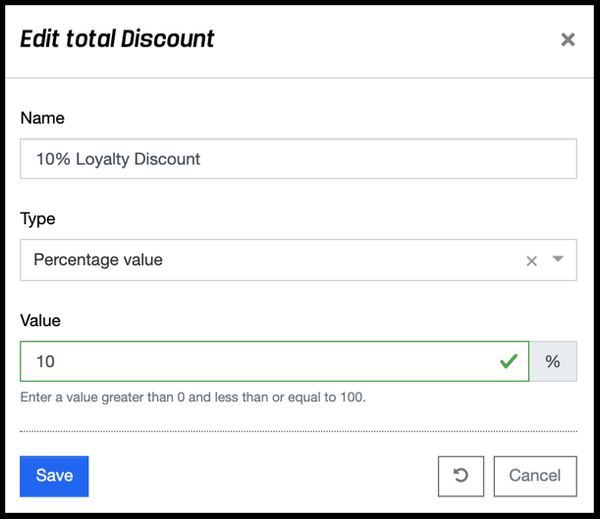
You can see if a total discount has already been deposited by the entries that appear below the "Total Net". A "Total Net incl. total Discount" is then also displayed.
Delete Invoice
An invoice can only be deleted if it is still in "Draft" status. All invoices with a more advanced status have already been assigned an invoice number and may not be deleted to ensure a complete traceability.
To delete an invoice in the "Draft" status, click on the "Delete Invoice" button in the top right corner of the detail view. This opens a confirmation dialog, which is closed with the action "Delete". After that, the invoice is irrevocably deleted, and you return to the overview of invoices.
Copy Invoice
An existing invoice can be copied from the detail view via the action "Copy invoice". A dialog opens to allow settings to be made for the new invoice.
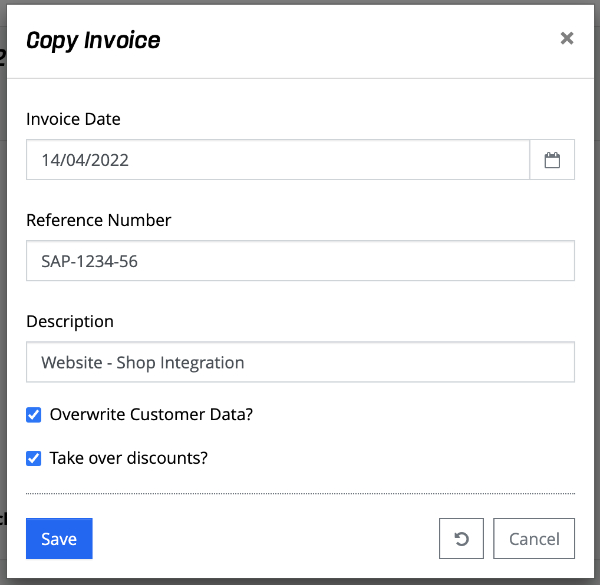
- Invoice Date: A new invoice date can be selected via a date picker dialog.
- Reference Number: The reference number of the invoice, which is usually named by the customer, can be adjusted.
- Title: The title should be adapted so that the new invoice can be clearly identified.
- Take over Customer Data: A checkbox can be used to determine whether the customer data should be taken over for the new invoice.
- Take over Discounts?: A checkbox can be used to determine whether the item and total discounts of the selected invoice should be taken over for the new invoice.
With the "Save" action, the new invoice is generated with the corresponding values in the "draft" status and can be edited directly. The "Reset" action restores the values specified from the selected invoice. The "Cancel" action cancels the copying process and closes the popup dialog.
Print Invoice
In order to print an invoice, a template must be assigned to it. Click on the "Print (Preview)" button in the detail view at the top right. This will automatically download the current invoice as a PDF document.
Send Invoice
An invoice can be sent as a PDF document via e-mail regardless of its status. This makes it possible, for example, to send a draft invoice to a customer and only finalize the invoice after approval. If the customer has change requests, these can be easily implemented without having to cancel the invoice.
As soon as an invoice is finalized, foreknown also creates the final PDF document with the invoice data.
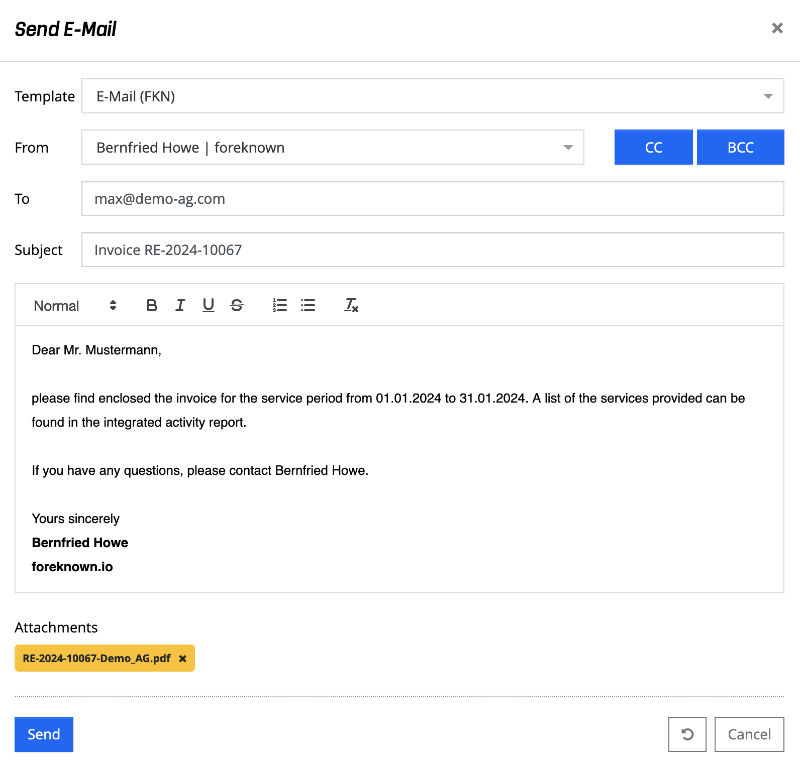
Sending via e-mail is triggered with the "Send Invoice" action. The "Send e-mail" dialog opens, which is preset with data from the "Standard Settings for Invoices and Activity Reports".
Further details on the "Default Settings for Invoices and Activity Reports" can be found in the online documentation under "System Administration / Settings".
The following properties can be set for sending the invoice via e-mail:
- Template: An e-mail template can be selected to be used as a frame for the subsequent text. You can add your own e-mail templates via the template management under "System Administration / Templates". A simple standard template, which only displays the text entered, is already supplied.
- From: The sender of the e-mail can be selected via a drop-down list. This is preset with the logged in user by default.
- To: One or more e-mail addresses can be entered in a text field, separated by commas. The field is prefilled with the e-mail address of the contact person stored in the invoice, provided that this person has been maintained and has an e-mail address.
- CC: If the "CC" button is selected, a further "CC" field appears, where e-mail addresses can also be entered, separated by commas. These will receive the e-mail in CC.
- BCC: If the "BCC" button has been selected, a further "BCC" field appears, where e-mail addresses can also be entered separated by commas. These will receive the e-mail in BCC.
- Subject: An e-mail subject can be entered. This is preset with the text "Invoice {invoiceNumber}".
- E-Mail Text: The text of the e-mail can be edited using a text editor with limited formatting options. If a text block has been selected in the "Standard Settings for Invoices and Activity Reports", the text is preset with replaced placeholders and can still be edited.
- Attachments: The file attachment of the invoice is displayed with the file name defined via the "Standard Settings for Invoices and Activity Reports" is displayed. If the activity report was not printed directly in the invoice, a second file attachment is displayed with the file name defined for activity reports. The activity report can be removed again using the "X" if required.
NOTE: It is possible via the standard settings for invoices or via the invoicing profiles to specify that all existing, non-internal documents that have been stored on an invoice under "Documents" are sent as separate PDF documents, as a combined PDF document or combined with the invoice document. (see Standard Settings for Invoices and Activity Reports)
The "Send" action sends the invoice and, if applicable, the activity report to the specified recipients with the specified subject, e-mail text and attachment. In addition, an entry is created under "Notes" which documents that the invoice and the activity report was sent by e-mail by the current user at the current time.
Activity Report
If invoice items of an invoice have been generated via the invoice wizard and are therefore based on services or additional services, there are additional options for outputting the services on the invoice.
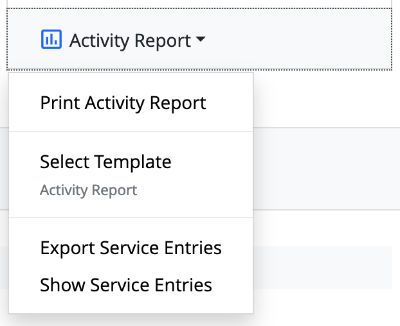
In this case, an additional "Activity Report" button is offered below the "Print" button, which provides a drop-down menu with various actions.
Print Activity Report
If the invoice is based on services and/or additional services, this action can be used to generate an activity report and to download it as a PDF document based on a previously selected template of the type "Activity Report".
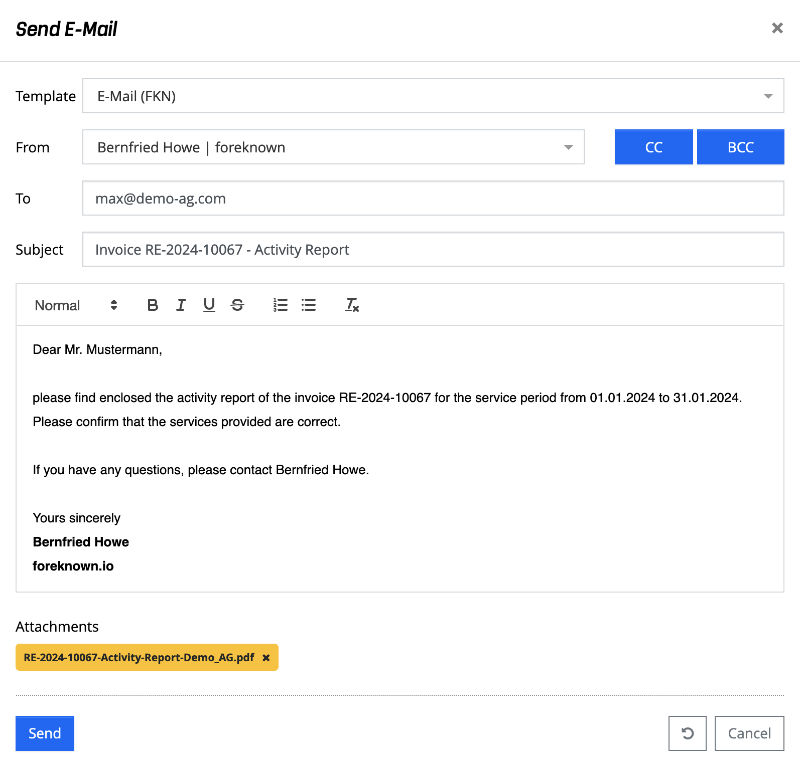
Send Activity Report
If the invoice is based on services and/or additional services, this action can be used to send an activity report as a PDF document via e-mail. The invoice can also still be in "Draft" status. In this way the activity report can be sent to the customer for approval before the invoice is finalized and therefore does not have to be cancelled again immediately in the event of change requests.
Sending via e-mail is triggered with the "Send Activity Report" action. This opens the dialog "Send E-Mail" dialog, which is preset with data from the "Standard Settings for Invoices and Activity Reports".
Further details on the "Default Settings for Invoices and Activity Reports" can be found in the online documentation under "System Administration / Settings".
The following properties can be set for sending the activity report via e-mail:
- Template: An e-mail template can be selected to be used as a frame for the subsequent text. You can add your own e-mail templates via the template management under "System Administration / Templates". A simple standard template, which only displays the text entered, is already supplied.
- From: The sender of the e-mail can be selected via a drop-down list. This is preset with the logged in user by default.
- To: One or more e-mail addresses can be entered in a text field, separated by commas. The field is prefilled with the e-mail address of the contact person stored in the invoice, provided that this person has been maintained and has an e-mail address.
- CC: If the "CC" button is selected, a further "CC" field appears, where e-mail addresses can also be entered, separated by commas. These will receive the e-mail in CC.
- BCC: If the "BCC" button has been selected, a further "BCC" field appears, where e-mail addresses can also be entered separated by commas. These will receive the e-mail in BCC.
- Subject: An e-mail subject can be entered. This is preset with the text "Invoice {invoiceNumber}".
- E-Mail Text: The text of the e-mail can be edited using a text editor with limited formatting options. If a text block has been selected in the "Standard Settings for Invoices and Activity Reports", the text is preset with replaced placeholders and can still be edited.
- Attachments: The file attachment of the activity report is displayed with the file name defined via the "Default Settings for Invoices and Activity Reports".
The "Send" action sends the activity report to the specified recipients with the specified subject, e-mail text and attachment. In addition, an entry is created under "Notes" which documents that the activity report was sent by e-mail by the current user at the current time.
Select Template
This action is only available for invoices with the status "Draft" and enables the assignment of a template for the creation of the activity report (PDF). Once an invoice has been finalised, the activity report, like the invoice itself is saved as a PDF document and can no longer be changed.
Note: A standard template of the type "Activity Report" is already provided via the template management. This template can be downloaded and customised. See the chapter in the documentation "System Administration / Templates"
Export Service Entries
In addition to generating an activity report (PDF), it is also possible to export service entries to MS Excel using a "service entry export" template. This action opens a pop-up dialogue that allows you to select a template.
Service exports can always be carried out regardless of the status of the invoice.
Note: A function that exports all additional service entries of an invoice to an MS Excel document, is not yet available.
Show Service Entries
This action opens the "Billing / Service Entries" dialogue with a filter on the current invoice, so that all the service entries on which this invoice is based are listed.
Note: A function that lists all additional services on an invoice is not yet available.
Edit Notes
Notes can be added to an invoice, e.g. from communication via telephone or e-mails, in order to document important information chronologically. Since notes are used in many areas of foreknown, you can find a detailed description of this functionality at Getting Started / Basics / Notes
Edit Documents
Additional documents, e.g. a signed, scanned activity report, can be uploaded to an invoice so that it can be sent later together with the invoice. To upload one or more documents for an invoice, select the desired invoice and open the "Documents" tab.
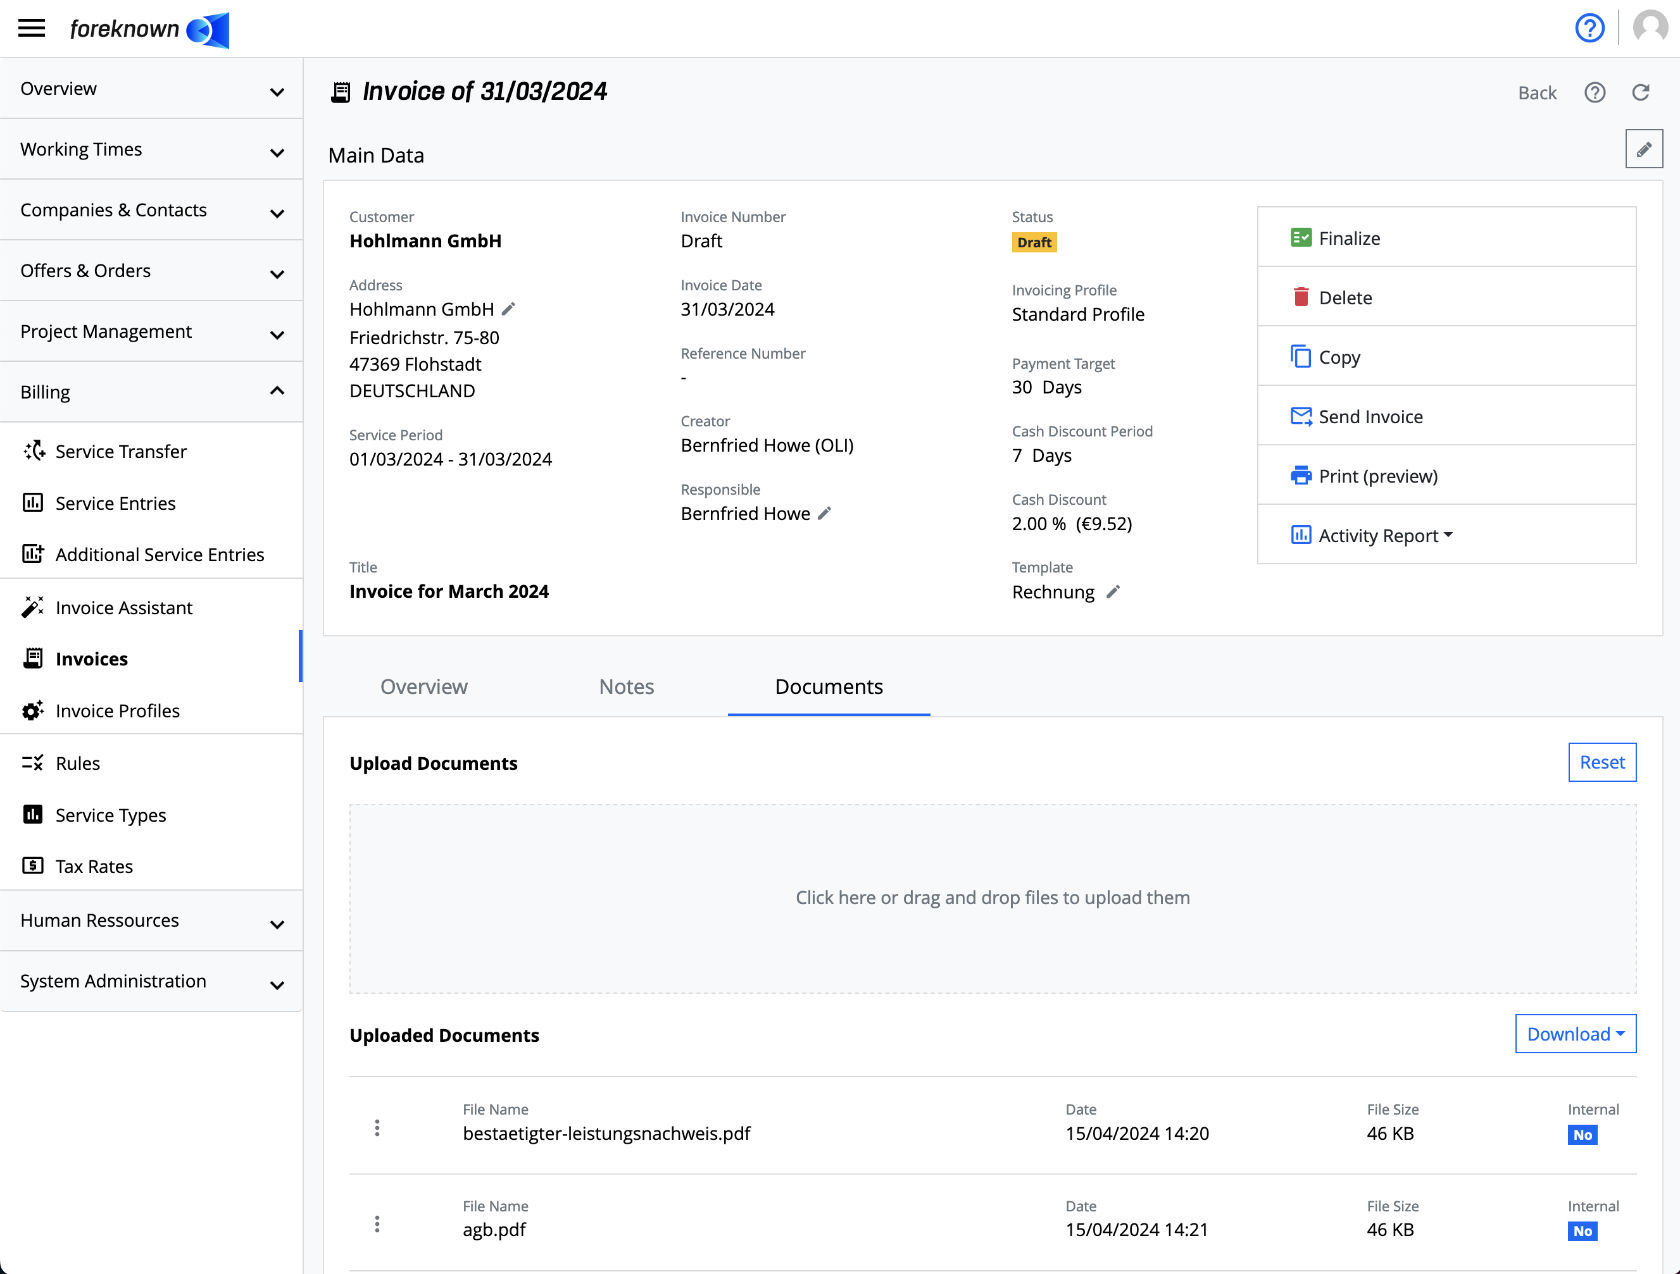
PDF documents can be added simply by drag & drop via a drop zone. All documents that have already been uploaded are listed below the drop zone. Each document has an action menu which offers the following actions:
1 Download: The document is downloaded to the local computer. 2 Edit: A dialog opens in which you can specify whether it is an internal or public document. Internal documents cannot be sent to the customer by e-mail. 3 Delete: The document is removed from the list after confirmation.
You can also use the "Download" button above the list on the right-hand side,
- download all public documents as one PDF document.
- download all internal documents as one PDF document.
NOTE:** Only documents of the mime type "application/pdf" can be uploaded as invoice documents. Thereby the document must not exceed a size of 20 MB.
Change Invoice Status
Invoices can have different statuses that make it clear where an invoice is currently in the process and what actions are possible. All statuses and the possible actions are shown below.
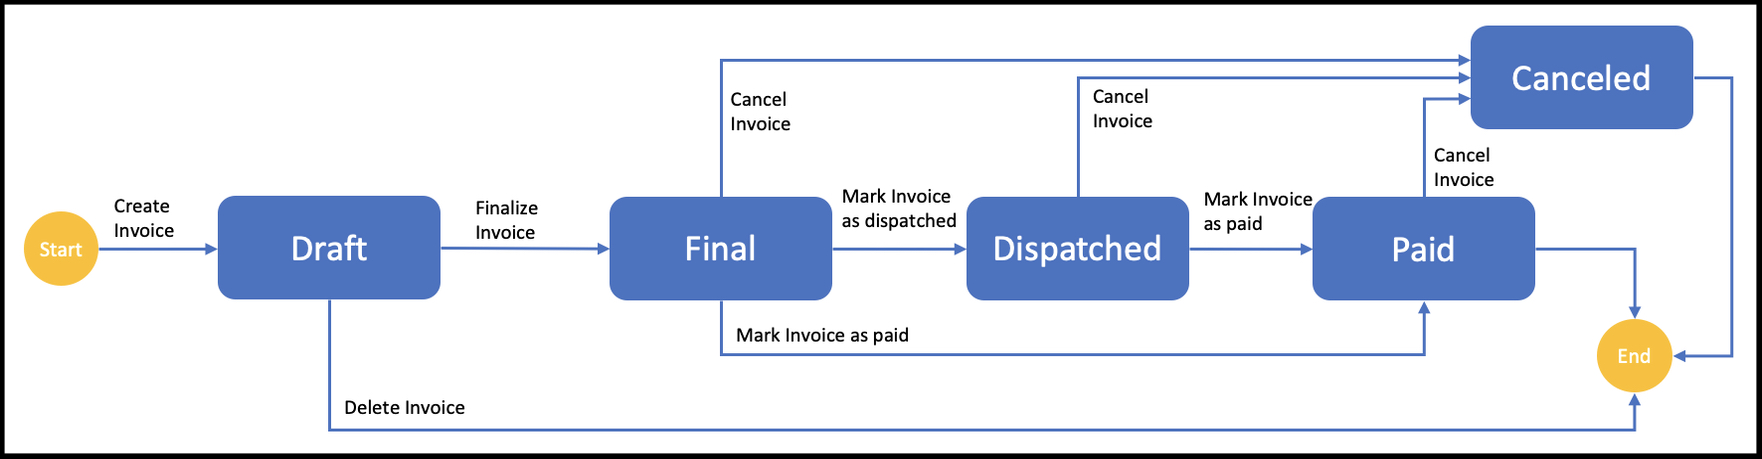
Each invoice is initially created with the status "Draft". This status still allows for full editing and deletion of the invoice. Furthermore, these invoices have not yet received an invoice number from the associated number range. Once the invoice has been completed, it can be finalized (see Finalize Invoice).
If a final invoice has been dispatched to the customer and the customer has paid, the invoice can be set to "paid". However, if the invoice was incorrect, it can be cancelled again. In this case, a cancellation invoice is also generated as an offsetting entry with negative values and assigned to the cancelled invoice.
Finalize Invoice
This action assigns an invoice number to an invoice and sets the status to the final state. A pop-up dialog will open to indicate whether all conditions for finalization are met.
The following conditions must be met to "Finalize" the invoice:
- Template: An invoice template is needed to generate the print version.
- Invoice position: At least one invoice position must have been created.
Furthermore, notes on missing information are given:
- Title: A title for the invoice should be stored so that the invoice can be better identified.
- Introductory text: An introductory text can be entered in the overview area.
- Closing text: In the overview area a closing text can be entered.
If "Finalize Invoice" is clicked in the pop-up dialog, the invoice status will be set to "Final".
NOTE: This action cannot be undone.
Dispatch Invoice
When an invoice has been sent to the customer, the status can be set to "Dispatched". This can be achieved by clicking on the green "Set as 'Dispatched'" button. A pop-up dialog will open where the action must be confirmed.
Once the status is set to "Dispatched" the invoice can only be set to paid, cancelled, send or printed.
NOTE: This action cannot be undone.
Invoice Paid
When an invoice has been paid by the customer, the status can be set to "Paid".
This can be achieved by clicking on the green "Set as 'Paid'" button. A pop-up dialog opens in which the payment date of receipt of the payment can be set. The process is finalised with the "Save" action.
Once the status is set to "Paid", the invoice can only be cancelled, sent or printed. From this moment the "Paid at" property is also displayed and can be edited.
NOTE: This action cannot be undone.
Cancel Invoice
An invoice can be cancelled, if necessary, by clicking the red "Cancel Invoice" button in the detail view. If the invoice status is "Cancelled", the invoice can only be printed.
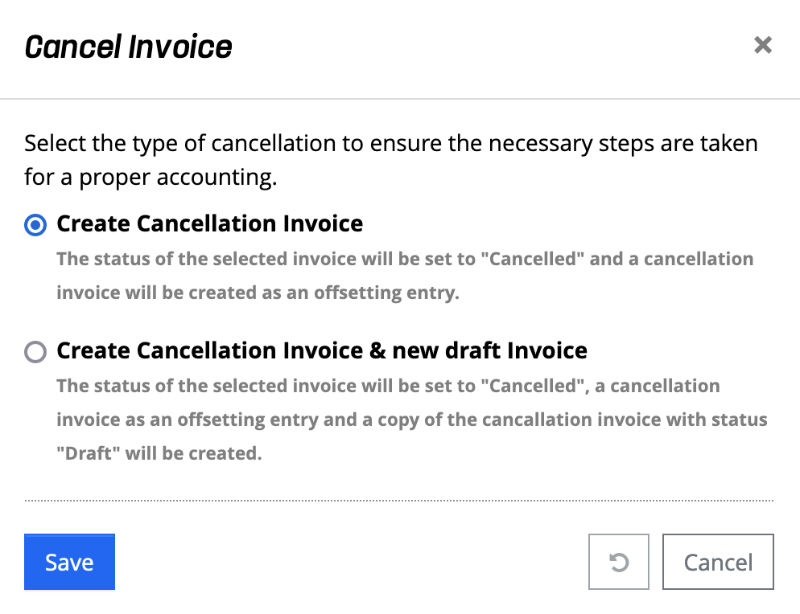
A popup dialog will open offering two actions for selection:
- Create Cancellation Invoice: The status of the selected invoice will be set to "Canceled" and a cancellation invoice will be created as an offsetting entry.
- Create Cancellation Invoice & new draft Invoice: The status of the selected invoice will be set to "Canceled". and a reversal invoice will be created as an offsetting entry (negative values) and a copy of the reversed invoice will be created in status "Draft" is created.
Below the selection, you can specify a date that will be used as the invoice date for the cancellation invoice and, if the second option is selected, also for the draft invoice. The current date is already suggested.
Note: Despite selecting a new invoice date, the payment terms for the cancellation invoice are always issued in relation to the invoice date of the canceled invoice.
The generated cancellation invoice can have two statuses:
- Cleared: In this case, the cancelled invoice was not yet in the "Paid" status. Thus the cancellation invoice represents the offsetting entry for the canceled invoice and the customer account is cleared.
- Not cleared: In this case, the canceled invoice is already marked as "Paid". Thus, another offsetting entry to the canceled invoice is generated with the cancellation invoice. Action is therefore still required to balance the customer account. As soon as this has been taken care of, the "Cleared" action can be used to set the status of the cancellation invoice to "Cleared".
Both the cancelled invoice and the cancellation invoice offer a link in an info block above the master data to jump to the respective other invoice.
If the invoice status is "cancelled", the invoice can only be printed or copied. A cancelled invoice can only be printed and will then show the necessary information:
- Title is "Canceled Invoice"
- A reference to the cancelled invoice is given with invoice number and date.
NOTE: This action cannot be undone. Furthermore, when customizing the invoice template it should be noted that the above information is always taken into account for printing a cancellation invoice, since there is exactly one template exists for all invoice types.
Support of electronic Invoices
From January 1, 2025, an electronic invoice (e-invoice) must be used regularly for transactions between domestic companies. E-invoices are sent by email in the familiar PDF/A-4 format. They can be opened and read like normal PDF files. However, machine-readable XML files are attached to these files, which enable automatic processing of electronic PDF invoices in the accounting department.
In foreknown, the format in which the machine-readable XML file is to be generated can be specified both via the invoicing profiles and directly on the invoice via the “Data Exchange Format” selection.
- EN 16931: In order to establish a uniform technical standard for e-invoicing throughout Europe, the EU has developed a standard (CEN 16931) for the data format for electronic invoicing.
- XRechnung: In Germany, the federal and state governments have developed the XRechnung invoice format. XRechnung has been the standard for implementing the e-invoicing directive in public administration since June 22, 2017. XRechnung thus forms a basis for the exchange of electronic invoices with German administrations.
As soon as an invoice for which a data exchange format has been defined is finalized, the system checks whether all the necessary data for an e-invoice is available in the selected format. If the data for the invoice is incomplete, corresponding errors are displayed. These may be missing information
- on the customer (e.g. Leitweg-ID, address data, ...)
- on the company profile (e.g. country code, VAT ID, ...)
- on the invoice (e.g. contact person, introductory text, ...)
- on the units used (e.g. the international trade code).
If all the required invoice data is available, an XML is generated in the selected data exchange format and added as an attachment to the PDF document of the invoice. This means you can use foreknown to generate invoices that comply with the e-invoice standard.
HINT: You can use tools like Quba to open and view e-invoices and how all invoice data has been mapped to the fields of the selected exchange data format (EN 16931 or XRechnung). See https://quba-viewer.org. The implementation of e-invoice support is based on ZUGFeRD 2.3.2 or Faktur-X 1.07.2 on the basis of the Mustang project. Further links are:
- ZUGFeRD: https://www.ferd-net.de/standards/zugferd/index.html
- Mustang project: https://www.mustangproject.org/
- Leitweg-ID: https://www.e-rechnung-bund.de/faq/leitweg-id/