Service Transfer - Time Tecording
- Filter Working Times
- Apply Rules
- Action Menu - List and Selections
- Action Menu for individual Working Time Bookings
- Sevice Transfer for Project Managers
Service Transfer Payment Schedule
Introduction
Via the service transfer you ensure in foreknown that on the one hand all booked working times from the time recording are transferred into service entries and on the other hand due payment plan entries from fixed price projects are transferred into additional service entries and thus made billable.
The "Service transfer" dialog is accessed via the menu item "Invoice / Service transfer". Initially, the "Time Recording" area is active and the list of working times that have not yet been transferred is displayed. To call up the service transfer, you need the role "Accountant" or "Project manager", whereby certain restrictions apply for project managers (see Service transfer for project managers).
Overview
Service Transfer - Time Recording
The "Service Transfer - Time Recording" function is used to manually or automatically transfer all booked working times of your internal and external employees into billable services (for orders based on time and effort) or into calculatory services (for internal and fixed-price orders).
Working times can be assigned to individual order positions and service types on the basis of rules that evaluate the labels of the working time bookings. You can use a property on the rules to decide whether a rule should be applied automatically or whether manual confirmation of the service transfer is desired.
The service transfer, together with the rules and labels, thus represents a central tool of foreknown to ensure timely creation of services and thus monetary values from booked working hours for up-to-date reporting and correct billing.
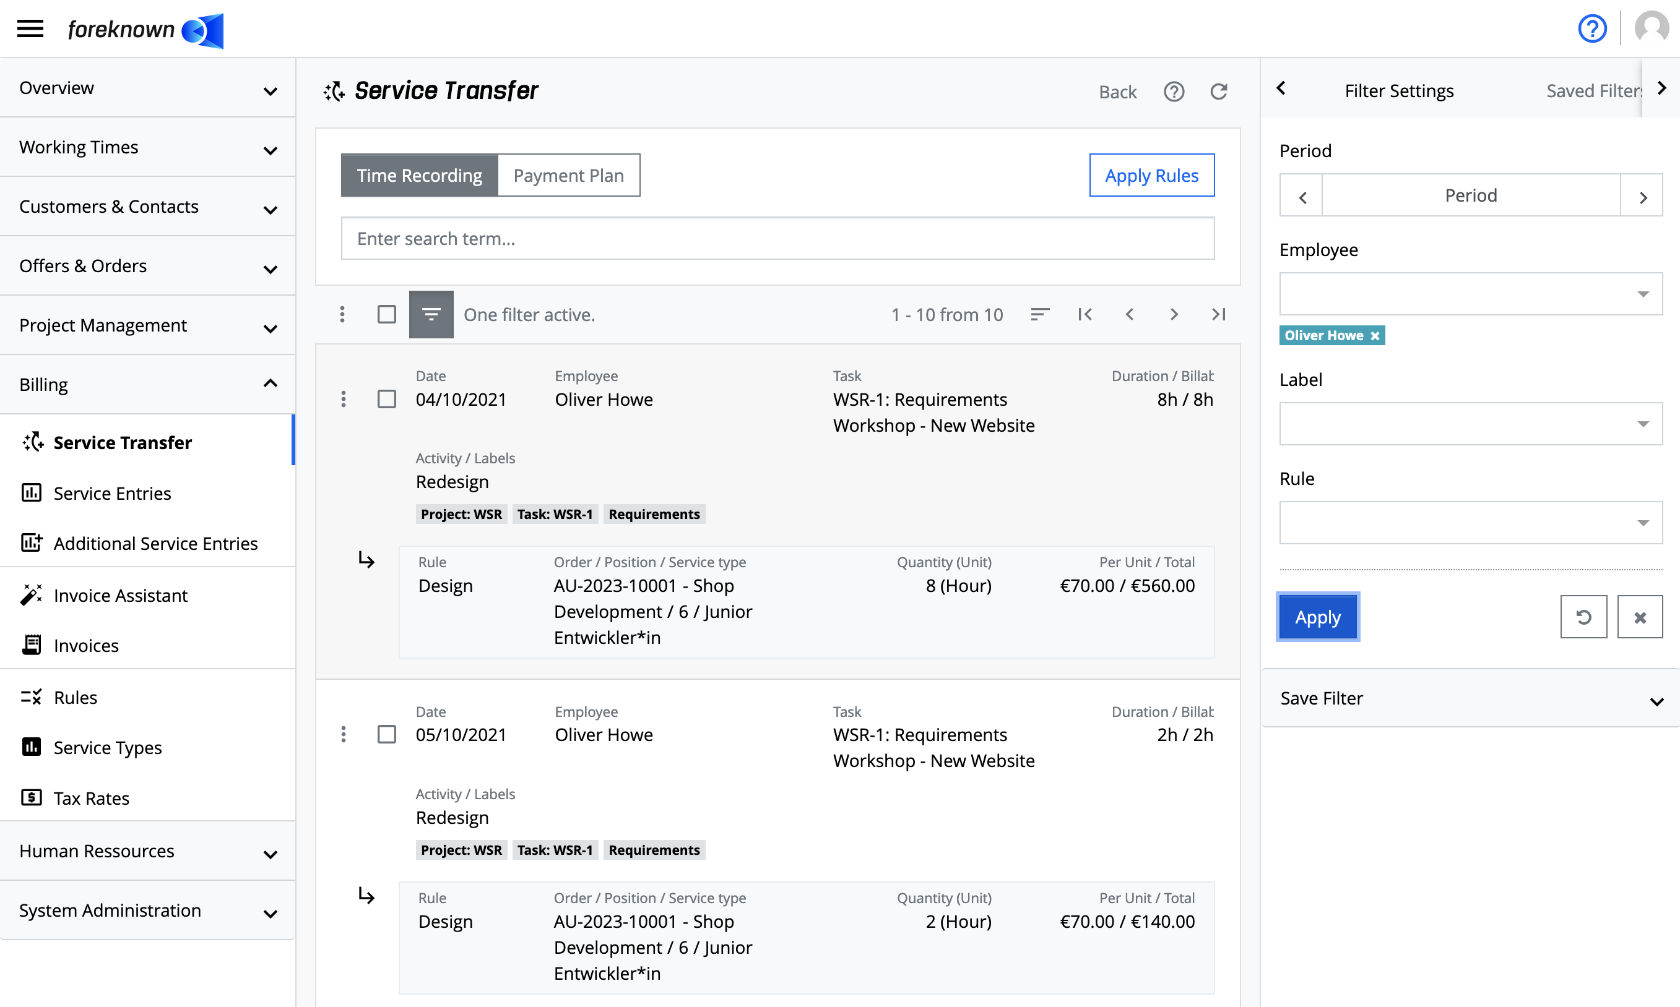
A list entry contains the following properties:
- Action menu: Contains the actions that can be performed per working time entry.
- Checkbox: Provides the possibility to select individual entries of the list.
NOTE: Currently no actions are available on selected entries.
- Date: Displays the posting date of the working time booking.
- Employee: Displays the name of the employee of the working time booking.
- Task: Displays the id and name of the task of the working time booking.
- Duration/Billable: Shows the actual duration of the working time and a billable duration in hours/minutes. So it can be decided by the employee but also afterwards by the project manager what should be the duration to be invoiced to the customer in the end. A red value means that a different duration of billable time has been entered for the booked working time.
- Activity/Labels: Shows the activity description and all assigned labels.
- Below the data of the working time booking it is displayed whether a rule has taken effect and if so, which order,
order position and service type results from it. If a rule could be assigned, the following information appears:
- Rule: Name of the rule (basic rule), if one could be assigned due to a label.
- Order / Position / Service type: The order no. and label, the position number and the name of the service type are displayed, which could be assigned due to the rule.
- Number (Unit): The billable duration of the working time with the corresponding unit (hour/day).
- Single / Total: Displays the hourly/day rate of the service and the total sum considering the duration.
If a working time could not be clearly assigned to an order and service item, various error messages are displayed describing the cause:
- No basic rule applicable No basic rule could be assigned because the working time entry does not have a label that would be required for an assignment of a basic rule.
- No detail rule applicable No detail rule could be assigned because the working time entry does not have a label that would be required for an assignment of a detail rule.
- Multiple basic rules found: This error appears if more than one basic rule was found for a working time. The reason for this can be the use of several labels that are used as criteria in several basic rules.
- standard label of the order position incorrect: This error appears if one has used the standard label ORDER:
-<POS>, but a non-existent order or position no. has been used. - Order item already completed/cancelled: The status of the order item is already set to "Completed" or "Canceled" and therefore the order item can no longer accept any services.
- Standard label referenced invalid order line item: This error appears if you have used the standard label ORDER:
-<POS> but referenced an order line item of the type "Other line item". - Order item budget exceeded: This error appears if the total of the services assigned to an order item exceeds the total of the order item and the "Limit entry" setting has been activated for the order item.
- Service item budget exceeded: This error appears if the total of the services assigned to a service item exceeds the total of the service item and the "Limit entry" setting has been activated for the service item.
- Default label of the service item: This error appears if one has used the default label SERVICE:
, but a non-existent abbreviation of a service type has been specified. - Service type not allowed: This error message appears if an attempt is made to post a service to an order item whose service type does not occur in any of the service items and where the order item has not had the "Allow entry of all service types" property set in the configuration.
- Service already billed: This error message appears when a working time is booked that is assigned to an order/service item that is billed on a daily basis, but the specified booking day has already been billed.
Filter Working Times
On the one hand, there is a search field above the list in which a search term can be entered. Then only working times are displayed that have the search term in the activity description. Furthermore, you can use the action "Show Filter" (button with three horizontal lines) on the right side the filter dialog can be shown or hidden again.
The following filter criteria are now offered here:
- Period: The predefined time periods "current day", "current week", "current month", "current quarter" and "current year" can be selected via a drop-down list. In the case of predefined time periods, the navigation buttons "<" and ">" can be used to scroll to the previous or subsequent time period in each case. 2. furthermore, an individual time period can be selected via the entry "period" using the dialog "select period" among others. 3. the action "Reset" deletes the period filter.
- Employees: Here you can filter for employees of the working time bookings via a drop-down list.
- Label: Here one or more labels can be selected via a drop-down list. Only working times that have all selected labels (AND link) are then displayed.
- Rule: Here a drop-down list can be used to filter for working times that could be assigned to a specific rule based on the Project:... label can be filtered.
With the action "Save" the filters are applied. With the action "Reset" and "Cancel" the entries are discarded and in case of the action "Cancel" all filters are removed.
Documentation note: For general information about the filter options see also in chapter Basics: Filters.
Action: Apply Rules
The action "Apply rules" can be used to transfer individual or all working times, which could already be uniquely assigned to an order, an order item and a service type on the basis of a rule, into corresponding services. The action is started via the "Apply rules" button above the list or via the action of the same name in the list action menu and opens the following popup dialog.
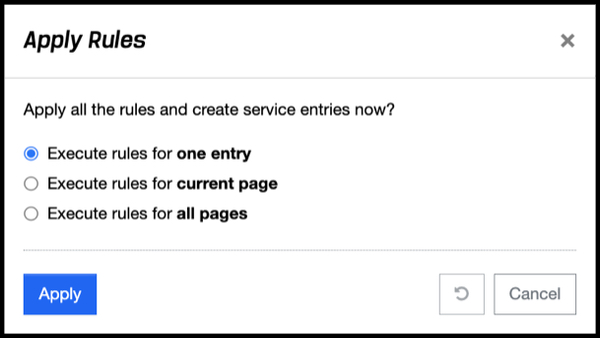
This dialog offers you the possibility to choose from three options:
- Execute rules for n entries: When applying the rules, this option only takes into account the entries that were previously selected via the checkboxes in the list. Entries that are no longer visible on the current page are also included.
- Execute rules for the current page: This option considers all working hours of the currently selected page.
- Execute rules on all pages: This option takes into account all working times that are available for service transfer.
After successful execution of this action, only those working time entries will remain in the list for which no rule could take effect or for which an error occurred during the transfer (see the error list in the [Service transfer - time recording](#service transfer - time recording) area). Such entries can occur for various reasons:
- Labels missing: The working time does not have the necessary labels to be able to assign a basic rule or a detail rule. In this case, either the employee can be asked to add the appropriate labels to the working time. It is also possible to add the missing labels directly via the "Edit working time" action.
- Rule missing: Another reason can be that the required basic rule or detail rule for a working time has not yet been created. In this case, the missing rule should be created via Manage rules.
- Error during transfer: An error occurred during the transfer of one or more working times into a service. (see error list in the area service transfer - time recording)
NOTE: When transferring the working times of a day to an order item with billing by daily rates, several working times are combined into one service. In this case, all activity descriptions of the working time bookings are transferred to the activity description and thus also appear in the activity report.
List - Action Menu
Various actions can be performed using the action menu of the list of working time entries. Actions below the "Selection (n)" separator also consider a selection of individual entries of the list.
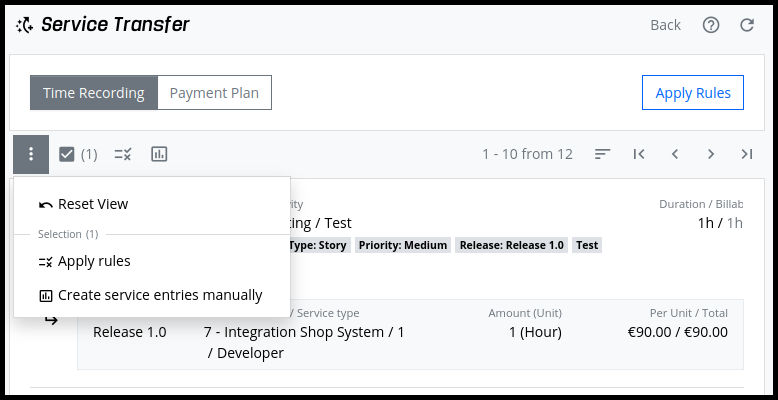
Reset View
This action resets the entire "Service transfer" page to its initial state. Among other things, all filters are removed and the sorting is reset.
Selection: Apply Rules
This action opens a popup dialog to select which working time bookings are to be taken into account for the service transfer. See also Apply rules
Selection: Create Services manually
This action opens the "Create Service" dialog, which can be used to select an order, an order item and a service type. (see also Create service manually)
Working Time Booking - Action Menu
Each individual working time booking has an action menu through which subsequent actions can be performed.
Edit Working Time
To edit a working time, you can either simply click on the working time with the mouse or select the action "Edit working time" via the action menu (three dots symbol) at the beginning of each line.
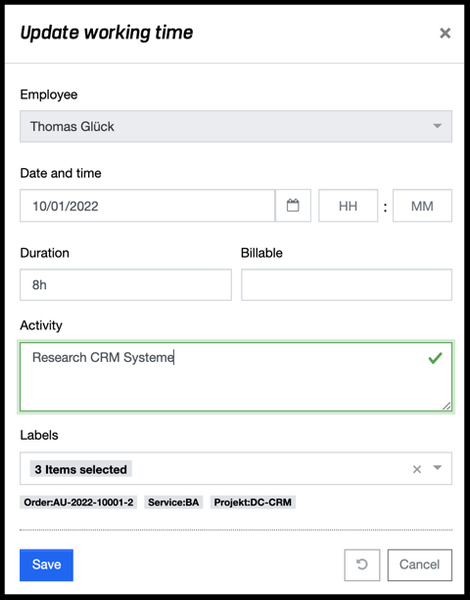
There are several reasons why it is necessary to edit the working time from the service transfer:
- The description of the activity is not sufficient and needs to be adjusted, as it also appears on the activity record for the customer.
- The working time is not to be accounted for in full. Thus, the desired, deviating duration must be entered in the "Billable" field.
- The working time does not have all the required labels and therefore cannot be assigned to a basic or detailed rule. The labels can then simply be added. After saving the changes, the desired rule should already take effect.
The following properties can be edited:
- Date and time: The date and time of the booked working time.
- Duration: The duration of the working time.
- Billable: The amount of the working time which is billable.
- Activity: The activity which was performed during the working time.
- Labels: With the help of the labels, rules can be directly assigned to the working times.
The "Save" action saves the changes made to the working time. With the action "Reset" and "Cancel" the entries are discarded and in case of the action "Cancel" the dialog is closed.
Create Service Entries manually
A working time entry in the service transfer list can also be manually transferred to a service. Two options are available for this purpose:
- The action "Create service entries manually" can be called up via the action menu in front of the working time entry, which opens the "Create Service Entry" dialog for the selected entry.
- Several working time entries can be selected via the checkboxes. Via an action above the list, which only appears if at least one working time entry has been selected, or the action menu above the list, the "Create Service Entry" dialog can also be called up. The action then affects all selected working time entries.
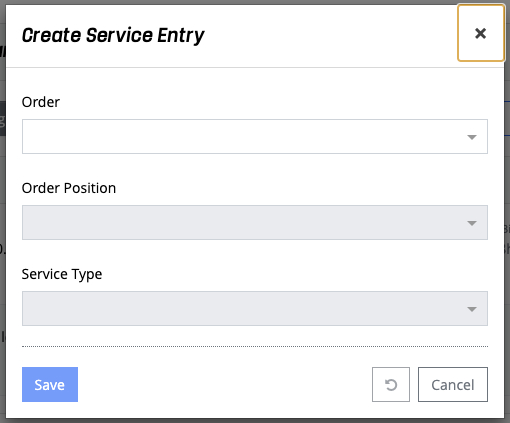
The following properties must be specified for the service:
- Order: An order to which the service entry will be assigned must be selected from an auto-fill field.
- Order Position: This field becomes active only after selection of an order. A position from the order must be selected via an auto-fill field.
- Service Type: This field only becomes active after an order position has been selected. Here a service type from the order position must be selected via an auto-fill field.
With the action "Save" a new service is created. With the action "Reset" and "Cancel" the entries are discarded and in case of the action "Cancel" the dialog is closed.
Service Transfer for Project Managers
A project manager has some restrictions in the service transfer.
- Only the working hours are shown to him, which are also booked on a task of a project assigned to the project manager.
- The filter option "Label" is limited for the project manager to the labels that result from the working times of tasks of assigned projects.
- The "Rule" filter option is restricted for the project manager to the rules created for projects for which the project manager is authorized. Additionally, only rules of projects that have the status "Planned" or "Started" are displayed.
- In the list view, a project manager has access only to the "Time Recording", not to the "Payment plan" area. Also, only the working times that have a project label from a project in which the project manager is authorized are displayed here.
Service Transfer - Payment Plan
Services rendered from fixed-price orders are usually billed based on a defined payment plan. Individual payment plan entries are linked to certain conditions. Once the conditions are met for a payment plan entry, it can be billed.
In foreknown, this process is mapped via the service transfer. Via the button "Payment plan", which is offered to a user with the role "Accountant" in the upper left corner, the following dialog is accessed.
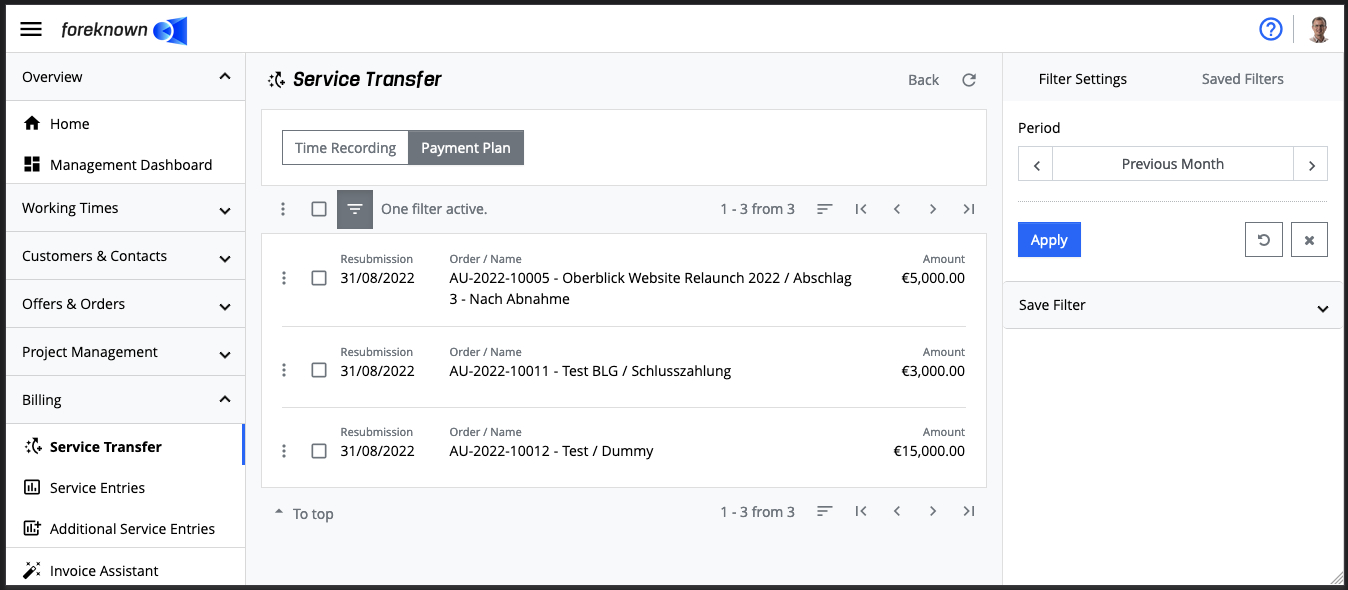
This dialog displays all payment plan entries due up to the current date in descending order of the resubmission date. The following describes how to filter this list and transfer the individual entries into billable additional services.
Filter Payment Plan Entries
Above the list, the "Show Filter" action (button with three horizontal lines) on the right-hand side can be used to show or hide the filter dialog. The following filter criteria for services are now offered here:
- Period:
- The predefined time periods "current day", "current week", "current month", "current quarter" and "current year" can be selected via a drop-down list. In the case of predefined time periods, the navigation buttons "<" and ">" can be used to scroll to the previous or subsequent time period in each case.
- Furthermore, an individual time period can be selected via the entry "period" using the dialog "select period" among others.
- The action "Reset" deletes the period filter.
The "Apply" action applies the filter and only payment plan entries whose resubmission date falls within the selected period are displayed. The "Reset" and "Cancel" actions discard the entries, and in the case of the "Cancel" action, all filters are removed.
Documentation Note: For general information on the filter options, see also the chapter Basics: Filters.
List - Action Menu
Currently, only the "Reset view" action is offered via the action menu of the payment plan entries list.
Reset View
This action resets the entire "Service Transfer" page to its initial state. Among other things, all filters are removed and sorting is reset.
Payment Plan Entry - Action Menu
Each individual payment plan entry has an action menu that can be used to perform subsequent actions.
Change Resubmission
This action opens a dialog that can be used to change the resubmission date of the payment plan entry. For example, if you determine that the conditions for the payment plan entry have not yet been met, you change the resubmission date to a new date in the future and the payment plan entry is then resubmitted for service transfer.
Create Additional Service
Payment plan entries are billed using additional services. This action opens the following popup dialog.
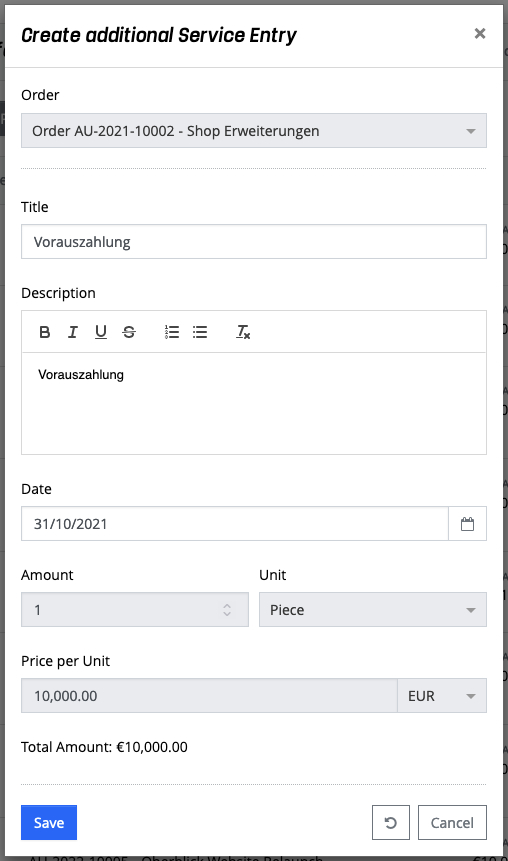
The following properties can be entered for the creation of the additional service or, if applicable, are already preassigned with information from the payment plan entry.
- Order: This field shows the order on which the payment plan entry is based. It makes sense that the order cannot be changed.
- Title: The name of the additional service. This is printed on the invoice and defaults to the title of the payment plan entry. It is necessary to enter a title.
- Description: An optional description of the additional service. This will be included on the invoice and pre-populated with the payment plan entry description.
- Date: The billing date of the additional service. This will be pre-populated with the resubmission date of the payment plan entry. The date is required.
- Number: The value is taken from the payment plan entry and cannot be adjusted.
- Unit: The value is taken from the payment plan entry and cannot be adjusted.
- Price / Unit: The value is taken from the payment plan entry and cannot be adjusted.
- Total amount: The value is taken from the payment plan entry and cannot be adjusted.
The "Save" action creates an additional service that is displayed under "Invoice / Additional Services". All additional services that have not yet been billed can finally be invoiced and billed via "Invoice / Invoice Assistant".