Table of Contents
Step 1 - Filtering
Step 2.2 - Invoicing Service Entries
Step 2.2 - Billing of additional Service Entries
Step 3 - View Draft Invoice
Introduction
The Invoice Assistant gives you the option to convert your billable service and payment plan entries into invoices with just a few clicks as soon as they are due.
Several steps are run through until a final invoice is created at the end.
Step 1: Select Customer and Billing Period
If you open the dialog of the same name via the navigation with the action "Invoice Assistant", the first step is to display an overview that lists the amount of service entries due per customer and, if applicable, also additional service entries.
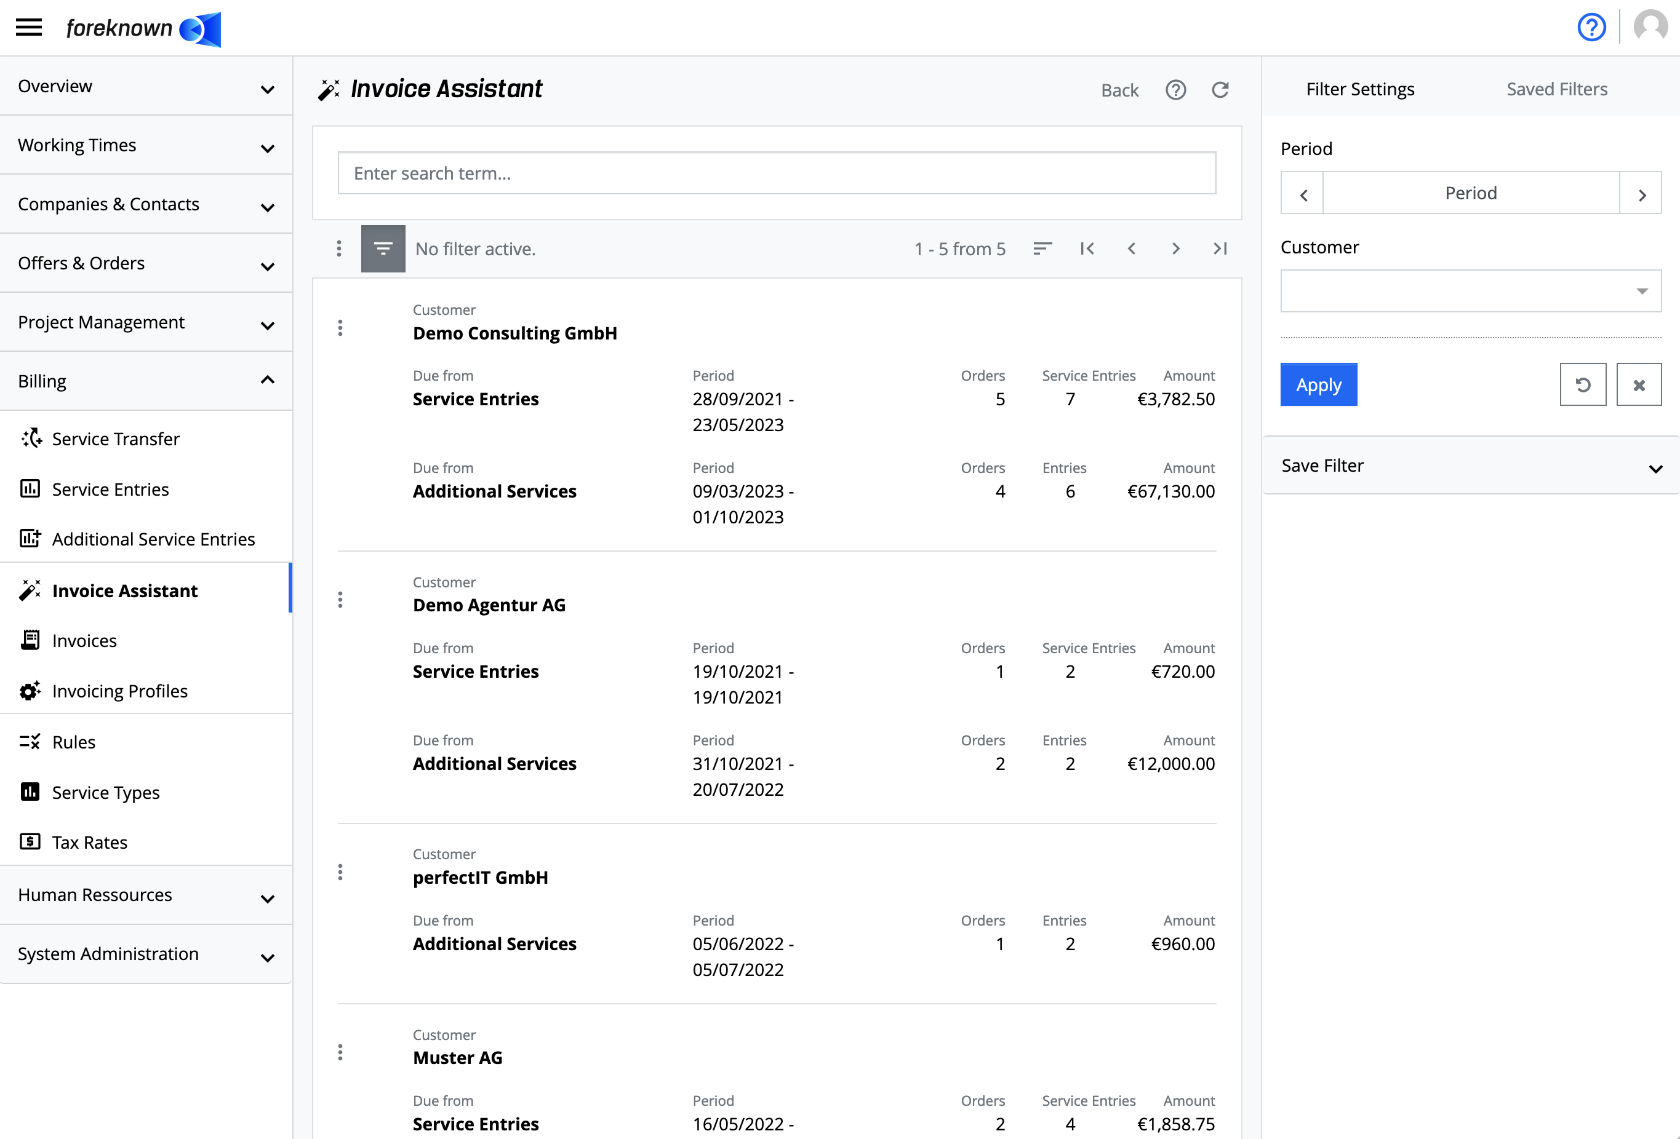
The search field is located in the upper part of the dialog. If you enter a search term in the input field, the list will only show the customers that contain the entered search term in their name. In this way, the list can be quickly narrowed down to a single customer.
However, the recommended procedure in this step is to first use the filter to make the necessary restrictions. The filter is opened as usual via the button with the three dashes above the list.
- Period: The billing period should be selected first, e.g. the past month. This ensures that only the service entries that can be billed according to the agreement with the customer are included in the invoice. A selected period will initialize the service period of the invoice.
- Customers: If the list of customers is quite long, it is also possible to filter by one or more customers in order to create invoices for these customers first.
The next step of the invoice assistant is reached via the action menu of the individual customer entries:
- Invoice Service Entries: If billable service entries exist for the customer for the selected time period, this action is selectable and you get to the second step.
- Invoice additional Service Entries: If there are additional service entries due for the customer, this action is selectable and you get to the second step.
Step 2.1: Invoice Service Entries
In order to invoice a service via the invoice wizard, the action "Invoice Service Entries" must be selected via the action menu (three dots symbol) at the beginning of the desired line. The following dialog will open:
Billing Period
If a period has not already been set via the filter in step 1, an billing period can also be set in this step via the "Period" selection field at the top right to set a billing period. You can set a predefined period such as the current month or an individual period.
Only services that fall within the selected period are taken into account.
Invoicing Profile
Invoicing profiles can be used to define certain properties for the creation of an invoice.
Documentation: You can find more information about creating invoicing profiles for customers in the documentation under [Invoicing Profiles](/en/docs/functions/billing/invoicing profiles).
If no invoicing profile is selected, the settings made via "System Administration / Settings" as "Standard Settings for Invoices and Activity Reports".
Documentation:** You can find more information about maintaining the default settings in the documentation under System Administration / Settings.
When selecting an invoicing profile, the grouping of services is also set, among other things. This has a direct effect on the listing of invoice items per order.
Grouping
The "Grouping" drop-down selection field can be used to set how the services are to be grouped. The grouping, which results from the selected invoicing profile, can be changed if necessary.
NOTE: Regardless of the selection of the following grouping types, a grouping is always done first by order. Then the selected grouping properties are added and finally the grouping is always by unit and unit price. The latter is necessary to ensure that an invoice item does not combine different units and unit prices.
Example: Grouping by service type means grouping by order, service type, unit, unit price.
Following grouping options are supported:
- No additional grouping: In this case, only the grouping by order and hourly / daily rate described above is carried out.
- Month: All service entries are additionally grouped by month based on the service entry date.
- Service Type: All service entries are additionally grouped by service type.
- Service Type and Employee: All service entries are additionally grouped by service type and employee.
- Employee: All service entries are additionally grouped by employee.
- Employee and Service Type: All service entries are additionally grouped by employee and service type.
- Order Position, Service Type: All service entries are additionally grouped by order position and service type.
- Order Position, Employee: All service entries are additionally grouped by order position and employee.
If a grouping type is selected that includes employees, the cost center, if available, will also be written behind the employee in the invoice position text.
Display Service Entries
To display the service entries behind an invoice item, you can click on the small chart icon behind the title.

You will be redirected to the "Service Entries" dialog, where the filter for the services is already preset to the order, the service type of the invoice item from the invoice assistant and to the status "New".
Create Invoice(s)
Depending on the scope of billable services, there may be several options for how the services grouped into invoice items per order according to the selected grouping can be invoiced.
Create individual invoices (all orders)
If there are billable services and additional services for several orders for a selected customer, this action can be used to trigger the automatic creation of multiple invoices (one per order).
Create total invoice (all orders)
If there are billable services and additional services for several orders for a selected customer, this action can be used to automatically create a single invoice with all services for all orders.
A text item is created in the invoice for each order so that the associated invoice items are always introduced with the information about the associated order.
Create new invoice (per order)
If you execute this action for an individual order, a new invoice is created directly with the listed invoice items of the underlying order.
Add to existing invoice (per order)
If you execute this action for an individual order, a pop-up dialogue opens that allows you to both create a new invoice, but also allows you to select an existing draft invoice. In this case the invoice items are added to the selected draft invoice. This function is well suited, for example, for the For example, this function is well suited to the use case where you want to include both due services and due additional services (travel expenses, licences, ...) of an order on one invoice.
Step 2.2: Invoice additional Service Entries
To invoice an additional service entry via the invoice assistant, you can select the action "Invoice additional Service Entries" via the action menu (three dots icon) at the beginning of each line. This will open the "Invoice additional Service Entries" dialog.

Billing Period
If a period has not already been set via the filter in step 1, a billing period can also be set in this step via the "Period" selection field at the top right to set a billing period. You can set a predefined period such as the current month or an individual period.
Only additional services that fall within the selected period are taken into account.
Invoicing Profile
Invoicing profiles can be used to define certain properties for the creation of an invoice.
Documentation: You can find more information about creating invoicing profiles for customers in the documentation under [Invoicing Profiles](/en/docs/functions/billing/invoicing profiles).
If no invoicing profile is selected, the settings made via "System Administration / Settings" as "Standard Settings for Invoices and Activity Reports".
Documentation:** You can find more information about maintaining the default settings in the documentation under System Administration / Settings.
When selecting an invoicing profile, the grouping of additional services is also set, among other things. This has a direct effect on the listing of invoice items per order.
Grouping
The "Grouping" drop-down selection field can be used to set how the additional services are to be grouped.
NOTE: Regardless of the selection of the following grouping types, grouping is always carried out first according to the type of additional service. A distinction is therefore made between partial payments and standard additional services. Furthermore, the order is always used as the second grouping characteristic. Then the selected grouping properties are applied and, finally, grouping is always based on tax rate, unit and unit price. The latter is necessary to ensure that an invoice item does not combine different tax rates, units and unit prices.
Example: Grouping by title means grouping by type, order, title, "tax rate, unit and unit price ".
The following groupings are supported:
- Itemization: All additional services are grouped by type and order and shown individually per group.
- Title: All additional services are also grouped by the title of the additional service. (default value)
Create Invoice
Click on the "Invoice" button to open the "Create invoice" dialog:
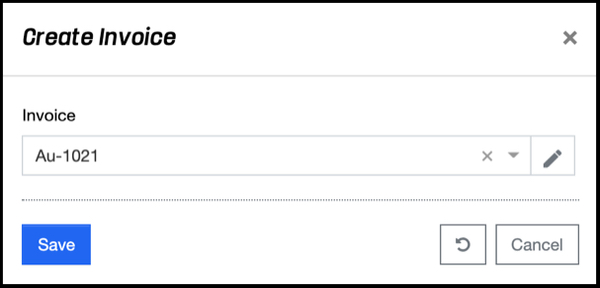
There are now two ways to add the selected additional services to an invoice:
- Create new invoice: You create a new invoice using the "+" button and then select it directly. directly. (see also Create invoice)
- Extend existing invoice: You are looking for an existing draft invoice. In this case, the invoice items are added to the draft invoice. This function is well suited, for example, for the use case that you want to add both due services and due additional services of an order to one invoice.
With the "Save" action, the additional services are added to the selected invoice. With the action "Reset" and "Cancel" the entries are discarded and in the case of the "Cancel" action, the dialog is closed.
Display additional Service Entries
To view additional Service Entries, you need to click on the small icon behind the title.
You will be redirected to the "Additional Service Entries" dialog, where the filter is already preset to the order and type of the additional Service Entries and to the status "New".
Step 3: Show draft invoices
If you click on the button "Last created Invoices", a drop-down menu opens, via which the draft invoices last created for the customer can be opened directly with one click.
All invoices created automatically by the invoice wizard follow the following rules:
- Invoices are always created in "Draft" status.
- Invoice template used is the one stored in the selected invoicing profile. If no invoicing profile is selected or no invoice template is stored in the invoicing profile, the invoice template marked as "Standard" is used.
- The file name of the invoice is created on the basis of a pattern. If a invoicing profile has been selected and an "Invoice File Name" has been stored there, this setting applies. Otherwise, the setting made via the "Standard Settings for Invoices and Activity Reports" under "System Administration / Settings" applies. The default value "Invoice-{invoiceNumber}" is stored there.
- The name of the invoice is created on the basis of a pattern. If a invoicing profile has been selected and an "Invoice Name" has been stored there, this setting applies. Otherwise, the setting made via the "Standard Settings for Invoices and Activity Reports" under "System Administration / Settings" applies. The default value "Our services in {MMMM} {YYYY}" is stored there.
- As long as the invoice is still in "Draft" status, subsequent editing/deletion is possible at any time.
- The activity report template used is the one stored in the selected invoicing profile. If no invoicing profile has been selected or no activity report template has been stored in the invoicing profile, the activity report template marked as The activity report template marked as "Standard" is used.
- The file name of the activity report is created on the basis of a template. If a invoicing profile has been selected and a "File Name of the Activity Report" has been stored there, this setting applies. Otherwise, the setting made via the "Standard Settings for Invoices and Activity Reports" under "System Administration / Settings" applies. There, the value "Invoice-{invoiceNumber}-activity-report" is stored as the default value.
Documentation:
You can find more information about the creation of invoicing profiles for customers in the documentation under Billing profiles.
You can find more information about maintaining the default settings in the documentation under System Administration / Settings.