Table of Contents
- Introduction
- General Maintenance
- Connect Jira with foreknown
- Connect Personio with foreknown
- Connect Mail (SMTP) with foreknown
Introduction
In the "System Administration / Applications" area, all connections to external applications are configured in foreknown. Currently, foreknown supports an integration of the task and project management solution "Atlassian Jira".
The administration of applications is only possible for users with the role "Account Administrator".
General Maintenance
If one or more applications are already created, they will be displayed in the form of a scrollable, sortable and filterable list.
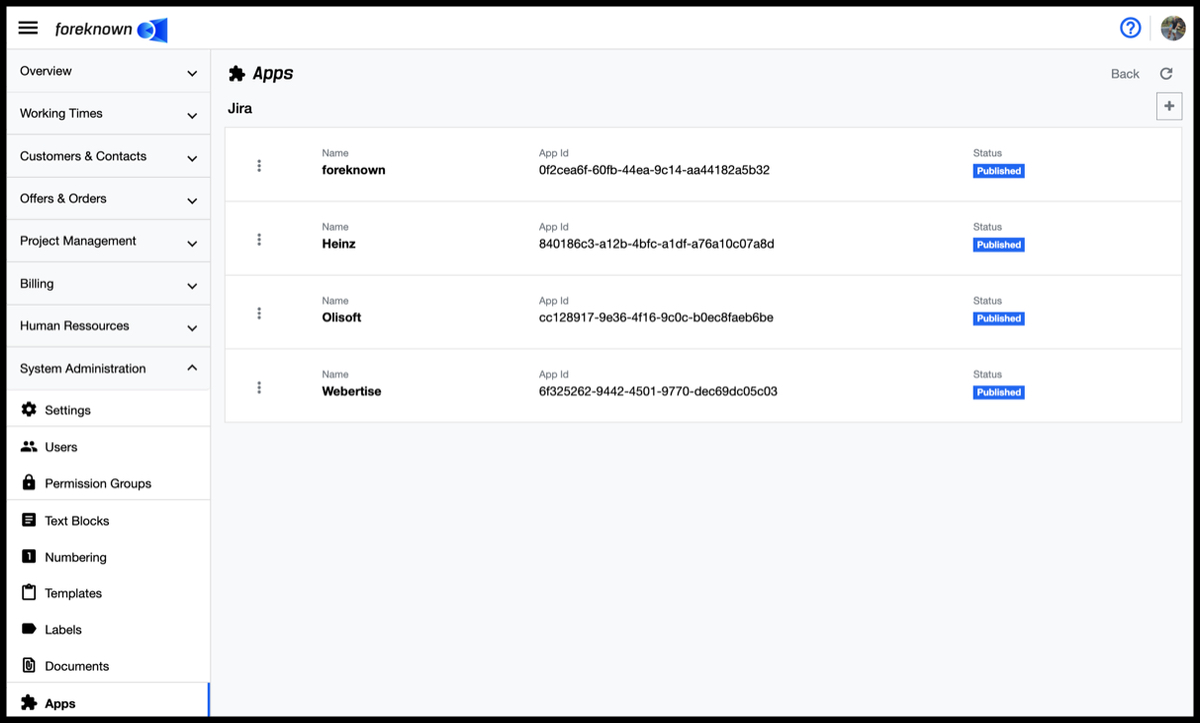
Here, the action menu can be opened in each line via the three dots at the beginning. This offers the options to edit or delete the respective application.
In addition, the names, App-Id and status of the individual applications can be found in the list view.
Edit Application
To edit the details set in step 1, click on the action menu and then click on "Edit Application". This will open the "Update Jira Application" dialog.
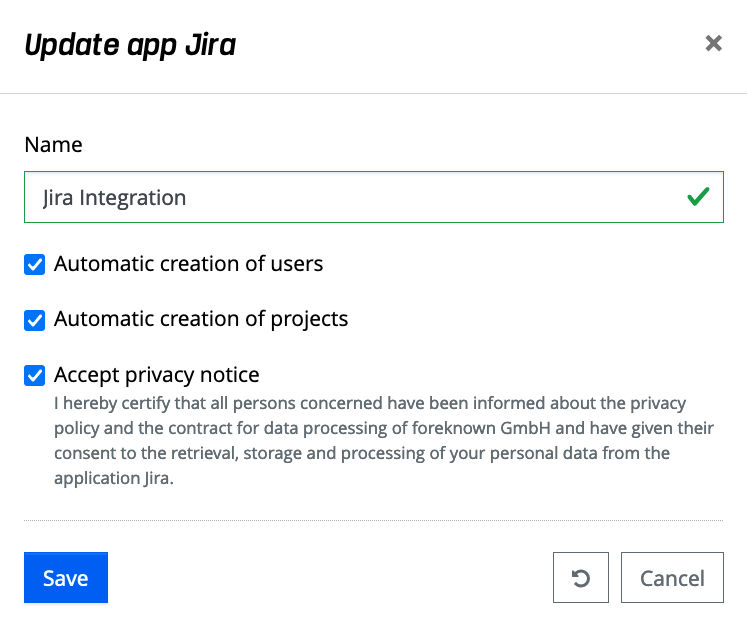
The "Save" action applies the changes. The action "Reset"(arrow in circle) clears all fields and with the action "Cancel" the dialog is closed.
Delete Application
To delete an application, you have to click on the action menu and then "Delete application". The "Delete Application" dialog will open, which must be confirmed with "Delete".
Also in Jira the connection to foreknown can be deleted. To do this, go to "Settings / Apps / foreknown / Configuration", click on the action menu for the corresponding App-ID in the list and then select "Remove".
Connecting Jira with foreknown
The following three steps will show you how to connect your Jira projects to foreknown and synchronize projects or individual tasks.
Step 1: Create Jira application in foreknown
To add a new Jira application in foreknown, first click on the plus in the top right corner.
This will open the "Create Jira Application" dialog:
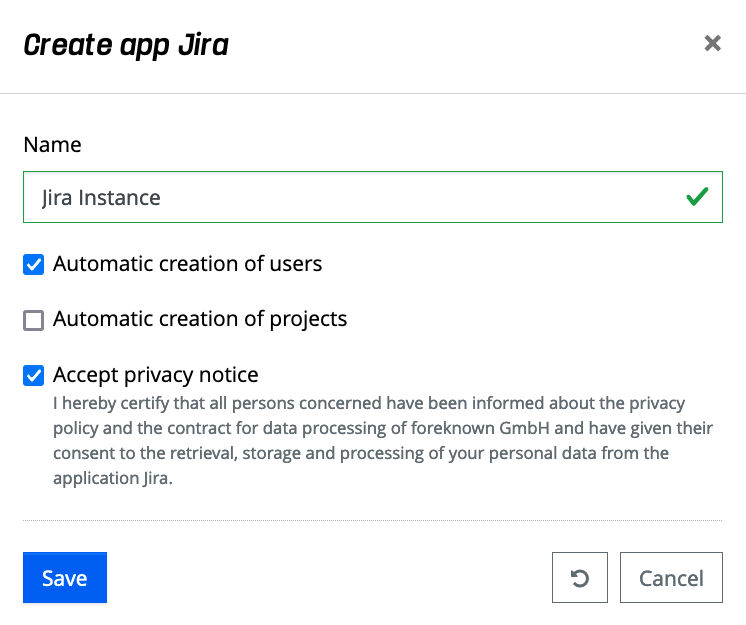
The following inputs can/must be specified for a new application:
- Name: A unique name must be entered here.
- Automatic creation of users: If this checkbox is activated, new users will be created in foreknown during synchronization.
This checkbox should usually be activated to allow a smooth synchronization.
Note: Users that do not yet exist in foreknown will be created with the user ID from Jira and the first and last name in foreknown and linked to the tasks, comments, work logs. Subsequently, the user data can be completed in foreknown. The creation ensures that the foreknown user is linked to the Jira user via the Jira user ID and can thus be uniquely assigned during future synchronizations.
- Automatic creation of projects: If this checkbox is activated, new projects (and their data such as tasks, comments, and working hours) are directly created when the project is created in Jira. If the checkbox is deactivated, only projects and their data that have been synchronized at least once will be transferred.
- Accept privacy notice: The privacy notice must be accepted for data to be transferred from Jira.
If the privacy notice is not accepted, no data is transferred.
Note: As a data processor according to the GDPR, we would like to ensure that all affected persons are informed that personal data of them is stored and processed e.g. through a Jira integration in foreknown. This checkbox ensures that all affected persons have been informed accordingly and have agreed to this.
The "Save" action saves the new Jira application. The "Reset" and "Cancel" actions discard the entries, and in the case of the "Cancel" action, the dialog is closed.
If a new Jira application has been created, it is displayed in the list with the app id and status.
The App-Id is displayed in the list behind the name. This ID is required when setting up the Jira plugin in the desired Jira instance in order to connect to the foreknown instance.
In the list of applications / Jira, one status is displayed per entry:
- Disconnected: no connection to a Jira instance has been established yet.
- Connected: the connection with a Jira instance has been established.
Step 2: Install foreknown Plug-in in Jira
The foreknown Jira plug-in is currently still configured as a "private plug-in" and therefore not yet available via the Atlassian Marketplace. If you are interested, please contact our support (support@foreknown.io) to get the required URL to install the foreknown plug-in.
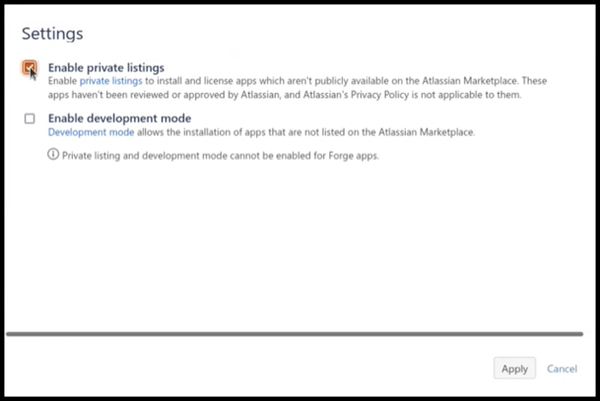
In order to install the app with the URL provided by us, you must first go to "Manage apps/apps" in the corresponding project. There you have to activate the checkbox "Enable private listings" in the "Settings", which can be found below the "User-installed apps".
After that, on the "Manage apps" page, you can find "Upload app" in the top right corner. Clicking on it will open the "Upload app" dialog.
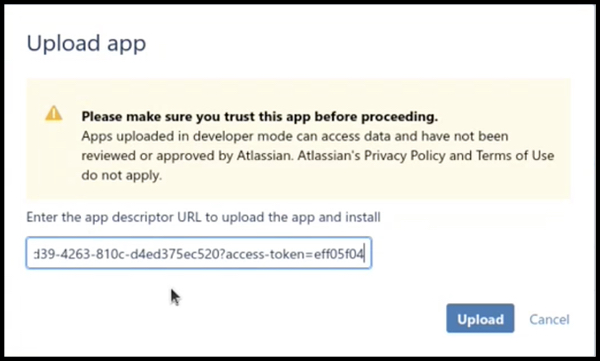
In this, the URL provided by us must be entered. By "Upload" the installation of the app begins, "Cancle" discards the input and closes the dialog.
Step 3: Establish Connection
Via the configuration page "Settings / Apps / foreknown / Configuration" the link "Connect new foreknown App..." opens the popup dialog "Connect Foreknown App", where the "App-Id" of the Jira application created in foreknown has to be entered.
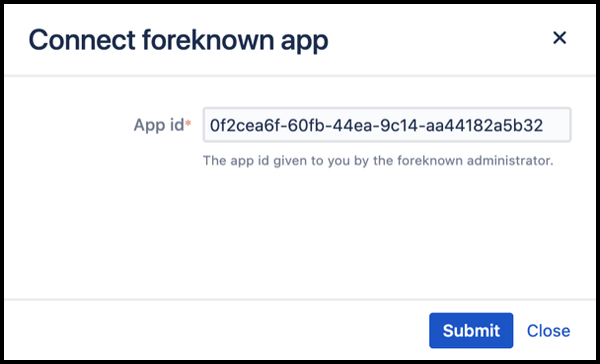
With the action "Submit" the App-Id in foreknown is checked. If a Jira application is found in foreknown, a connection is established and the status of the Jira application in foreknown is set to "Connected".
Synchronize Project
In the project settings, under the "Apps" section in the navigation, you will find the entry "Foreknown". This link opens the dialog "Foreknown project config", where the action "Synchronize project" opens the popup dialog "Synchronization with foreknown".

The following inputs can/must be specified for a new application:
- Synchronize work logs: If this checkbox is active all work logs from the given date will be synchronized.
- Synchronize comments: If this checkbox is active all comments from the given date will be synchronized.
- Date: The start date from which data will be transferred.
With the action "Submit" the project will be synchronized, the action "Close" closes the dialog.
Synchronize Task
It is also possible to synchronize a single task in Jira with foreknown. To do this, select the desired task and open the "Sync with foreknown" action via the action menu. This action also opens the "Sync with foreknown" dialog (See: Synchronize Project) with the difference that only the selected task and not the whole project will be synchronized. The same setting options apply.
Note: Specifying a date from which comments and working times should be synchronized serves to optimize the synchronization, since often only the last changes to comments or working times are missing and should be transferred by the synchronization.
Connect Tempo
Important: The configuration of Tempo must be performed by a user with FULL ACCESS to ALL working hours. The following steps are required to set the necessary authorisations:
Go to the ‘Tempo’ application under Apps
Open the "Settings" dialog
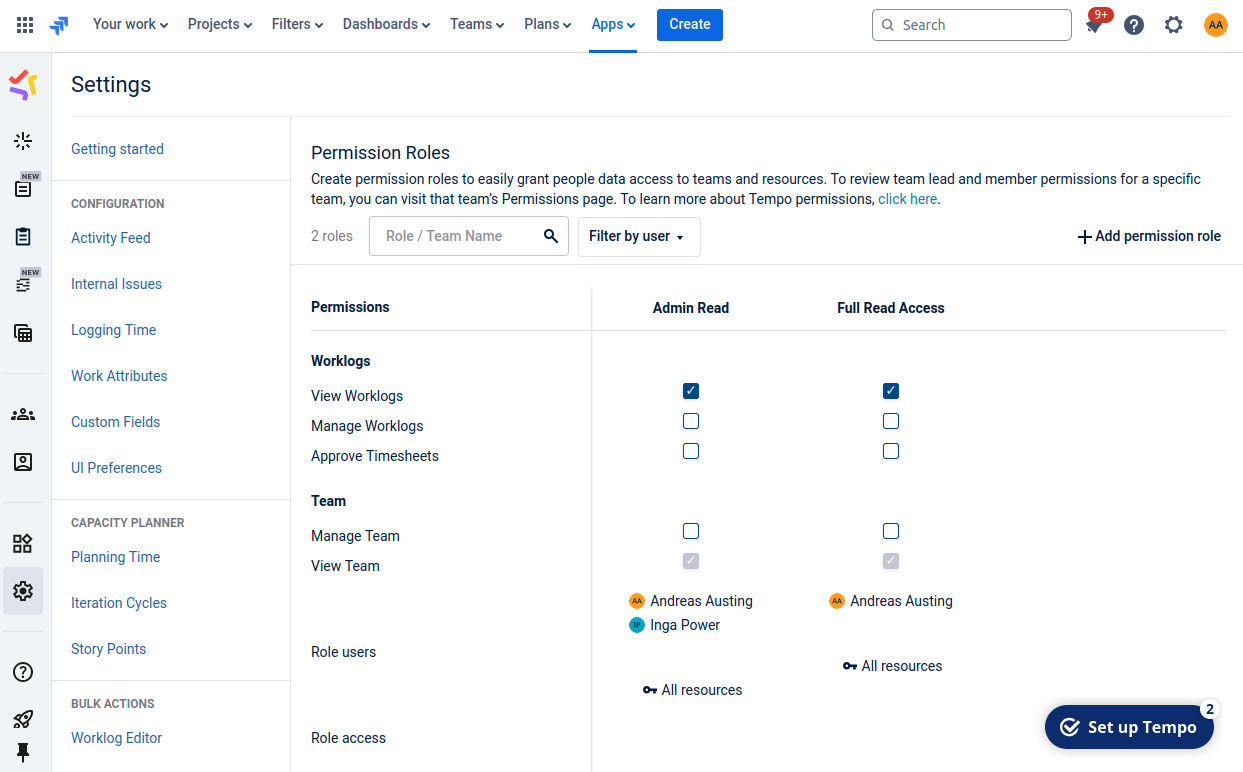
Select the ‘Permission Roles’ dialog in the ‘Data Access’ area
Add a new authorisation role with the name ‘Full Read Access’ (‘Add Permission Role’ button) and set the ‘Worklogs / View Worklogs’ flag (see screenshot)
In case you also want to connect the "Tempo" Jira App with foreknown, you first need to go to the API Integration dialog:
- Go to the ‘Tempo’ application under Apps
- Open the "Settings" dialog
- Select the ‘API Integration’ dialog in the ‘Data Access’ area
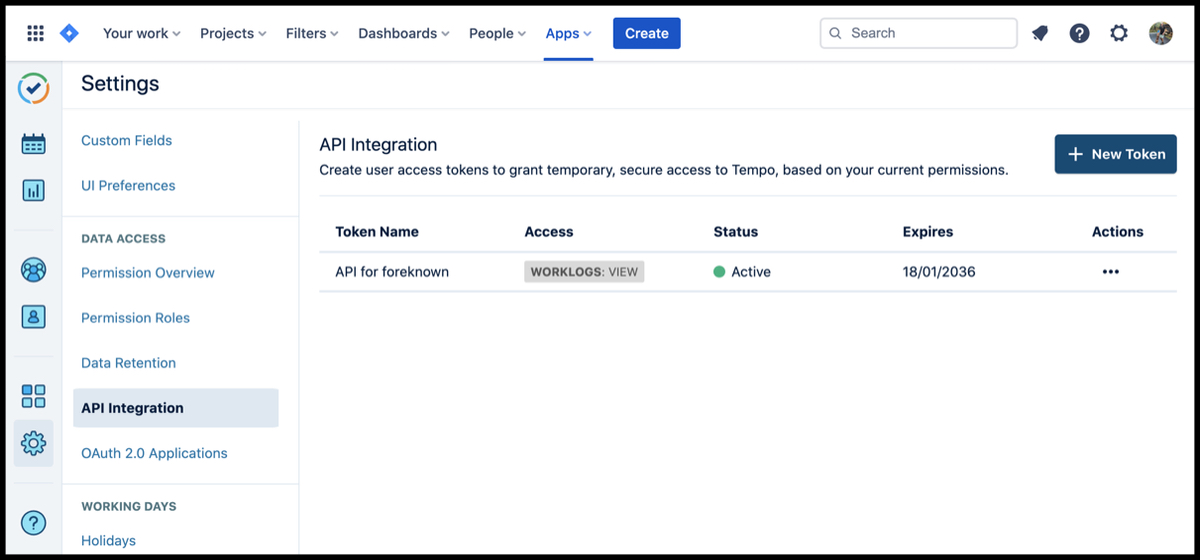
Here you need to create a token under "+ New Token". In the "Create Token" dialog, the checkboxes
- View worklogs
- View accounts (optional, creates a label for the assigned account of the task)
must be activated. After saving a new token is created, which has to be copied and pasted in the foreknown configuration of Jira under "Tempo API Token setup...".
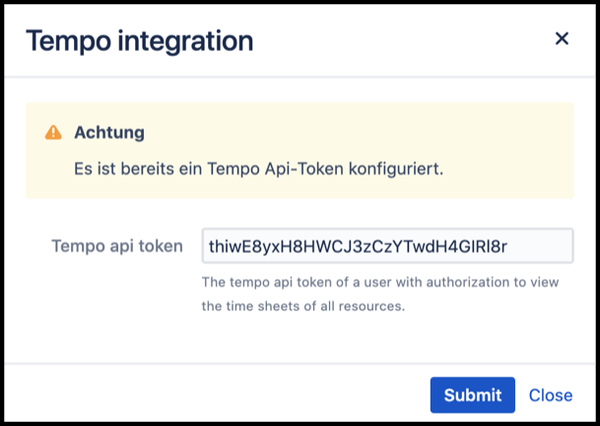
If the dialog is confirmed with "Submit" after entering the token, Tempo connects to foreknown. With the action "Close the entries are discarded and the dialog is closed.
Documentation Note: Integration with Jira and Tempo Timesheets will submit additional information (labels) to your foreknown instance. These are very helpful for the automatic generation of service entries via rules. Therefore you can find additional information in the documentation under Billing / Manage Rules concerning these labels.
Connect Personio with foreknown
Below is a description of how you can connect your Personio system to foreknown in order to be able to regularly synchronize the absence times from Personio with foreknown. This integration allows you to have your employees maintain absences, such as vacation, sickness, exclusively in Personio and have them automatically transferred to foreknown.
Once a Personio application is actively set up in foreknown, the following synchronizations take place:
- Every 5 minutes (unless set otherwise) changes to absences in Personio are synchronized with foreknown Only new and changed absences are synchronized. Deletions of absences are not taken into account in this synchronization.
- Once a night a complete synchronization of absences is performed. This always takes into account a period starting from the current day, which considers two full months retrospectively and all future months of the current year. If the current day is >= the 1st of July, 6 months in advance are always included. This synchronization also considers deletions of absences.
In addition, a synchronization can also be triggered manually:
- Via time tracking, any employee or a team manager for his employees can perform the action "Synchronize absences", which will update the absences from Personio for the current month in foreknown.
- Via the Personio application under "System Administration / Applications" an account administrator can trigger the action "Start Synchronization" which will trigger a full synchronization as described above. This action should only be seen as an exception, as it will request extensive data from Personio.
Step 1: Create API-Key in Personio
In order to connect to the Personio system, you need to create API credentials in Personio. After logging in to Personio as "Administrator", open the settings.
On the page you will find the link "API credentials" in the box "Integrations". This will take you to a dialog, where all API credentials for your Personio instance can be created.

Now perform the following steps:
- Click on "Generate new access data".
- Assign a unique name e.g. "foreknown Sync".
- Select the value "Other" under "Integration".
- Select the checkboxes for "Employees / Read" and "Absences / Read".
- Select the attributes "Email", "Employee ID", "Cost center", "Personal email" under "Readable employee attributes".
- Finish this action with "Generate new access data".
If all the data has been entered correctly, the API credentials will now appear in the form of a Client ID and a Secret. These two values are needed for the next step to create a Personio application in foreknown.
Step 2: Create Personio Application in foreknown
After generating the required API access data, a Personio application can be created in foreknown.
Now perform the following steps:
- Log in to foreknown with a user who has an "Account Administrator" role.
- Go to the page "System Administration / Apps" via the navigation.
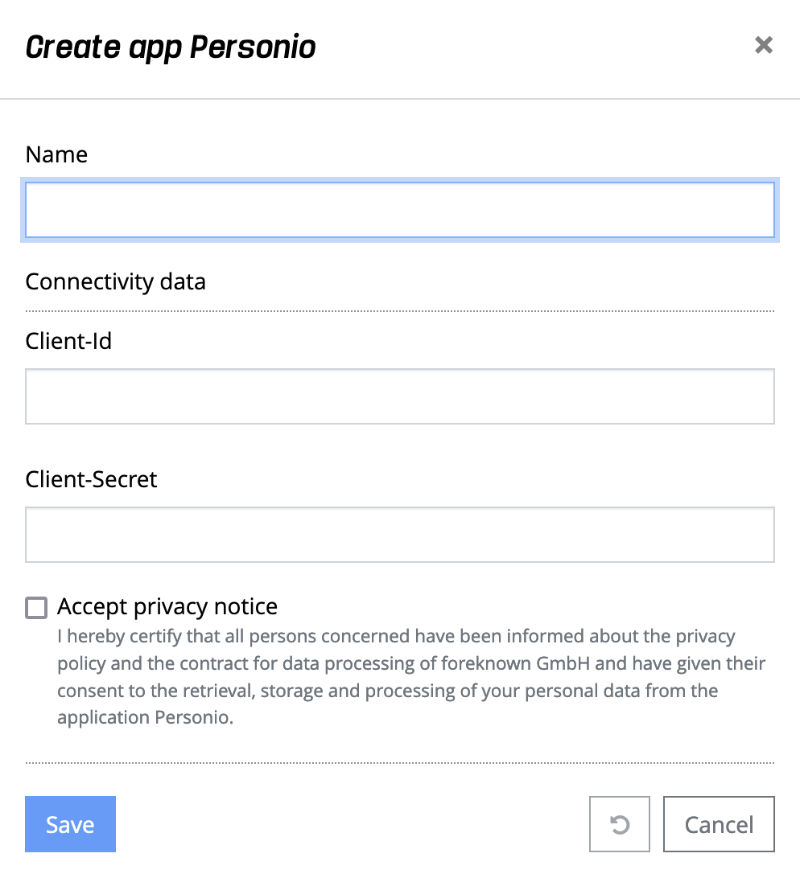
- Create a new Personio application by clicking on the "+" button on the right side above the Personio box.
- Enter a unique name for the application, e.g. "Personio System".
- Add the client ID and client secret from the API credentials previously created in Personio.
- Accept the privacy notice by selecting the checkbox.
- Complete the step by clicking Save.
An entry should now appear in the Personio box. There is also an action "Test Connection". Execute this action to make sure that a connection can actually be established with the configured Personio system. A system message will indicate whether the connection has been established or not.
Step 3: Configure Personio Application
The Personio application initially provides a default behavior for the synchronization, which can be adjusted if necessary.
The following settings are taken into account:
- runtimeInterval: Sets a value in minutes and defines how often changed absence times should be queried by the Personio instance. The default value is 5.
- syncStartDate: Defines the start date from which entries are transferred from Personio to foreknown.
If no configuration is stored, the entries are transferred from the current date by default with following rules:
- two complete month backwards are considered
- always all following month till end of the current year are considered
- if the current date is >= the 1st of July, always the next 6 month are considered
- syncEnabled: This setting can be used to enable (true) or disable (false) synchronization. The default value is "true
- syncComments: Specifies whether the comment that can be optionally specified at an absence in Personio, will be copied to foreknown during synchronization. Default value is "true".
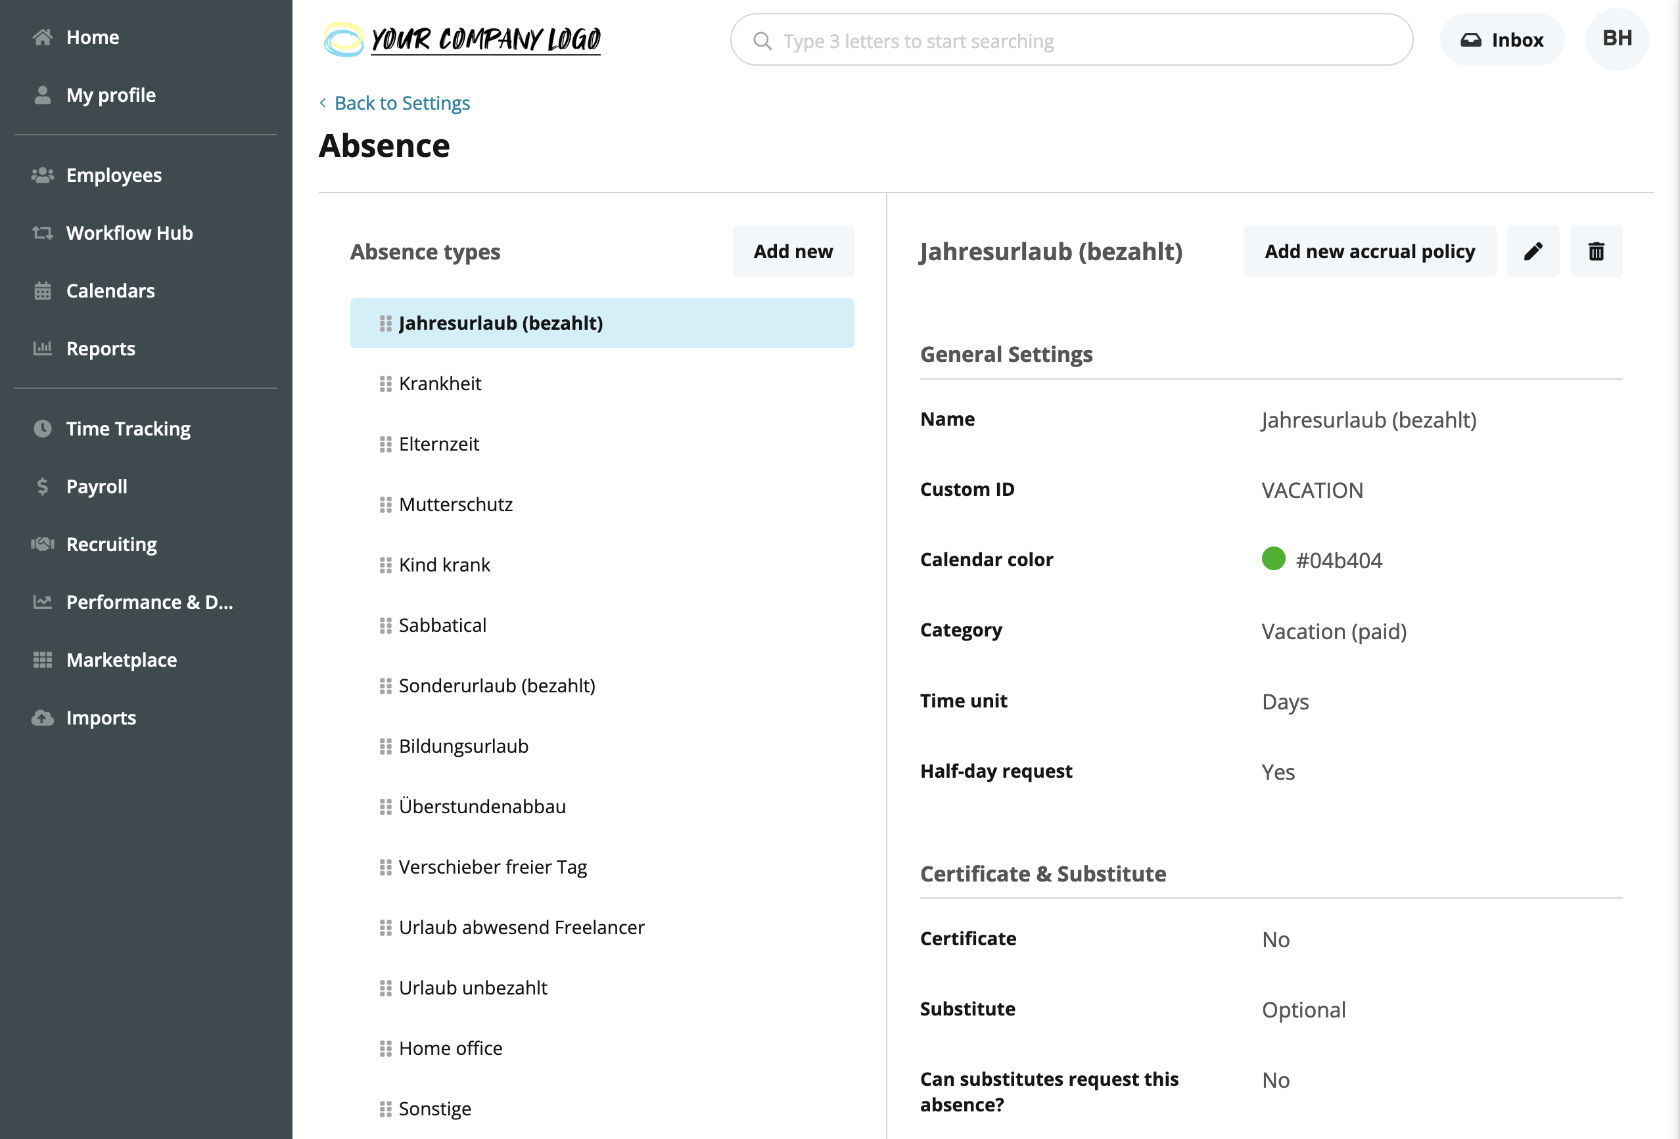
- typeMapping: In Personio as well as in foreknown there are absence types, which have to be linked during a synchronization. Initially an assignment is stored, which is oriented to the categories of the absence types in Personio (see Settings / Absence in Personio).
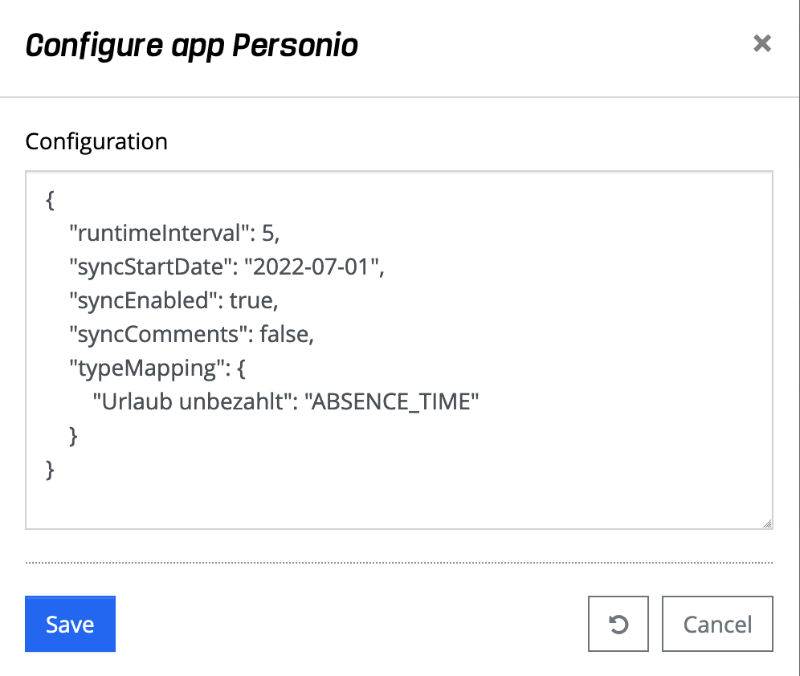
To customize these default settings for a Personio application, individual settings can be configured via the action "Configure app" (see action menu in front of the Personio application) in form of a defined json structure.
The following example shows a possible customized configuration of a Personio application:
{
    "runtimeInterval": 5,
    "syncStartDate": "2022-07-01",
    "syncEnabled": true,
    "syncComments": false,
    "typeMapping": {
        "Overtime Booking": "OVERTIME"
    }
}
The definition of the "typeMapping" takes place as follows.
- On the left side is the name of the absence type in quotation marks. This can be found under "Settings / Absence"
in Personio.
- On the right side is the absence type of foreknown in quotation marks. This can contain the following values
- VACATION: Vacation
- SICK_LEAVE: Sickness
- OVERTIME: Overtime Reduction
- ABSENT_TIME: Other Absences
- If a Personio absence type is to be ignored, the value "skip" can be specified instead of a foreknown absence type. All absence bookings from Personio that have this absence type will then not be transferred.
The "typeMapping" needs to be changed only for the Personio absence type where the default mapping according to the Personio category does not fit. The default behavior is as follows:
- Category "Sick leave" is assigned to "Sickness" absence type in foreknown.
- Category "Paid leave" is assigned to absence type "Vacation" in foreknown.
- All other categories will be assigned to absence type "Other Absences" in foreknown.
- Category "Mobile work" is not transferred to foreknown ("skip").
NOTE: An assignment of a Personio absence category to the absence type "OVERTIME" is by default not possible, because there is no category for overtime. However, since Personio allows individual absence types e.g. with the category "Other paid leave", an assignment to "OVERTIME" in foreknown would have to be made via configuration.
Connect Mail (SMTP) with foreknown
The following describes how you can configure an SMTP server in foreknown for sending emails.
Users with the "Account Administrator" role can use the navigation under "System Administration / Applications" to set up an application of the type "Mail (SMTP)". By clicking on the corresponding "Add" button (plus) the following dialogue opens:
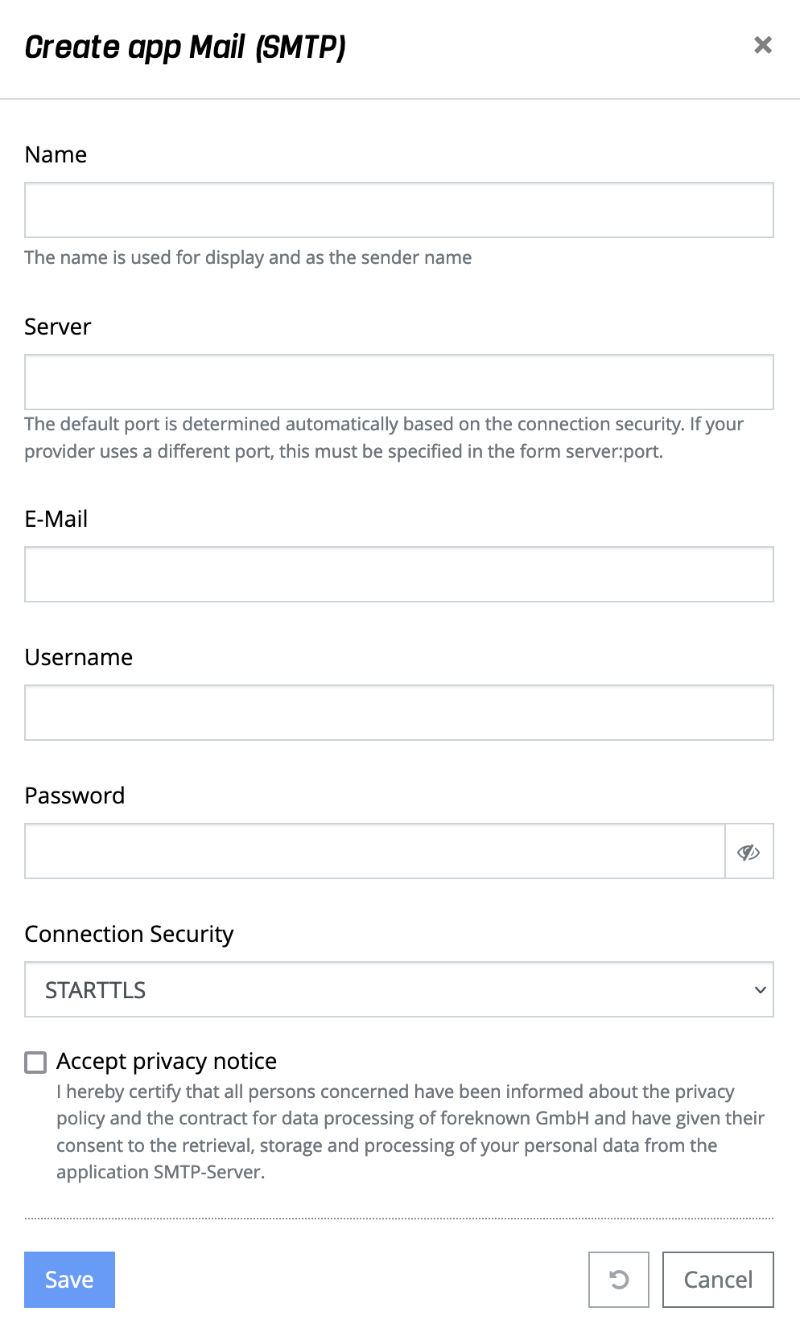
The following properties must be maintained:
- Name: A unique name must be entered that is used for the display in the list of applications and as name of the sender of an e-mail.
- Server: Name of the server e.g. smtp.domain.de.A default port is automatically determined based on the selected connection security is determined automatically. If your provider uses a non-standard port, this must be specified in the form server:port. Example: smtp.domain.de:1234
- E-mail: E-mail address of the mailbox that is used for sending e-mails via SMTP.
- User: Username of the mailbox used for sending emails via SMTP.
- Password: Password of the mailbox that is used for sending emails via SMTP.
- Connection security: Type of connection security to be used for sending emails via SMTP. STARTTLS and SSL/TLS are offered. Unencrypted connections are not supported by foreknown for security reasons.
- Accept data protection notice: In order for data to be sent via SMTP, the data protection notice must be accepted.
If the data protection notice is not accepted, no e-mails can be sent.
Note: As a data processor in accordance with the GDPR, we would like to ensure that data subjects are informed that personal data of these persons will be stored and processed, e.g. through a mail (SMTP) integration in foreknown. This checkbox ensures that all data subjects have been informed accordingly and have given their consent.
When the data is saved, a new application of the type "Mail (SMTP)" is created. The "Test connection" action can be used to check whether an e-mail can be sent via the specified SMTP server.