Table of Contents
- Introduction
- Search Projects
- Filter Projects
- Create Project
- Edit Project
- Project Overview
- Budget
- Manage Order Positions
- Authorize Project
Introduction
Projects in foreknown serve different purposes. On the one hand, order items of won orders can be assigned to projects for implementation. On the other hand, a project represents a bracket for tasks that are related to each other from a technical or organizational point of view. Furthermore, important key figures can be queried at the level of a project. And last but not least, a project in foreknown is also used for integration with external systems such as Jira to synchronize projects and tasks.
The administration of projects can be accessed via the menu item "Project Management / Projects". For access, the role "Employee" is basically required, whereas certain functions, such as the creation of new projects, require the role "Project Manager". Individual projects are authorized in more detail via permission groups.
Search Projects
If you select "Project Management / Projects" from the main menu, you will get to the following dialog:
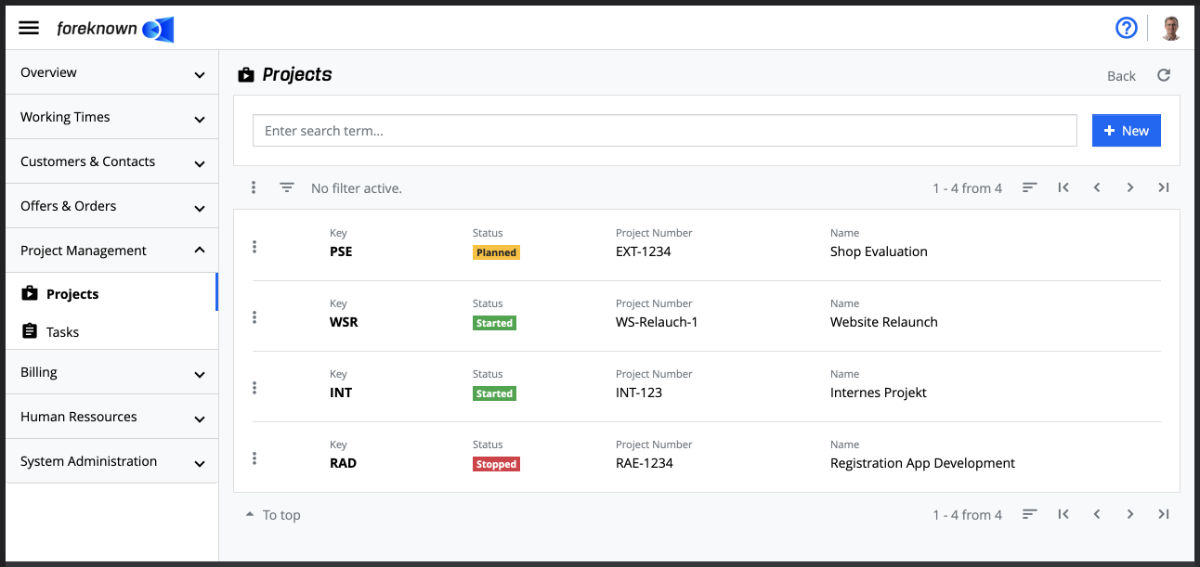
In the upper part of the dialog you will find the search field and the "+ New" button (see also Create project). Below this area all already created projects are displayed, for which the current user is authorized for via the permission groups are displayed in the form of a list that can be scrolled, filtered and sorted.
If you enter a search term in the input field, the list shows only the projects that contain the entered search term in the name or key. In this way, individual projects can be found quickly and selected for editing.
Filter Projects
In addition to the search function, the project management also offers a filter dialog. A filter dialog is located at foreknown as a fold-out dialog on the right side. By clicking on the button on the left above the list with the three dashes the filter dialog can be expanded and collapsed.
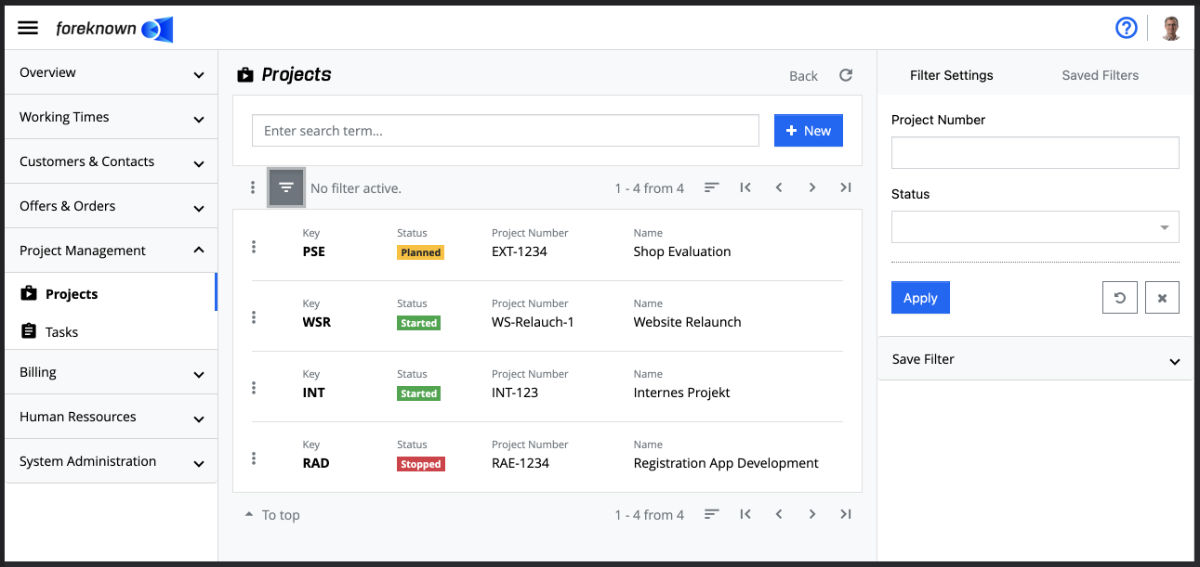
The following filter options are offered for projects:
- Project Number: A project number can be entered via an input field. Projects are filtered by which value is contained in the project number.
- Status: Via a field with auto-completion one or more project statuses can be selected. All projects are filtered that have one of the selected statuses.
The "Apply" action displays all projects in the list that match the filter criteria. The action "x" removes all filter settings and the list shows all projects again. The "Reset" action (symbol: arrow in a circle) discards all changes that may have been made to a saved filter.
For general information on the filter options, see also the chapter Basics: Filters.
Create Project
To create a new project, click on the "+ New" button located in the upper right corner of the search field for users with the role of "Project Manager" in the upper right corner next to the search field. This button opens the pop-up dialog "Create project".
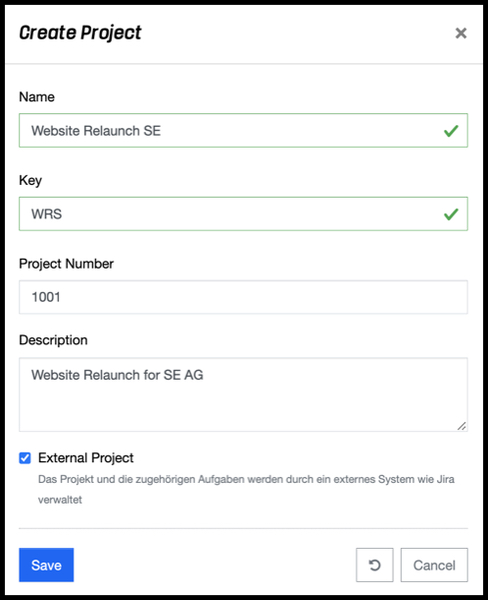
The following properties can be specified for a project:
- Name: A unique, speaking name for a project should be specified.
- Key: When entering the name, a proposal for a project key is already generated from the first letters of the words contained in the project name. However, this does not have to be valid or unique. Therefore, the generated key should be adapted if necessary so that it is unique. The key is also used for tasks of a project as a prefix.
- Project Number: The project number serves as an additional identifier usually an external reference number of the customer's project and is optional.
- Description: A description for the project can be stored.
- External Project: Check this checkbox if the project and associated tasks are managed by an external system such as Jira.
- Assign Permission Group: Activate this checkbox, if the standard permission group, which is defined under "System Administration / Settings / Standard Settings for Project", should be assigned to this project.
If you click on the button with the round "arrow" symbol, all data in the dialog will be reset to the initial state. To cancel the process, click on the "Cancel" button.
Click on the blue "Save" button to create the new project and return to the list view.
Note: When a project is created, a basic rule is also always created that is permanently linked to the project. This basic rule cannot be changed or deleted, but it can be deactivated so that it is not used for the service transfer.
Edit Project
To edit properties of a project, the user must have the "Project Manager" role in this project.
Edit Properties
The general properties "Name", "Project Number" and "Description" of a project can be edited via the popup dialog "Update project". This is activated either from the list view via the action menu of a project (three dots button) with the action "Edit project" or in the detail view via the button with the pencil icon, which is always located at the top right above the master data.
With the action "Save" all changes to the project are saved. With the action "Reset" and "Cancel" the entries are discarded and in case of the action "Cancel" the dialog is closed.
Edit Key
The abbreviation of a project can only be changed via the detailed view of a project in a separate dialog, which is opened by clicking on the pencil symbol behind the abbreviation. It must be ensured that the new abbreviation is still unique across all projects. The "Save" action saves the new abbreviation to the project. With the action "Reset" and "Cancel" the change is discarded and in case of the action "Cancel" the dialog is closed. dialog is closed.
IMPORTANT: All already created tasks of a project keep the old key as prefix in the task key and only new tasks get the new key as prefix. Thus, with the change of the prefix, tasks are created from the moment with a different prefix than the previous tasks.
Edit Status
A project has a life cycle, which is expressed by different statuses.
- Open: Used for new projects that have not yet been started.
- Started: As soon as work is started in a project, the status can be set to "Started".
- Stopped: If the work on a project has to be interrupted, the status can be set to "Stopped".
- Closed: If no more work is being done on the project, the status can be set to "Closed".
Via the dialog "Change Project Status", which can be opened either from the list view via the action menu of a project (button with three dots) with the action "Change Status" or in the detail view via the button with the pencil symbol, which is located behind the status label, the status can be changed.
With the action "Save" the new status is saved to the project. With the action "Reset and "Cancel" the entries are discarded and in case of the action "Cancel" the dialog is closed.
NOTE: Maintaining the current status is helpful, as projects can also be filtered in the list according to the current status. Thus, for example, all projects that are currently stopped can be easily filtered.
Delete Project
A project with status "closed" can be deleted in the list view via the action menu of a project (button with three dots) with the action "Delete Project". A confirmation dialog appears with a note and an input field in which the project key must be entered, before the deletion process is finally executed with the action "Delete".
WARNING: If a project is deleted, all associated tasks will be deleted as well, even if they have already working time bookings. These data are then irretrievably lost!
Manage Order Positions
Orders or individual order items can be assigned to a project in foreknown for the implementation (see also Assign Project). This way it is ensured that also during the implementation of a project the underlying orders always remain in focus.

Order items are assigned to a project by the responsible account manager in consultation with the respective project managers and then appear on the project under the "Orders" tab.
Project Overview
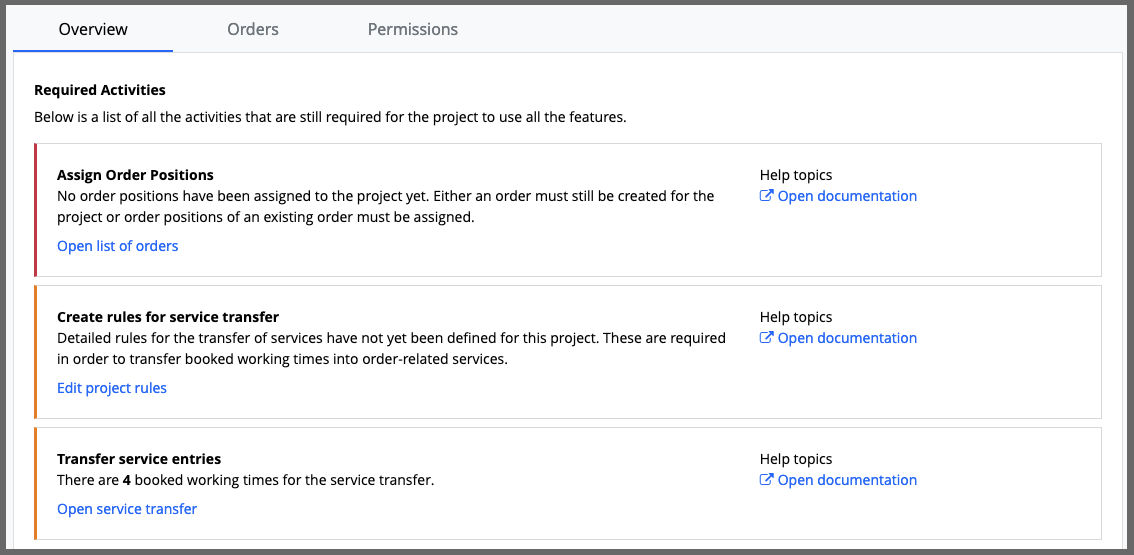
In the detailed view of a project, below the master data in the "Overview" tab, you will find some useful information, which on the one hand help to identify the required activities for the project and on the other hand to get a quick overview and access to certain tasks.
Required Activities
In this area, a project manager of the project is shown all the activities that are still necessary for the project to be able to use all functions.
-
Create Rules for Service Transfer: This activity appears if no detail rules have yet been created for the project. However, the detail rules are required in order to be able to transfer booked working times on tasks of the project into order-related services. Via the link "Edit project rules" the project manager gets to the dialog which shows the basic rule of the project and offers the possibility to create the still missing detail rules.
Documentation: For more details on maintaining detail rules, see also chapter. "Features / Billing / Rules".
-
Assign Order Positions: This activity appears if no order positions have been assigned to the project yet. Either a corresponding order must still be created for the project or order positions of an existing order must still be assigned to the project.
Documentation: For further details on order maintenance, see also chapter "Features / Offers & Orders / Orders".
-
Transfer Service Entries: This activity appears if there are already working times for the project that have not yet been transferred to service entries. Clicking the "Open service transfer" link takes you to the "Service transfer" dialog and you can start transferring the working times directly.
Documentation: For further details on the transfer of working hours to benefits, see also chapter "Features / Billing / Service Transfer".
When all activities are completed, the required activities area disappears from the project overview.
Tasks and Status
The "Tasks and Status" area will display a box with task quantities per task status (Open, In Progress, Completed) for each of the labels described below.
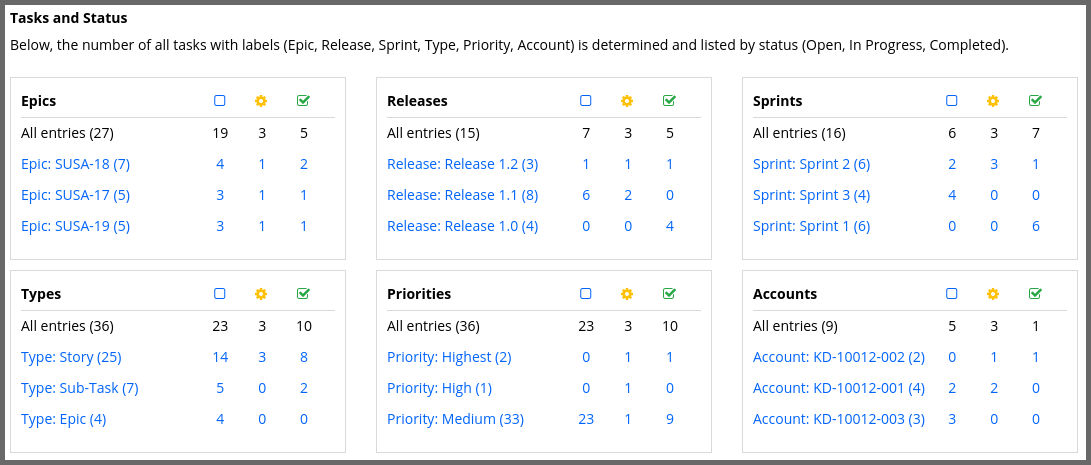
- Epics: All tasks that have the label "Epic:...". This is generated e.g. from Jira, if you work there with Epics and tasks have been assigned to an Epic.
- Releases: All tasks that have the label "Release:...". This is generated e.g. from Jira if releases are used there.
- Sprints: All tasks that have the label "Sprint:...". This is generated e.g. from Jira, if sprints are used there.
- Types: All tasks that have the label "Type:...". This is generated e.g. from Jira and represents the task type.
- Priorities: All tasks that have the label "Priority:...". This is generated e.g. from Jira, if the standard field "Priority" is used.
- Accounts: All tasks that have the label "Account:...". This is generated e.g. when synchronizing tasks from Jira, if the plugin "Tempo Timesheets" is used and tasks are assigned to Tempo accounts.
Each individual box offers the possibility to directly access a filtered list of tasks per entry in the table. Thus, you can e.g. directly display all open tasks of an epic or all tasks of a sprint with one click. In addition, the list of tasks provides important KPIs for the selected tasks.
Budget Tab
General Key Figures
Below the "Budget" tab is the "General KPIs" section. Here important KPIs related to the project budget are displayed.
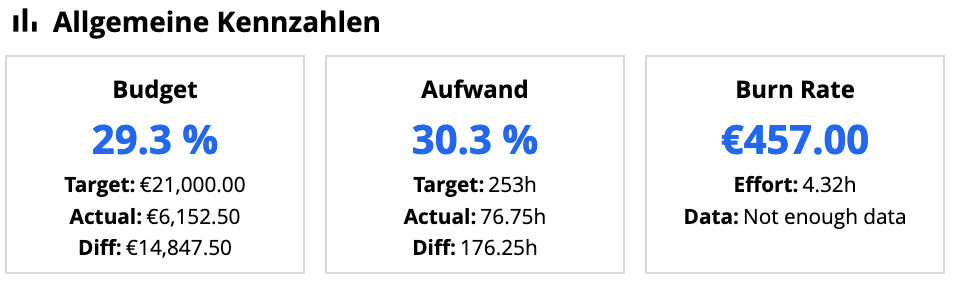
Budget: This shows as a percentage how much of the budget has already been consumed by billable services.
- Target: Shows the total amount of the budget.
- Actual: Shows the amount currently consumed.
- Remainder: Shows the amount of budget still available.
Effort: This shows in percent how much effort in hours has already been consumed by billable services.
- Target: Here the sum of all consumed efforts from the assigned orders in hours is displayed.
- Actual: Displays the total of all billable efforts from the assigned orders in hours.
- Remaining: Displays the difference in hours between the target and actual values.
Burn Rate: The average consumption per day is displayed here. This is determined on the basis of existing service entries of the assigned orders and takes into account a maximum of two previous months. Depending on the available services, as much data as possible is used to calculate the burn rate. If there is not enough data available, a ? is displayed and "Not enough data" appears under basis.
- Effort: Here is displayed how much time on average per day was booked on the budget.
- Base: The duration from which the burn rate was calculated is displayed here.
- Forecast: This shows the date on which the project budget is expected to be used up, taking into account the burn rate.
Burn-Down Chart
The Burn-Down Chart provides you with a graphical representation of the following information:
- The blue, solid line shows the actual budget consumption, which results from the billable services.
- The yellow, solid line shows the linear progression of the determined burn rate for the period of the calculation.
- The yellow, dotted line shows the linear progression of the burn rate from the end of the calculation period and represents the projected course of the budget based on the burn rate.
- The vertical orange line with the "Forecast" label indicates the point in time from which the forecast based on the burn rate will be applied.
- the vertical gray line with the "Today" label indicates the current date by which theoretically service entries could be available.
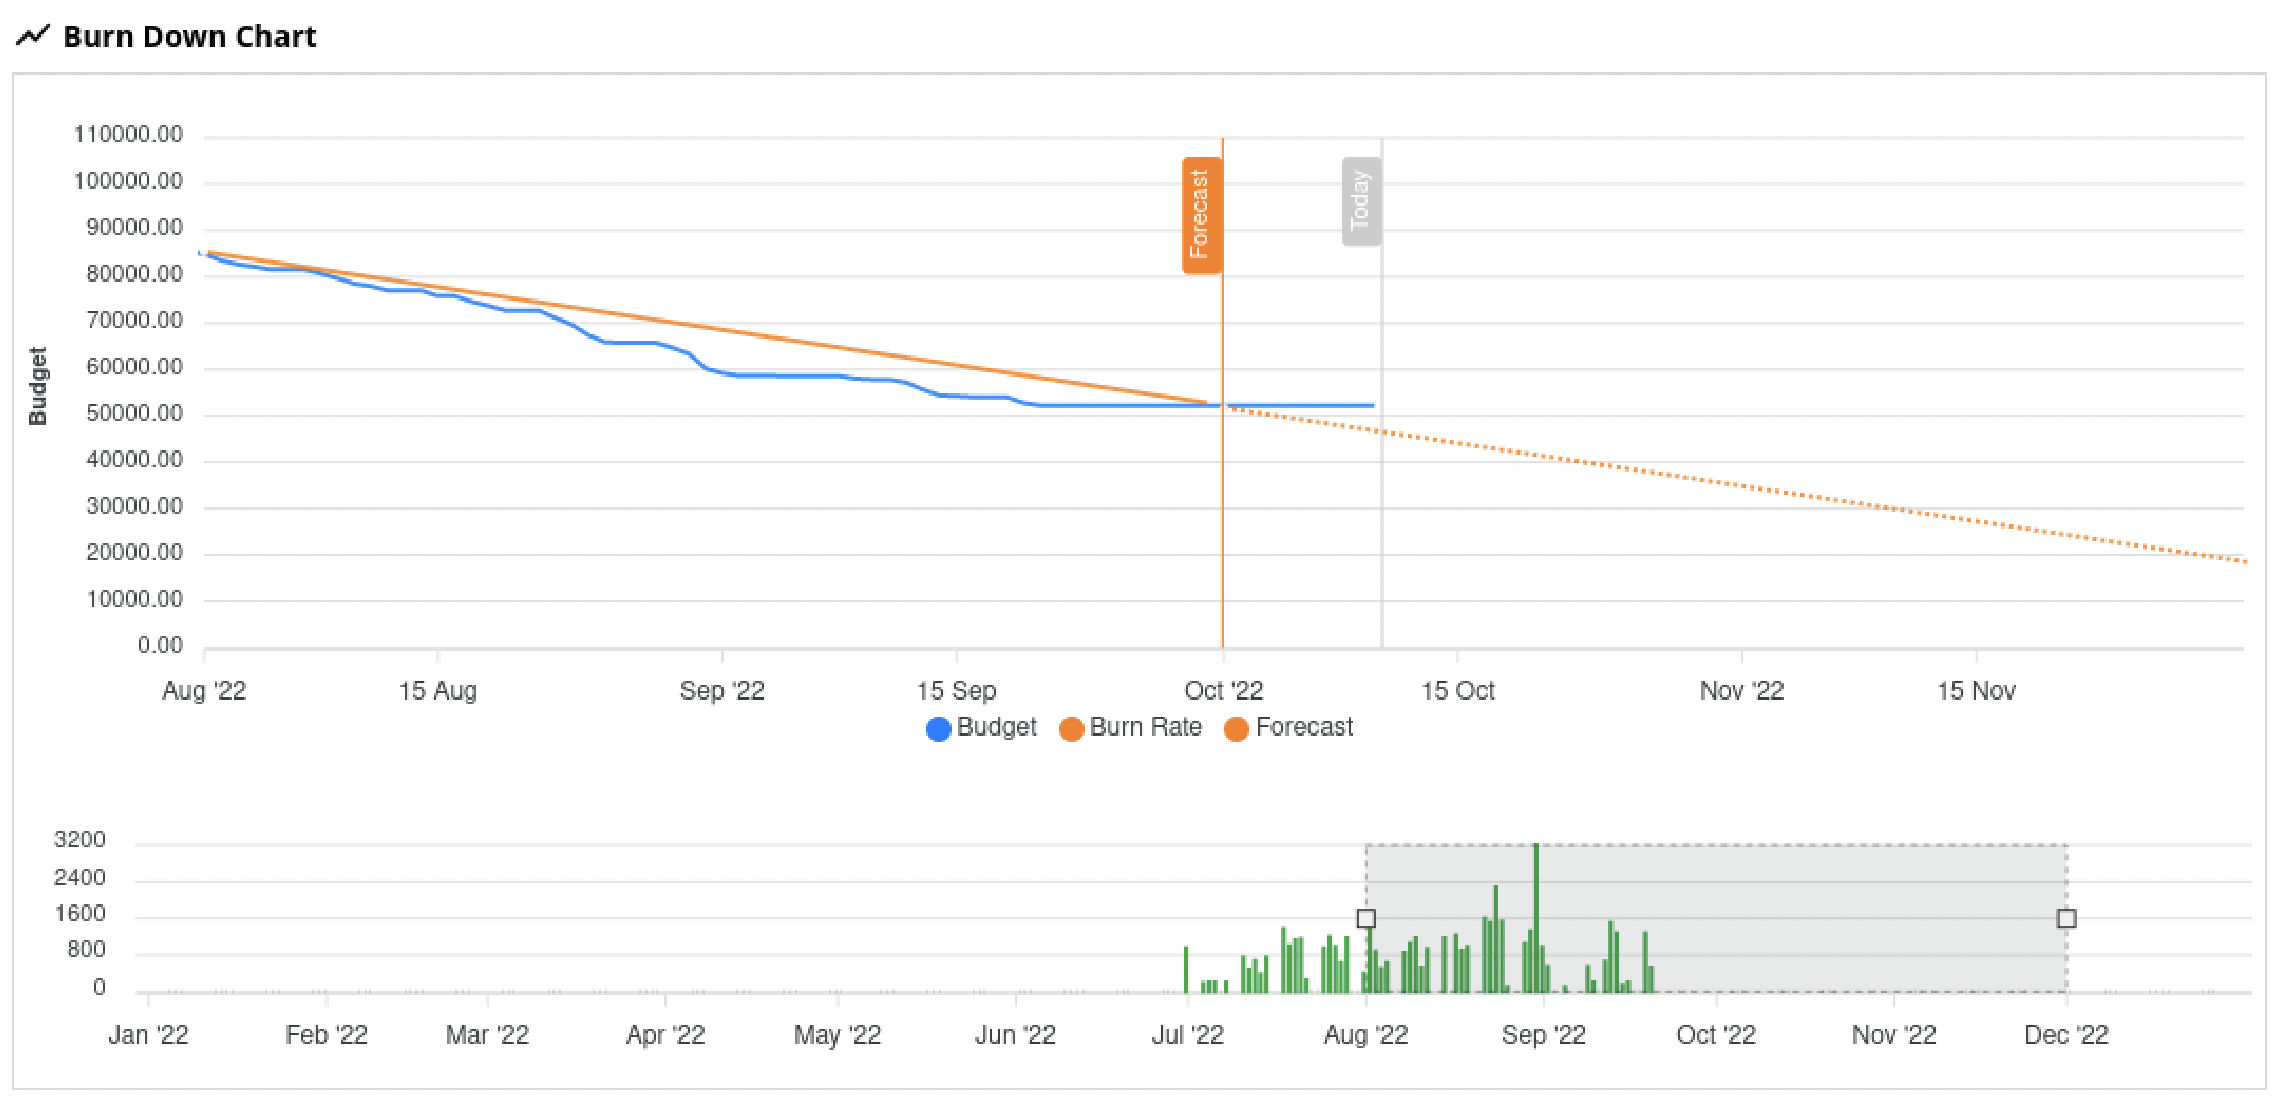
Below the line chart is a bar chart, which shows the billable service entries on a time axis. The time period can be changed with the mouse via a gray selection box. This also affects the data shown on the line chart. The selection box can also be moved on the time axis.
Note: The period used for the calculation of the burn rate does not include the current month, since this could still be incompletely maintained, e.g. because working times have not yet been booked or services have not yet been transferred, and thus the burn rate would be too low. Therefore, the forecast period does not start at the "Today" line, but at the "Forecast" line.
Consumption per order position and service type
In order to be able to recognize how the consumptions are distributed the efforts of all booked billable services are broken down into order positions and service types in tabular form.
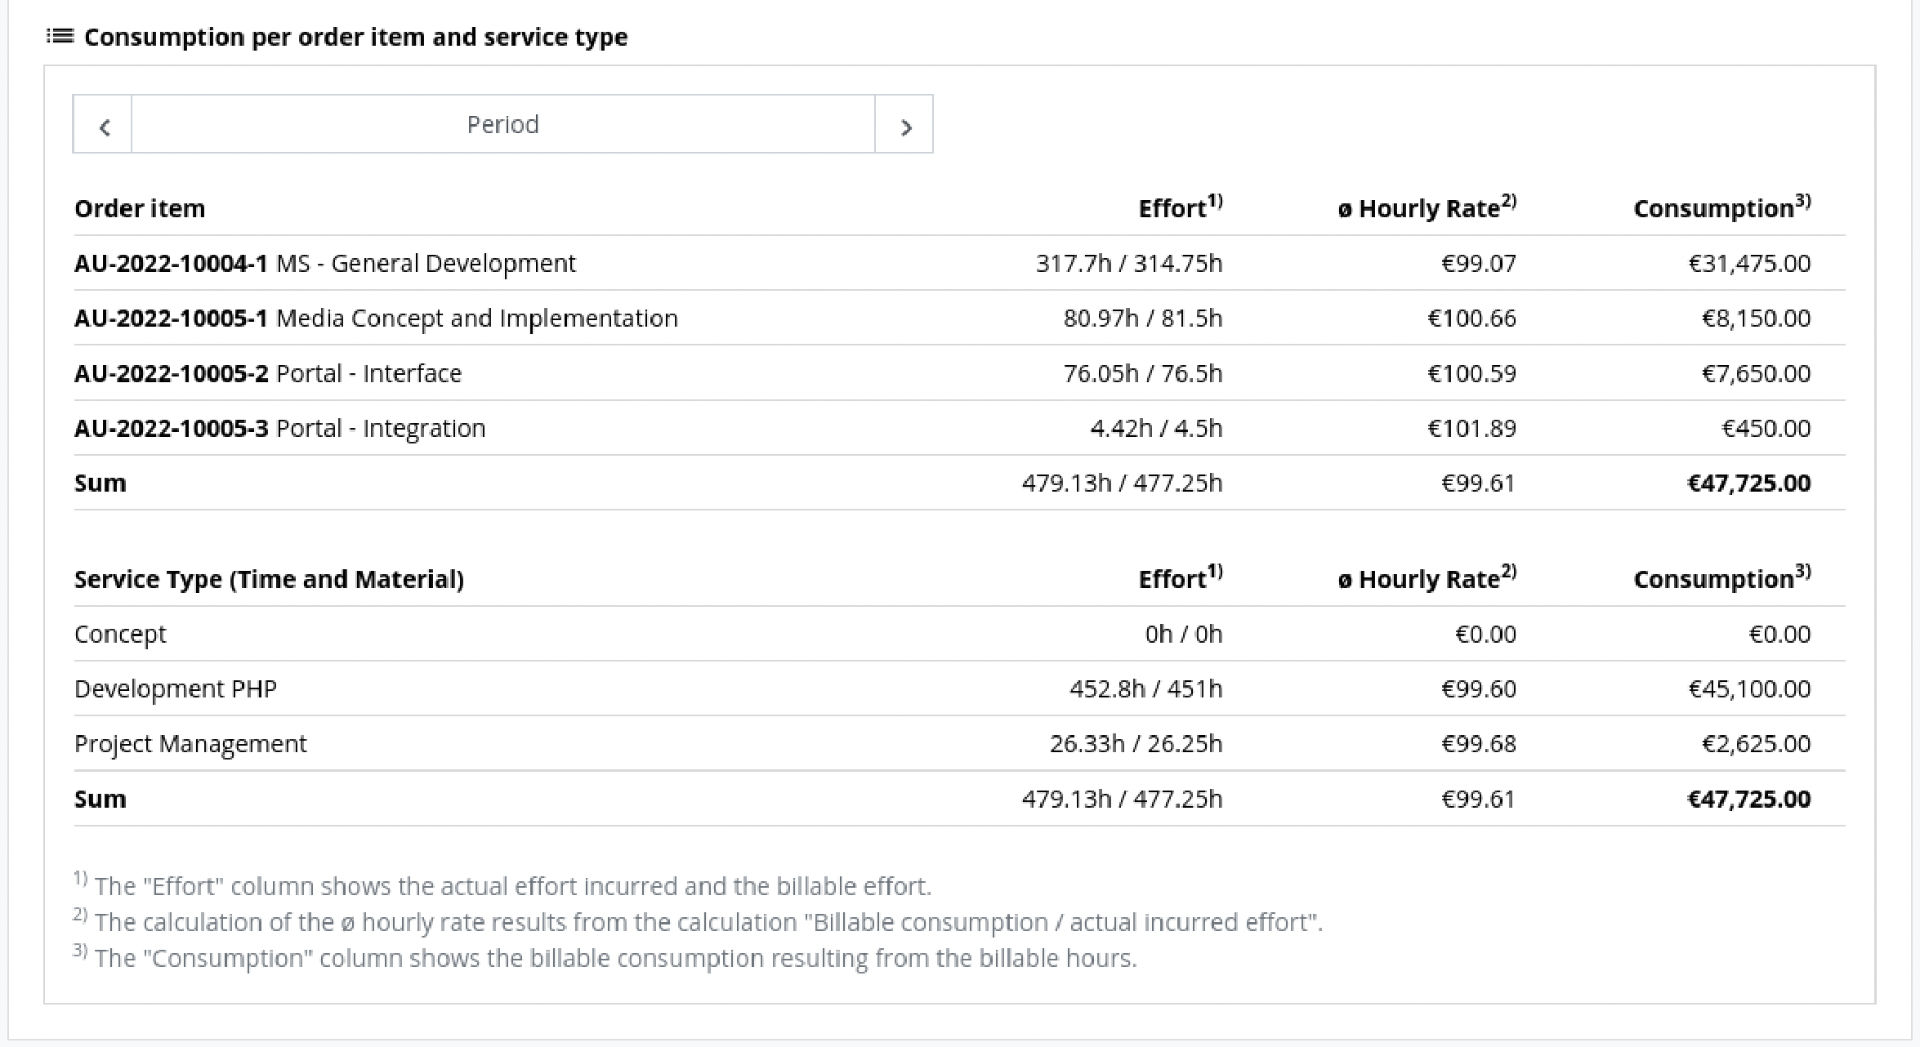
Order Positions
All assigned order items of the project are displayed here with the following information and key figures. are displayed.
- Order Position: The order number with position number and description is displayed here. A link can be used to go directly to the "Controlling" tab of the related order.
- Effort: This column shows the actual and billable effort.
- ø Hourly Rate: The calculation of the ø hourly rate results from the calculation "Billable Consumption / Actual Effort".
- Consumption: This column shows the billable amount resulting from the billable hours.
Another line shows the totals for all columns.
Service Types
Here all service types are listed consolidated over all assigned order positions. If a project has both, fixed price positions and time & material positions, these are consolidated in two tables separately. The following information is displayed per service type.
- Service Type: Name of the service type
- Effort: This column shows the actual effort incurred and the billable effort.
- ø Hourly Rate: The calculation of the ø hourly rate results from the calculation "Billable Consumption / Actually Effort".
- Consumption: This column shows the billable amount resulting from the billable hours.
Another line shows the totals for all columns.
Manage Order Positions
Orders or individual order items can be assigned to a project in foreknown for the implementation (see also Assign Project). At this way it is ensured that also during the implementation of a project the underlying orders always remains in focus.
Order items are assigned to a project by the responsible account manager in consultation with the respective project managers and then appear on the project under the "Orders" tab.
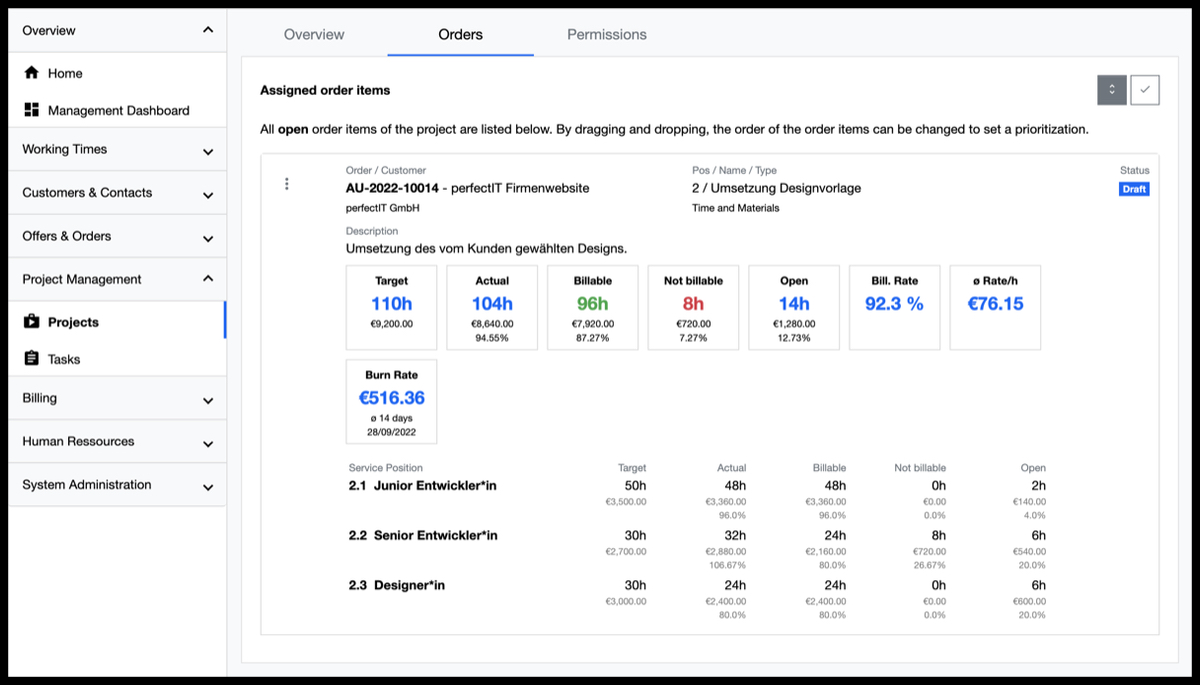
Assigned Order Positions
Below the "Orders" tab, all order items that are currently assigned to the project are displayed. Different views are distinguished, which can be controlled via two buttons on the right side of the tab.
-
Show/Hide Details: When opening a project, all details of the order positions are already displayed, such as the key performance indicators (KPIs), the item description and the service positions. By clicking on the button with the arrows up and down you can switch between the reduced and the detailed view of the order item. The reduced view is advantageous if, for example, the list of order items is to be sorted by means of Drag & Drop to sort the list of order items by importance.
-
Display open/completed Order Positions: Initially the list shows only the open order positions. By clicking on the button with the checkmark it is possible to switch between displaying the completed and open order positions of the project.
Sort Order Positions
The list of order positions can be easily sorted into a desired order using drag & drop. This serves to bring the important order positions, which must be implemented first by the project, to the top. To reorder an order position, it is best to first switch to the reduced view (hide details). Then go with the mouse on the desired order position and drag it with pressed mouse button to a new position in the list. The new order is then saved directly.
Cancel Assignment
An order position that has been assigned to a project can only be removed again by a project manager of the project. This ensures that, for example, open working time bookings are processed before this order position is assigned to another project.
To remove an order position, open the action menu and click on the action "Unassign".
Views of Order Positions
As already described above, it is possible to switch between a reduced and a detailed view of the order items.
- Reduced View: This view is obtained via the action "Hide details". Only the essential data of the order positions
are displayed:
- order no., title, customer
- position, name, type
- status
This view is well suited for changing the order of order positions using drag & drop.
- Detailed View: The detailed view adds the following data to the display of an order position:
- description of the order item (if available)
- key figures (target effort, actual effort, open effort, billable and non-billable services, billing rate, average hourly rate)
- service positions with key figures (target effort, actual effort, open effort, billable and non-billable services)
DOCUMENTATION NOTE Details about the key figures of an order position can be found in the documentation under Features / Offers & Orders / Orders / Controlling.
In this way, project managers and all project participants can see how far the implementation of individual order items has progressed and which order items cannot be implemented in the plan.
NOTE: If an order position is considered "Completed" in the sense of the implementation in the project, then the status of the order position can only be set to "Completed" by the account manager on the order. This ensures that account managers and, if applicable, the customers itself can check whether the requirements of the order position can actually be seen as completed. In the project, only the tasks that have been assigned to an order position can be set to "Completed".
All completed order positions can be listed using the "Show completed" button.
Authorize Project
In the detailed view of a project, the "Permission" tab below the master data can be used to assign permission groups to a project. With the help of these permission groups, users can be assigned to the project with either the role "Project Manager" or "Employee".
The permission groups are created by an account administrator via the dialog "System Administration / Permission Groups" and can then be assigned to a project via the "Assign Permission Group" action.
Each permission group already assigned to the project can be removed again via the action menu (three dots) in the list using the "Remove Assignment" action.
NOTE: If several permission groups are assigned to a project and users are authorized for the project by several permission groups, the sum of all roles with which the user has been assigned to the permission groups applies.