Table of Contents
Introduction
Orders play an important role in foreknown. They are not only the basis for the business relationship between you and your customers, but also very important for controlling and reporting. All services that you or your employees perform are always assigned to an order and an order position/service type in foreknown. Invoicing is also always done in the context of an order.
Regardless of whether services are provided at a fixed price, according to time and materials, in the form of flat rates, e.g. maintenance contracts, or for internal tasks, in foreknown you will always create a corresponding order.
Manage Orders
In the order management of foreknown you get an overview of all orders. In addition, there is the option to search for specific orders, to filter the order list, to create new orders or to edit existing orders.
Search Orders
If you select the "Orders" menu item from the main menu, you will get to the following dialog:
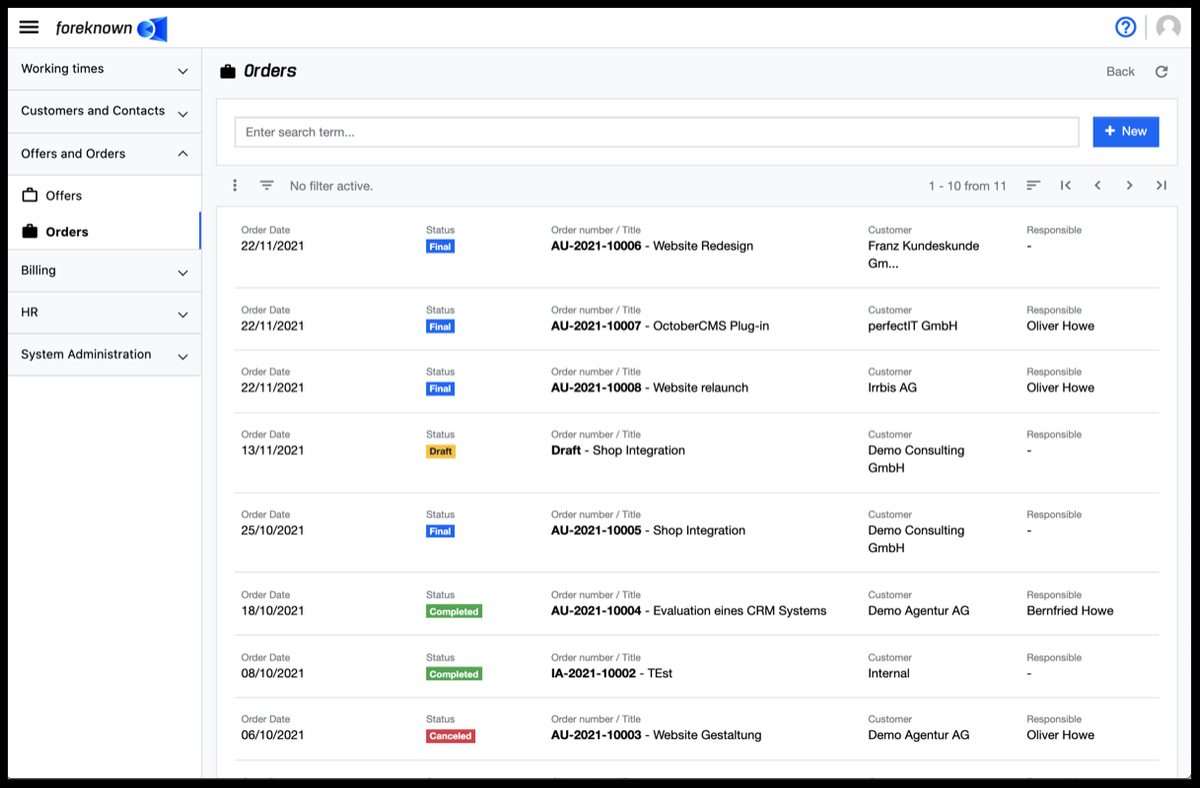
The upper area of the dialog contains the search field and the "+ New" button (see also Create Order). Below this area all already created orders are displayed in form of a list, which can be scrolled, filtered and sorted.
If you enter a search term in the input field, the list will show only those orders that contain the entered search term in the name, order number, customer name or customer number. In this way, individual orders can be found quickly and opened for processing.
In the list display, the order date, the current status, the order number, the title, the customer and the responsible employees are displayed in a sortable and scrollable table.
Filter Orders
In addition to the search function, the order management also offers a filter dialog. In foreknown, the filter dialog is always located as a fold-out dialog on the right-hand side. The filter dialog can be expanded and collapsed by clicking on the button with the three dashes above the list on the left.
The following filter options are offered for orders:
- Business Unit: A business unit can be searched for and selected via an auto-complete field. Only orders that are assigned to the business unit are displayed. Several business units can be selected.
- Orders that are not assigned to any business unit: Checkbox to filter orders without business unit assignment. This filter property may only be used if no business unit has been selected in the previous filter property.
- Customer: A customer can be searched for and selected via an auto-complete field.
- Status: One or more statuses can be selected via an auto-complete field.
- Orders that have non-projected order positions: Checkbox to filter orders that have at least one order position that has not yet been projected.
- Orders that have subscription order positions: Checkbox to filter orders that have an “Other Position” with a subscription service.
By the action "Apply" all orders in the list will be displayed that match the filter criteria. The "x" action removes all filter settings and the list shows all orders again. The "Reset" action (symbol: arrow in a circle) discards all changes that may have been made to a saved filter.
For general information on the filter options, see also chapter Basics: Filters.
Create Order
An order is usually created from an offer when it has been won. However, internal orders can also be created to assign internal services to an order as well. In this case, it is not necessary to create an offer. Therefore, the following applies here:
- Customer Orders should usually be created on the basis of an offer via the "Create Order" action. See also Offer Won. However, it is also possible to create an order without an offer in the order management.
- Internal Orders do not require an offer and can be created directly via the order management.
To create an order, click on the "+ New" button located at the top right of the search field. This button opens the popup dialog "Create Order".
Basic Data
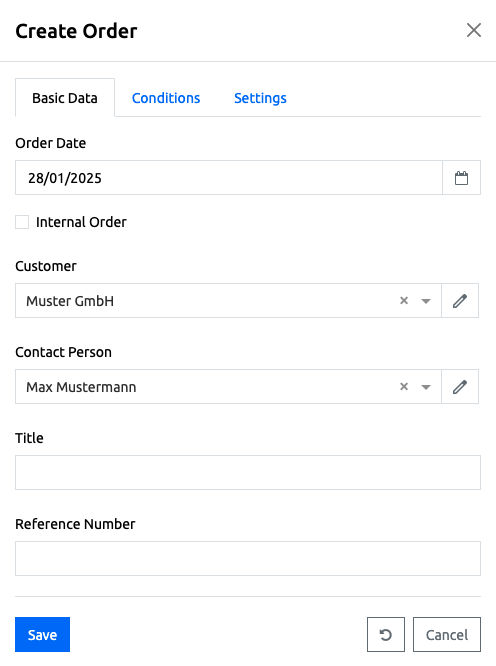
- Order Date: Here the creation date of the order is selected via a calendar. This also appears on the printed order as "Order Date".
- Internal Order: If this checkbox is activated, the order is considered internal and "Customer", "Contact Person" and "Payment Term" are omitted. Services assigned to an internal order are not billable. If the checkbox is not activated, a billable sales order can also be created, which is then not preceded by an offer.
- Visible to public: For internal orders, this option can be used to specify whether the order should be offered
to all project managers when detailed rules are created.
Example: Working times for general meetings are to be booked uniformly for all employees. For this purpose, an internal order is created with an order item "General meetings", which is marked as "Visible to public". Now all project managers can create a task "General meetings" in their projects and assign all working times of this task to the internal order via a detailed rule of the project rule set.
- Customer: An existing customer can be selected from a drop-down list with auto-completion. Clicking on the "+" symbol in the same line opens the "Create Customer" dialog.
- Contact Person: If a customer has been selected, a contact person can be selected from a drop-down list with auto-completion. Clicking on the "+" symbol in the same line opens the "Create Contact" dialog.
- Title: A more precise title of the order is entered here, which can also be used later for searching.
- Reference Number: The "external" reference number of the order is entered here, which is usually provided by the customer (e.g. the customer's order number from their ERP system).
Conditions
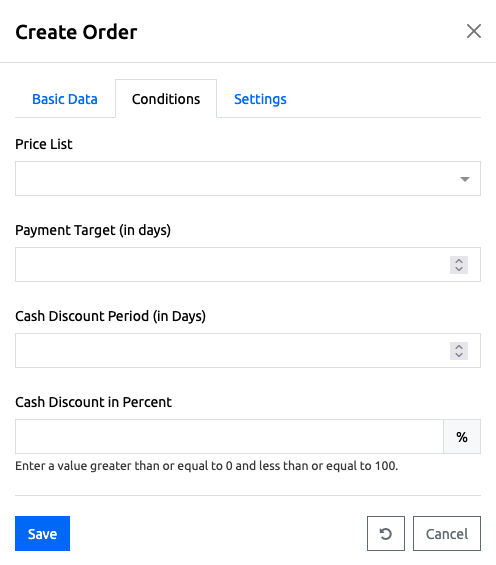
- Price List: If individual price lists have been defined for the customer, the price list marked as standard is preset and another price list can be selected if necessary. This means that when selecting individually agreed customer prices from a price list are used when selecting the service items.
- Payment Target (in days): The value defines the duration in days in which the customer should have paid the invoice, based on the invoice date.
- Payment Discount Period (in days): The value defines the period in days from the invoice date in which the customer may deduct the payment discount.
- Payment Discount: The value defines the payment discount in percent.
Settings
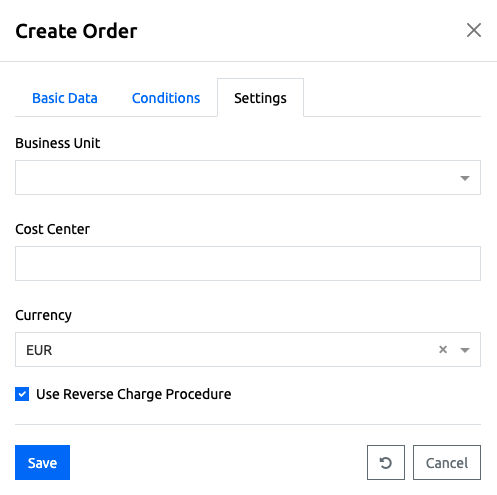
- Business Unit: Select the business unit this order belongs to. All costs and earnings will be considered for this business unit.
- Cost Center: Here you can optionally enter a cost center id for an order. This may be required for later evaluations in external accounting systems. In foreknown the cost center has only informative character.
- Currency: A currency is selected from a drop-down list.
- Flag "Apply Reverse Charge Procedure": Determines whether invoices for this company should be created using the reverse charge procedure and therefore only allow a value-added tax rate of 0%.
The "Save" action creates a new internal order. With the action "Reset" and "Cancel" the entries are discarded and in case of the action "Cancel" the dialog is closed.
To finalize an order, the blue "Finalize Order" button in the detail view must be selected. This opens a pop-up dialog for confirmation, in which a PDF preview of the order can also be called up. If the "Finalize Order" button is confirmed again here, the order status changes to "Final" and from this point on, changes to the order can only be implemented via new versions.
Edit Order
Editing an order is only possible in the "Draft" status. If an order is already in "Final" status, you must first create a new draft version via the "Versions" tab using the "Create version" action.
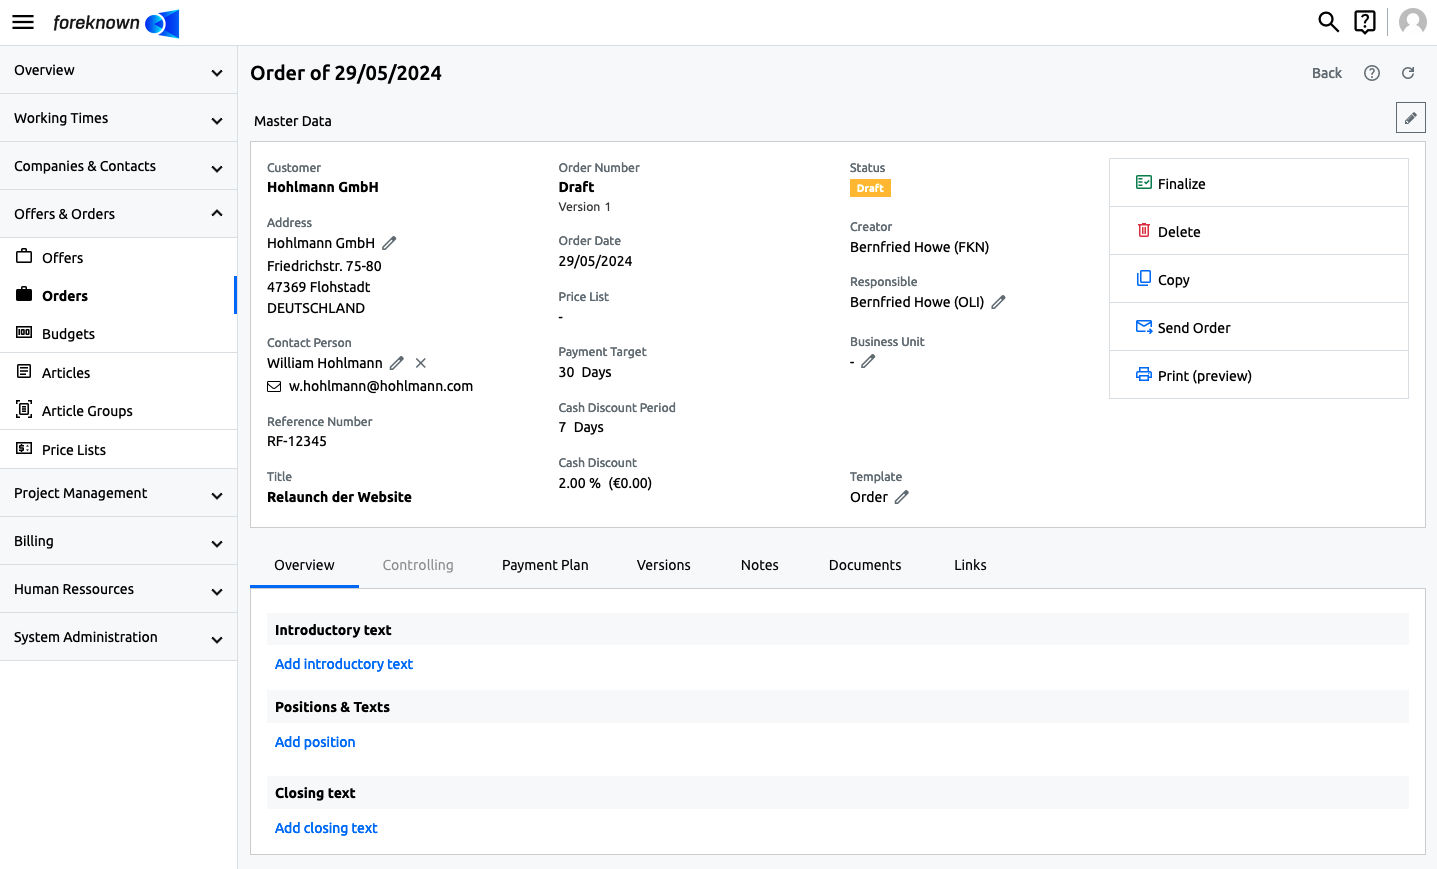
The master data of an order in "Draft" status can be edited via a pop-up dialog. To do this, the detailed view of the order to be edited must be called up. Here you will find a pencil icon in the upper right corner. Clicking on the button opens the "Update Order" dialog. See also the description of the dialog under Create Order.
The fields "Service Recipient", "Document Recipient" and "Delivery Address" can be edited via a joint dialog "Edit Address" dialog.
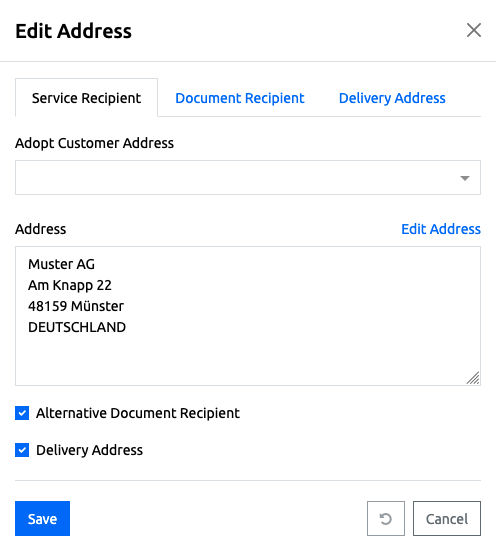
A distinction is made between three address types:
- Service Recipient: This address determines who receives the service and thus also bears the VAT burden in terms of tax law.
- Document Recipient: This optional address determines who should receive the document in order to process it if the address differs from the service recipient.
- Delivery Address: This optional address determines who should receive the goods if the address differ from the service recipient.
Corresponding addresses may already have been stored at the company (customer) so that they can simply be selected or may have already been pre-assigned as the default. Each document has a "Service Recipient" address. The flags "Alternative Document Recipient" and “Delivery Address” are used to activate the “Document Recipient” and “Delivery Address” tabs.
Documentation Note: See also the management of addresses at the company
Also the fields "Contact Person", "Responsible", "Business Unit" and "Template" can be edited directly by clicking on the pencil icon next to the corresponding field in the detailed view.
Below the master data, four additional tabs are offered:
- Overview: Contains the maintenance of the introduction text, the order positions with the service positions, text positions, the closing text and optional discounts.
- Controlling: All important KPIs concerning the order are displayed here.
- Versions: Each change to an order creates a new version. All versions are listed below this tab and new versions can be created there.
- Payment Plan: An order can have a payment plan stored if it contains order positions of the type "Service at fixed Price" or "Other Position". A payment plan may have already been generated from the offer on the order.
- Notes: Notes can be stored for an order to document any changes or agreements with the customer.
- Documents: Additional documents can be uploaded to an order and sent via e-mail together with the order.
- Links: Links to offers, other order, invoices and budgets can easily used to jump to related items.
Create Order Position
In the lower half of the detail view, the order positions can be seen.
By clicking on the "Add position" link below the area "Positions & Texts", the "Create Order Position" dialog opens. For one order three different types of order positions can be created. These are described in detail below.
Order Position according to Time and Material
If a service is to be billed according to effort, an order position of the type "Service according to Time and Material" must be selected.
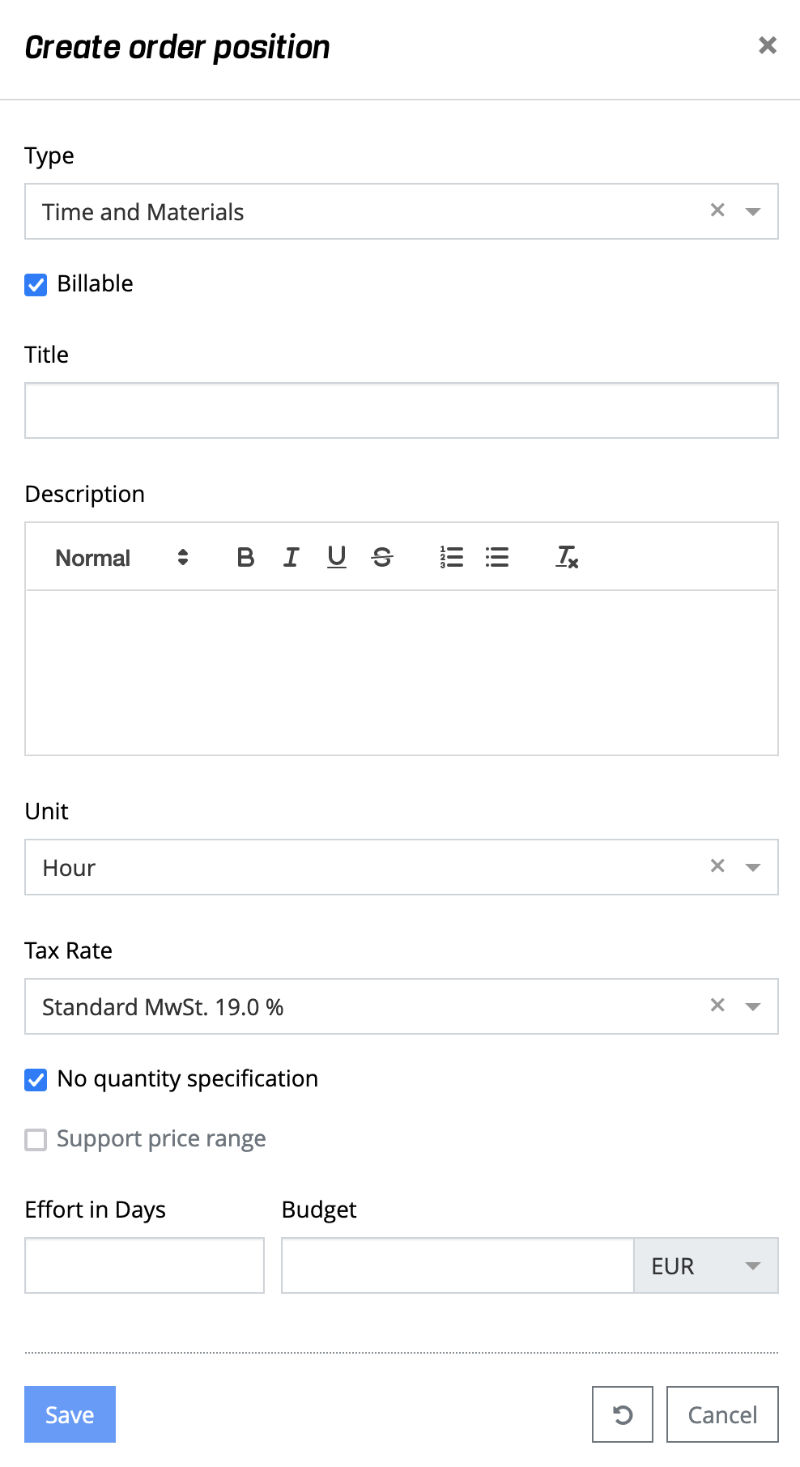
- Type: The type "Service according to Time and Material" is selected via a drop-down list.
- Billable: If this checkbox is checked, the amount of the position becomes part of the order total and future services are considered billable.
- Title: A short title of the position is entered here.
- Description: An additional description for the order position can be entered here.
- Unit: A drop-down list can be used to select between "Hour" and "Day".
- Tax Rate: A VAT rate must be selected from a drop-down list.
- No quantity specification:
- This checkbox determines whether a quantity must be specified for the service positions. Activate this checkbox if you only want to offer hourly or daily rates, but the quantity only results on demand.
- When activated, the columns "Amount" and "Net/Gross" are hidden for the service items and the fields "Effort in days" and "Budget" are displayed. These fields can be used to enter planned values despite a missing quantity specification, which can be used for controlling and also as limits for the service transfer.
- If the entire order does not contain any positions with quantity information, the totals block and the possibility of discounting will also be hidden.
- Support price range: If this checkbox is checked, a MIN and MAX value can be specified in the "Create Service Position" dialog under "Amount".
The "Save" action saves the order position. With the "Reset" and "Cancel" actions, the entries are discarded and, in the case of the "Cancel" action, the dialog is also closed.
An order position of the type "Service according to Time and Materials" always needs at least one service position, which defines which service types with which conditions are required for the described service.
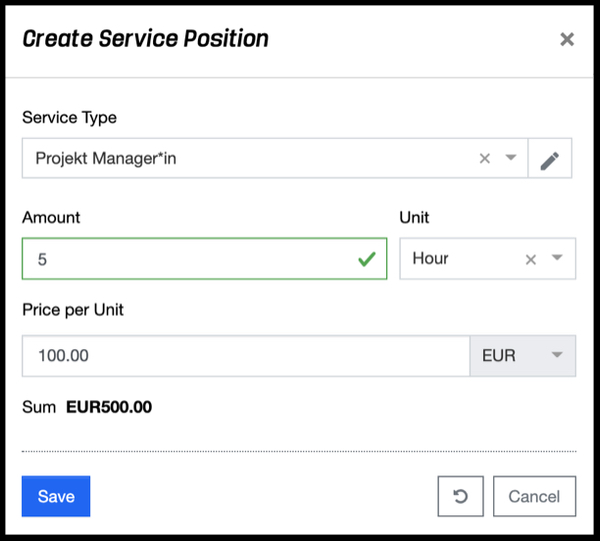
Below the created order position you will find the blue link "Add Service Position". Clicking on it opens the "Create Service Position" dialog.
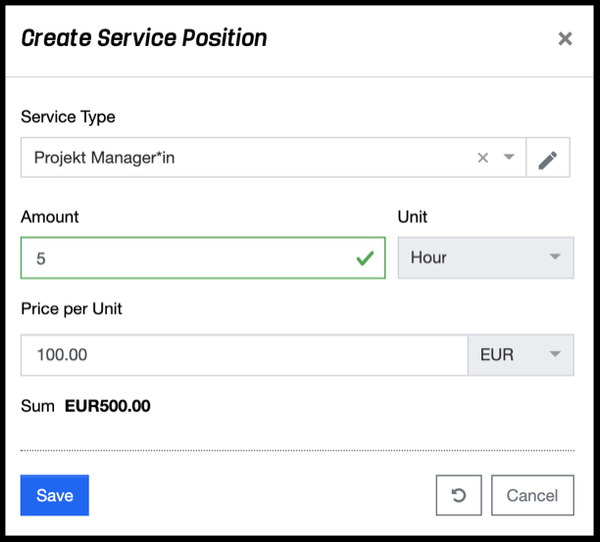
- Service Type: An existing service type can be searched for and selected via a field with auto-completion. If the desired service type does not yet exist, it can be created directly with the name entered.
- Amount: The amount of hours or days (depending on the selected unit) calculated for this service type is entered here. If the checkbox "Support price range" has been activated for the position, the fields Amount (Min) and Amount (Max) will appear.
- Unit: In this case, the unit is already set to the unit selected in the order position.
- Price per Unit: Automatically taken from the selected service type and can be adjusted if necessary.
- Total: Displays the total resulting from the amount x unit price.
The "Save" action saves the entered data. With the action "Reset" and "Cancel" the entries are discarded and in case of the action "Cancel" the dialog is closed.
Order Position at fixed Price
If a service is to be offered at a fixed price, the order position must be given the type "Service at fixed Price".
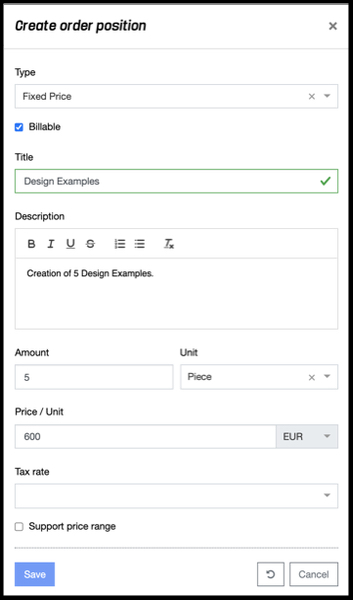
- Type: Select "Service at fixed Price".
- Billable: If this checkbox is ticked, the amount of the position will become part of the total amount of the order.
- Title: A short title of the position is entered here.
- Description: An additional description of the order position can be entered here.
- Amount: Typically the amount is set to 1 for a fixed price specification.
- Unit: The unit is always set to "piece".
- Price/Unit: Typically the fixed price total is entered here.
- Tax Rate: A VAT rate must be selected from a drop-down list.
- Support price range: If this checkbox is checked, a MIN and MAX value can be entered in the "Create Service Position" dialog under "Quantity". However, for fixed price positions, a price range does not affect the position value, but only the service positions.
The "Save" action saves the entered data. With the action "Reset" and "Cancel" the entries are discarded and in case of the action "Cancel" the dialog is closed.
Service positions must also be created for an order position of the type "Service at fixed Price". However, these service positions are not intended for billing, but for controlling and usually correspond to a cost estimate that was made for the determination of the fixed price.
Under the created order position there is a link "Add Service Position" which opens the dialog "Create Service Position".
- Service Type: An existing service type is selected from a drop-down list. With the "+" in the line, a new service type can be created directly.
- Amount: The amount of hours or days (depending on the selected unit) calculated for this service type is entered here. If the checkbox "Support price range" has been activated for the position, the fields Amount (Min) and Amount (Max) will appear.
- Unit: From a drop-down list, you can choose between "Hour" and "Day".
- Price per Unit: Is automatically taken from the service type and can be adjusted if required.
- Total: Displays the total resulting from the amount x unit price.
The "Save" action saves the entered data. With the action "Reset" and "Cancel" the entries are discarded and in case of the action "Cancel" the dialog is closed.
With this type of order position, the service positions are displayed but do not affect the total of the offer position.
Other Order Position
In an order, positions can also be created that are not to receive service positions, e.g. for the settlement of license costs or products.
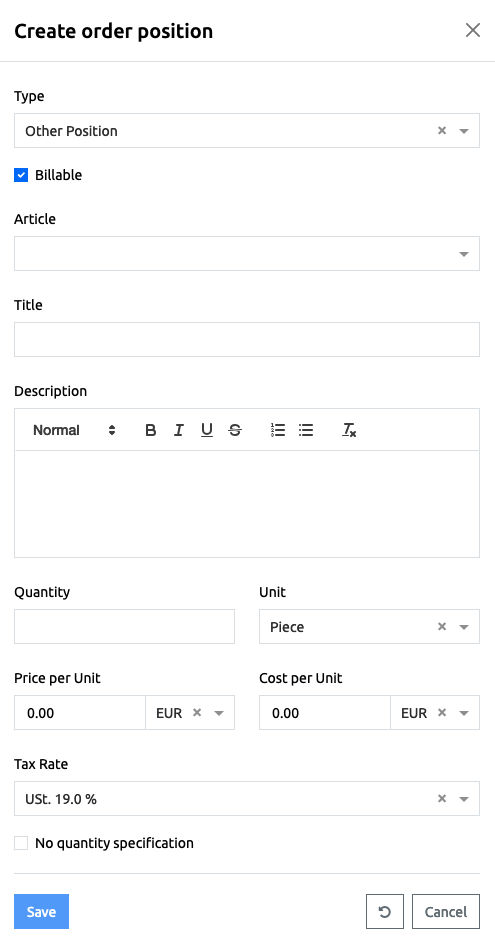
- Type: Select "Other Position".
- Billable: If this checkbox is ticked, the amount of the position will become part of the total amount of the order.
- Article: An article can be selected, which takes over the description, price and unit data into this offer position.
- Title: A short title of the position is entered here.
- Description: An additional description of the order position can be entered here.
- Amount: The amount of units used.
- Unit: Following unit types are supported: "hour", "day", "month", "flat rate", and "piece"
- Price per Unit: The price per unit is entered here.
- Cost per Unit: The cost per unit can be entered here.
- Tax Rate: A VAT rate must be selected from a drop-down list.
- No quantity specification: This checkbox determines whether a quantity must be specified. Activate this checkbox if you want to offer only a single price, but the quantity results only on call. If activated the columns "Quantity" and "Net/Gross" will be hidden for the position. If the whole order does not contain items with quantities, the totals block and the possibility of discounting will also be hidden.
With the action "Save" the entered data will be saved. With the action "Reset" and "Cancel" the entries are discarded and in case of the action "Cancel" the dialog is closed.
Edit Order Position
To edit an order position, for example to adjust the service positions, the order must have the status "Draft" or a new version of the order must be created first. (See Manage Versions).
In a new version, the order has again the status "Draft" and can thus be changed. Existing order position can be edited, changed and newly added. The editing dialogs for an order position correspond to those that are also used during creation (see Create Order Position).
NOTE: If the unit of an order position is changed after the creation of service positions, the units of the service positions are also changed and all quantities are reset to 0.
Via the action menu in front of each order position several functions to update the order position are available.
Only the status and the settings of an order position can be changed without creating a new version. See the sections below for more information.
Change Order Position Status
When an order goes into development, the individual order position are developed step by step. To be able to document the progress on an order, there is the option to change the status of each order position.
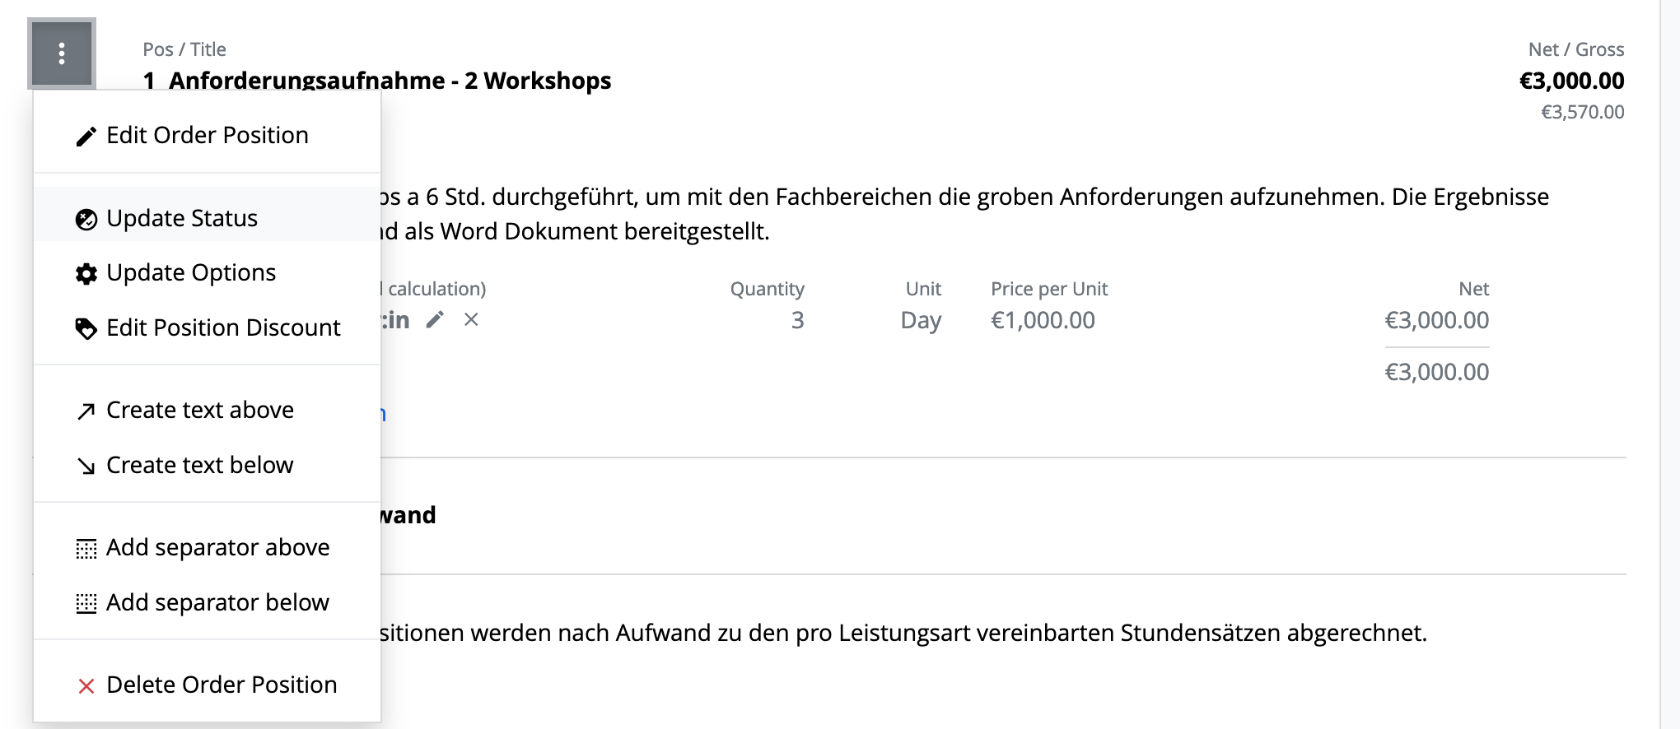
Via the action menu of the desired order position the corresponding dialog can be opened with the action "Change status".
- Complete Order Position: With this action you mark an order position as "Completed". All services required to fulfill this order position have been performed and assigned. No further service entries can be assigned to this order position.
- Pause Order Position: With this action you mark an order position as "Paused". The assignment of service entries to this order position is to be stopped.
For items that are already in "Completed" or "Pausing" status, the "Reopen Order Position" option is offered in the dialog. Service entries can then be added to this order position again.
Note: If an order item is no longer required, a new order version should always be created. The order item can be deleted. If service entries have already been assigned to this order item, the amount could be adjusted to the total of the services already assigned and the status should be set to "Completed".
Edit Subscription Configuration
An order position of the type “Other Position” can be configured as a subscription service. Via the action menu of the desired order position, the corresponding dialog with all settings can be opened with the action “Change Subscription Configuration”. can be opened.
The following settings are offered:
- Activate Subscription Service: This checkbox is used to specify whether additional services should be automatically generated in the form of a subscription on the basis of this order item. in the form of a subscription should be generated automatically on the basis of this order item. If this checkbox is activated, the following subscription settings appear:
- Subscription Cycle: This drop-down selection can be used to specify whether additional services are to be generated weekly, monthly, quarterly, half-yearly or yearly.
- Due at: This drop-down selection can be used to specify whether additional services should be generated at the beginning or end of a subscription cycle.
- +/- Days: This field can be used to specify a number of days that is used to calculate a later start or earlier end date.
If the “Start” option has been selected under “Due at”, the specified number of days is added to the start date
of the subscription cycle. If the “End” option has been selected, the specified number of days is subtracted from
the end date of the cycle. Depending on the subscription cycle, different values are permitted. If a higher value
than allowed is entered, the due date is automatically set to the first or last day of the subscription cycle:
- Weekly: 0-6 days
- Monthly: 0-30 days
- Quarterly: 0-92 days
- Half-yearly: 0-182 days
- Yearly: 0-364 days
- Execution Period: This optional date selection can be used to define a period in which the subscription services are to be generated. You can also specify only a start or end date.
- Repetitions: Defines the number of repetitions or additional services to be generated. If the field is empty, the amount of the order item is used as the upper limit. If the order item does not contain a quantity specification, the subscription runs until the order or order item is set to “Completed”.
- Description of the Additional Service: A different description for the additional services can be entered in
this input field. If the input field is empty, the name of the order item is used for the additional service.
The input field supports the following placeholders:
- {title}: Inserts the title of the order item.
- {cycle}: Inserts the display name of the billing cycle.
Example for a Subscription Configuration:
For a monthly payment over the next 12 months on the 15th of the month with the text “Subscription: Server Maintenance (Monthly)” the following settings should be made:
- Subscription Cycle: Monthly
- Due at: Start (1st of the month)
- +/- Days: 14 (start is the 1st day + 14 days => 15th day)
- Repetitions: 12 (if not already defined as a quantity in the order item)
- Title of the additional service: e.g. Subscription: {title} ({cycle})
The subscription service runs nightly after 0:00 a.m. and generates all subscription services due as additional services on the current date. For the example above, an additional service would therefore be generated on the 15th of each month.
Create Text Position
An order usually consists not only of positions that define services, but can also contain additional descriptive texts. Therefore, foreknown offers the possibility to create not only introductory and concluding texts, but also explanatory texts between the order positions.
In an empty order, you will find the following actions for the "Introduction Text" and "Closing Text" sections "Add Introduction Text" and "Add Closing Text".
As soon as a text position has been created in an area, the actions "Create content above" or "Create content below" can be performed via the action menu of the text position. These actions are also available in the action menu of an order position and thus also allow the insertion of text positions there.
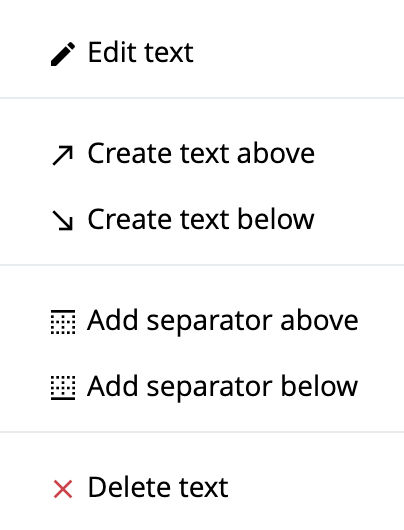
The action menu of a text position contains the following actions:
- Edit text: This action opens a dialog that allows you to enter an individual text via an editor with simple formatting options. Alternatively, a text based on a pre-defined text module can be copied into the text position. Placeholders (drop-down list) can be used to enter data of the customer assigned to the order and the order can be integrated into the texts.
- Create text above: This action also opens the dialog for creating a new text position, which will be inserted above the selected text position.
- Create text below: This action also opens the dialog for creating a new text position, that will be inserted below the selected text position.
- Add/Remove Separator Above: This action adds or removes a separator line above the text position.
- Add/Remove Separator Below: This action adds or removes a separator line below the text position.
- Delete text: This action deletes the currently selected text position if deletion has been confirmed before.
The action menu of the order position also has actions to create text positions.
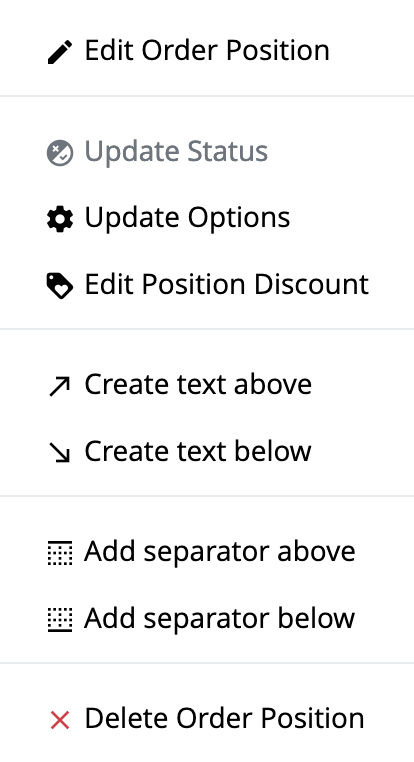
Again, it can be decided whether a text is to be inserted above or below an order position.
Assign Project
Once an order has been finalized, implementation is usually started or scheduled in a project. The account manager usually then determines, in consultation with the project managers, which order items are to be implemented in which project.
For this step, foreknown provides the action "Assign Project", which can be called up in the master data block via the button of the same name.
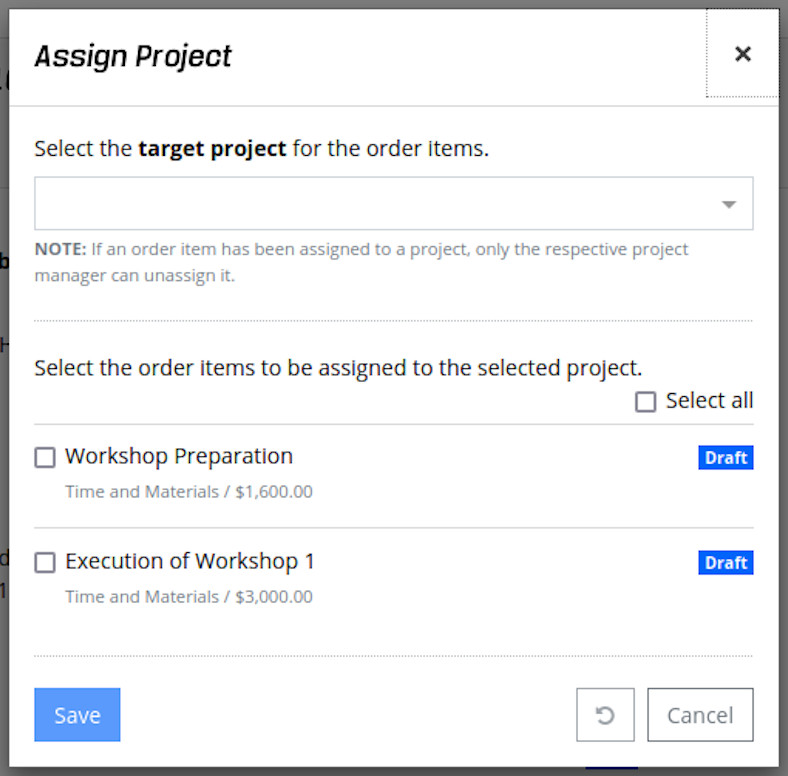
The "Assign Order Items to Projects" dialog opens, in which the project to which order items are to be assigned is first selected. Subsequently, the customer advisor can select the desired positions from a list of order positions (checkboxes). Via the checkbox "Select all" all positions can be selected or deselected.
With the action "Save" the selected order items are assigned to the project and removed from the list. This process can be repeated as long as order items are not yet assigned.
The "Reset" action returns the dialog to its initial state. The action "Cancel" closes the dialog.
Note: Assignment of order items to projects can only be done by an account manager from the underlying order. Once an order item has been projected, only project managers of the project can cancel this assignment. This ensures that the responsible persons for the order or project are always involved in the process of assignments or cancellations of an assignment.
Print Order
To print an order, click on the "Print" action in the upper right part of the master data area. This will automatically download the current order as a PDF document.
NOTE: A template must be selected in advance.
Delete Order
Orders that are in the "Draft" status and do not have further versions can be deleted. For this case, the action "Delete" is displayed in the upper right part of the master data area. A confirmation dialog opens, which must be confirmed with the action "Delete". If an older version already exists, the current version of the order, if it is in "Draft" status, can be deleted via the "Versions" tab.
NOTE: The "Delete" action disappears as soon as the order status is changed to "Final".
Change Order Status
Orders can have different statuses that make it clear where an order is currently in the process and what actions are possible. All statuses and the possible actions are shown below.
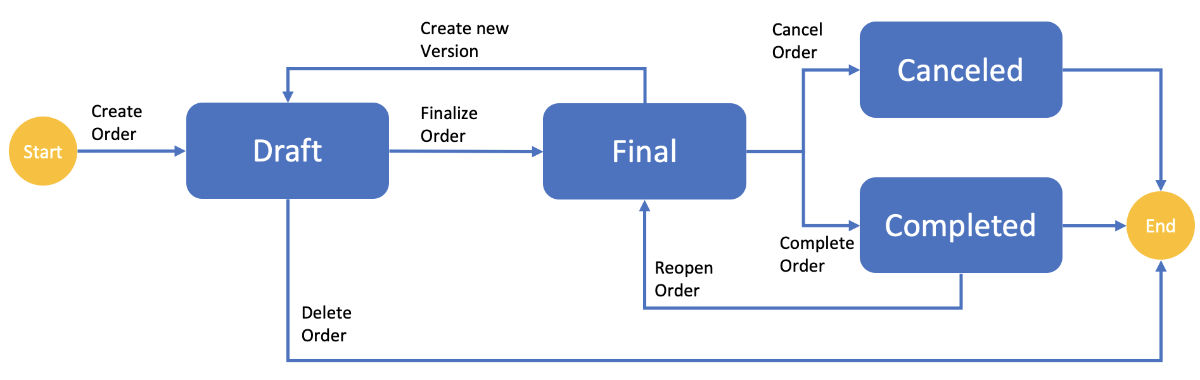
Each order is initially created with the status "Draft". This status still allows complete processing and deletion of the order. Furthermore, these orders have not yet received an order number from the associated number range. Once the order has been completed, it can be finalized (see Finalize Order).
Finalize Order
To change the order status to "final", the "Finalize" action must be clicked in the upper right part of the master data area. The order will then be checked for completeness and a popup dialog will open. If certain conditions are not met, corresponding errors and warnings will be displayed.
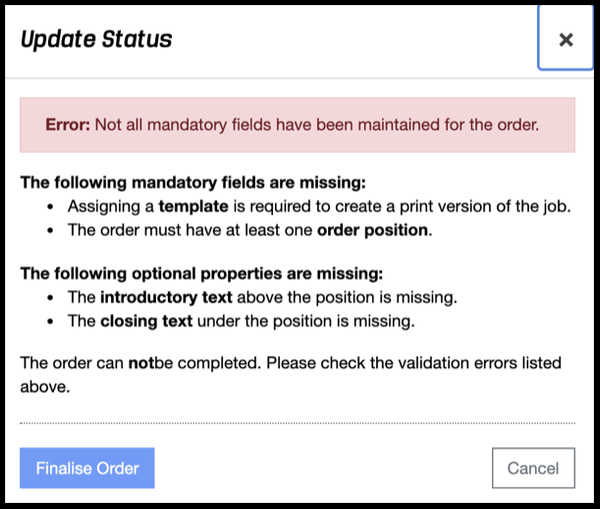
The following conditions must be met to "finalize" the order:
- Template: An order template is required to generate the print version.
- Order Position: At least one order position must be created.
- Service Position: Depending on the order position type, at least one service position must be created.
- Payment Plan: A payment plan may need to be created if the order contains Fixed price or Other positions.
Notes are displayed for the following properties if they are not maintained:
- Introductory Text: An introductory text can be entered in the "Overview" subitem.
- Closing Text: In the subitem "Overview" a closing text can be entered.
If you click on "Finalize Order" in the pop-up dialog, the order status is set to "Final".
NOTE: This action cannot be undone.
Cancel Order
Sometimes it happens that an order that has already been finalized cannot be implemented after all. Since such an order has already been assigned an order number from the number range and complete traceability must be ensured, the order cannot simply be deleted.
In this case, an order is cancelled. Clicking on the red "Cancel Order" button in the detail view opens a confirmation dialog. If "Cancel Order" is selected here again, the order status is set to "Canceled". The order can then only be printed.
Complete Order
When an order has been fully implemented, i.e. all order postions have either been completed, canceled or aborted, it can be set to the "Done" status.
Clicking on the "Complete" action in the upper right part of the master data area opens the "Change status" confirmation dialog, where the status is changed by clicking on "Complete Order" again. The order can then only be printed.
Reopen Order
If an order is already in the "Completed" status, no more activities can be assigned to the order, for example. To enable this again, the order must be reset to the "Final" status.
By clicking on the action "Reopen" on the right side of the master data area, the confirmation dialog "Change status" is opened where the status can be changed by clicking on "Reopen order" again. The order can then be used again.
Extended Configuration
An order in foreknown is not only used to create order documents for a customer, but is also for the transfer of working hours into billable service entries, for invoicing and for controlling to determine the success of orders.
In order to create individual setting options for these tasks, an action "Update Options" is offered for each order and service position.
Configure Order Position
An order in foreknown is not only used to create order documents for a customer, but is also the basis for transferring working times into billable services, for invoicing and for a reporting system to be able to determine the success of orders. In order to create individual setting options for these tasks, a "Change Settings" action is offered per order position in the action menu. Clicking on this action of an order position opens the "Change Settings" dialog.
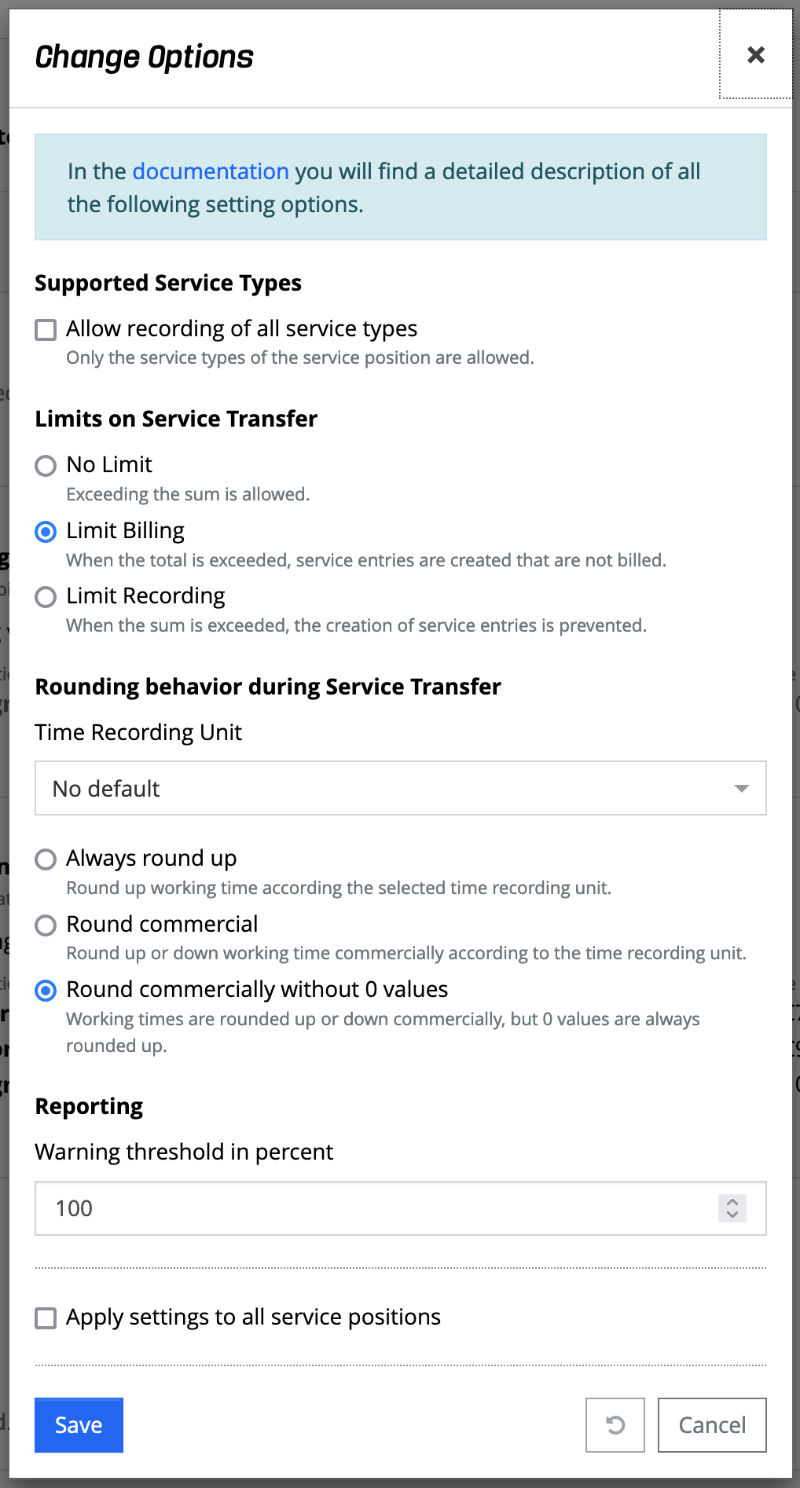
The following settings can be configured:
-
Supported Service Types:
- Allow Recording of all Service Types: During the service transfer, working times are generally only assigned to an order position if this also has a service position that has the same service type as the service type that was determined during the transfer. If this checkbox is activated, services whose service type was not defined in the list of service positions can also be assigned to the order position.
Example: An order position has been provided with a service position that has 10 hours of service type "Senior Developer". If a working time with the service type "Junior Developer" is to be booked to this order position, the above checkbox must be activated. Otherwise, the transfer of this working time will be rejected.
-
Limits on Service Transfer: If a service is booked against an order position, this also reduces the still available financial amount, which results from the sum of the service positions. In foreknown there is now an option to define how services should be handled when the remaining sum of an order position no longer covers the expense of the service.
-
No Limit: This option specifies that even if the order position total is exceeded, services can still be booked to the order position. Thus, overbooking is possible.
Note: For fixed price order positions, it is always ensured that the billable effort never exceeds the target effort of the order position. In order to be able to adhere to the exact target effort, the effort that can no longer be taken over completely is reduced to the available amount. Furthermore note that the number of billable hours continues to increase in order to ensure that exceeding the fixed price does not have a negative impact on the billing rate of an employee, but rather only on the achieved ø hourly rate.
Example: An order item has a target expense of EUR 1,500. There are a total of 4 services a €600.00 (6h x €100.00). When transferring the services, the first two service entries are fully charged, the third service entry only with €300.00 and the last service with €0.00, so that the billable amount is exactly €1,500. The number of hours of the service entries in the amount of 24h are taken over completely as billable hours. However, the ø hourly rate is reduced to €62.50 (€1,500 / 24h).
-
Limit Billing: This option is used to specify that services can be assigned to the order position, but that the billable hours are set to 0 if the order position total is exceeded. If no automatic transfer of working hours has been activated, corresponding notes will appear in the list of the service transfer dialog.
Note: For fixed price order positions, this option behaves identically to the "No limit" option. See Note on the "No limit" option.
-
Limit Recording: This option is used to specify that services can no longer be created for this order position if the order position total is exceeded. The associated working time entries remain in the list of the service transfer dialog with a corresponding error message.
-
-
Rounding Behavior during the Service Transfer:
- When a service is generated from a working time, the following options can be used to specify whether and how rounding of
the working time duration is performed.
- Time Recording Unit: A selection list can be used to specify whether the duration of a working time is to be transferred without rounding (No default), or rounded to a full 5, 10, 15, 20, 30, 60 minutes. For the following options, one of the time recording units must have been selected.
- Always round up: This option specifies that all working times are always rounded up based on the selected time recording unit.
- Round commercially: This option specifies that all working times are rounded commercially based on the selected time recording unit.
Example: If the time recording unit is 15 minutes, it would be rounded as follows:
- 7 minutes becomes 0 minutes
- 8 minutes become 15 minutes
- 17 minutes would become 15 minutes
- Round commercially without 0 values: This option behaves like the "Round commercially" option with the exception that rounding down to 0 is not allowed, but in that case rounding up also takes place.
Example: For a time recording unit of 15 minutes, the rounding would be as follows:
- 1-7 minutes becomes 15 minutes
NOTE: If the billable portion has been explicitly set to 0 for a working time, 0 will also be adopted in this case when the service is generated.
- When a service is generated from a working time, the following options can be used to specify whether and how rounding of
the working time duration is performed.
-
Reporting:
- Warning threshold in percent: A warning threshold can be defined per order position, which ensures that a responsible person is informed during the implementation of an order when x percent of the order position total has been consumed. - Currently not yet evaluated -
-
Apply Settings to all Service Positions: This checkbox should be activated if all service positions are to receive the same settings as the order position settings. Deviating settings for service positions will then be overwritten if necessary.
The "Save" action saves the changes for the order position and, if applicable, service positions. The "Reset" and "Cancel" actions discard the entries and, in the case of the "Cancel" action, close the dialog.
NOTE: To edit these settings for an order that is already in the "Final" status, a new order version is not required.
Configure Service Position
Service positions also have some setting options that can be configured for the transfer of working times into billable services, for invoicing and for a reporting system. Therefore, there is also an action "Change Settings" per service position.
Clicking on the cogwheel symbol behind the name of a service position opens the "Change Settings" dialog.
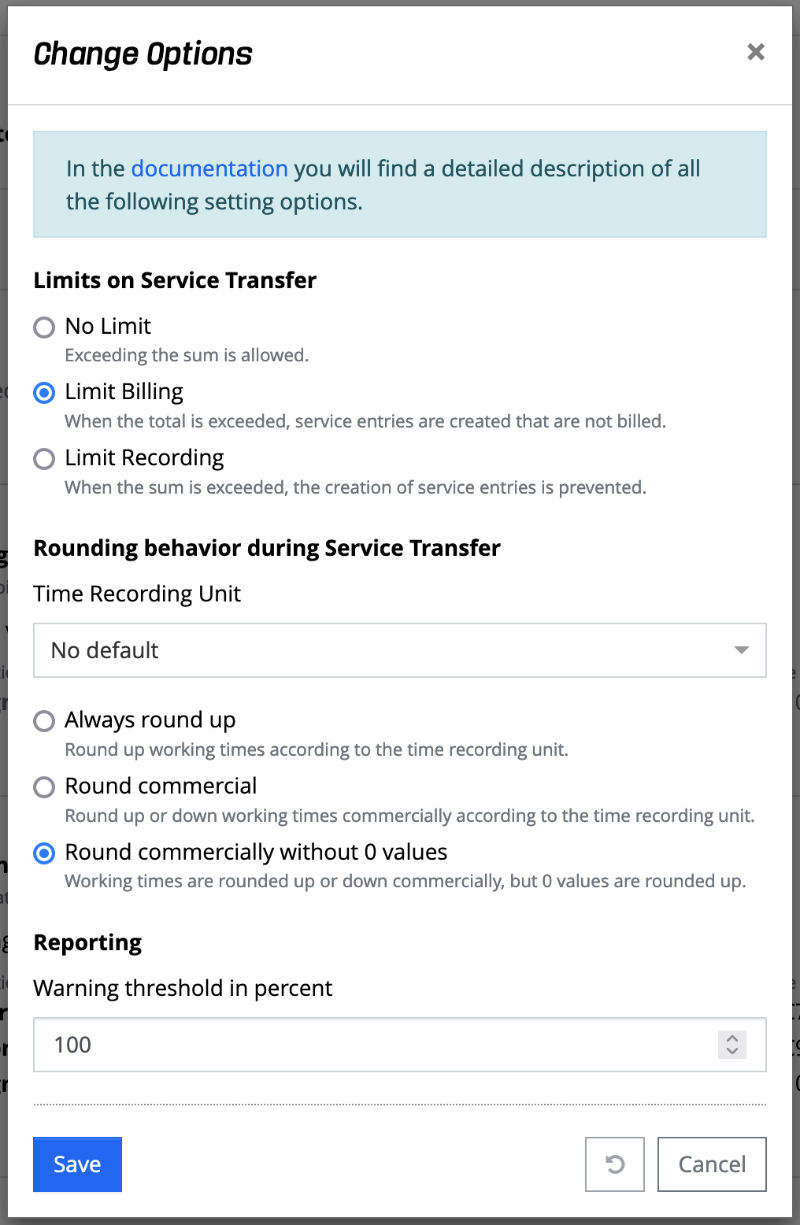
The following settings can be configured:
-
Limits on Service Transfer: If a service is booked against a service position, this also reduces the still available financial amount of the service positions. With this option you can define how service entries should be handled when the remaining amount no longer covers the expense of the service entry.
-
No Limit: This option specifies that even if the service position total is exceeded, services can still be booked to the service position. Thus, overbooking is possible.
Note: For fixed price order positions, it is always ensured that the billable effort never exceeds the target effort of the service position. In order to be able to adhere to the exact target effort, the effort that can no longer be taken over completely is reduced to the available amount. Furthermore, note that the number of billable hours continues to increase in order to ensure that exceeding the fixed price does not have a negative impact on the billing rate of an employee, but rather only on the achieved ø hourly rate.
Example: An service psotion has a target expense of EUR 1,500. There are a total of 4 services a €600.00 (6h x €100.00). When transferring the services, the first two service entries are fully charged, the third service entry only with €300.00 and the last service with €0.00, so that the billable amount is exactly €1,500. The number of hours of the service entries in the amount of 24h are taken over completely as billable hours. However, the ø hourly rate is reduced to €62.50 (€1,500 / 24h).
-
Limit Billing: This option is used to specify that service entries can be assigned to service positions, but that the billable hours are set to 0 if the service position total is exceeded. If no automatic transfer of working hours has been activated, corresponding notes will appear in the list of the service transfer dialog.
Note: For fixed price order positions, this option behaves identically to the "No limit" option. See Note on the "No limit" option.
-
Limit Recording: This option is used to specify that services can no longer be created for this service position if the service position total is exceeded. The associated working time entries remain in the list of the service transfer dialog with a corresponding error message.
-
-
Rounding Behavior during the Service Transfer: When a service is generated from a working time, the following options can be used to specify whether and how rounding of the working time duration is performed.
- Time Recording Unit: A selection list can be used to specify whether the duration of a working time is to be transferred without rounding (No default), or rounded to a full 5, 10, 15, 20, 30, 60 minutes. For the following options, one of the time recording units must have been selected.
- Always round up: This option specifies that all working times are always rounded up based on the selected time recording unit.
- Round commercially: This option specifies that all working times are rounded commercially based on the selected time recording unit.
Example: If the time recording unit is 15 minutes, it would be rounded as follows:
- 7 minutes becomes 0 minutes
- 8 minutes become 15 minutes
- 17 minutes would become 15 minutes
- Round commercially without 0 values: This option behaves like the "Round commercially" option with the exception
that rounding down to 0 is not allowed, but in that case rounding up also takes place.
Example: For a time recording unit of 15 minutes, the rounding would be as follows:
- 1-7 minutes becomes 15 minutes
NOTE: If the billable portion has been explicitly set to 0 for a working time, 0 will also be adopted in this case when the service is generated.
-
Reporting:
- Warning threshold in percent: A warning threshold can be defined per order position, which ensures that a responsible person is informed during the implementation of an order when x percent of the order position total has been consumed. - Currently not yet evaluated -
The "Save" action saves the changes for the order position and, if applicable, service positions. The "Reset" and "Cancel" actions discard the entries and, in the case of the "Cancel" action, close the dialog.
NOTE: To edit these settings for an order that is already in the "Final" status, a new order version is not required.
Extended Functions
In addition to the basic functions of an order, there are other functions, such as maintaining discounts or the management of payment plans, versions and notes.
Send Order
An order can be sent as a PDF document via e-mail regardless of its status. This makes it possible, for example, to send a draft order to a customer and only finalize the order after approval. If the customer has change requests, these can be easily implemented without having to create a new version of the order.
As soon as an order is finalized, foreknown also creates the final PDF document with the order data.
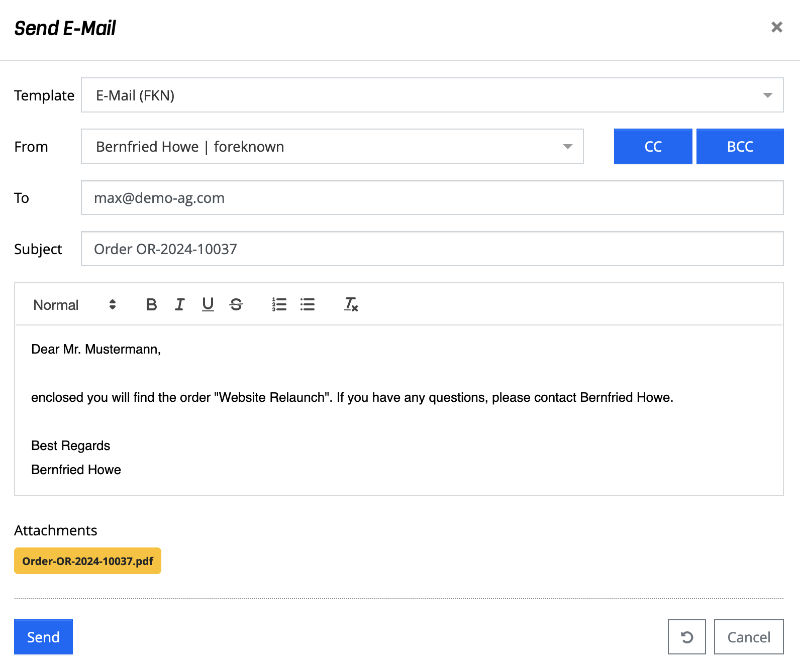
Sending via e-mail is triggered with the "Send Order" action. The "Send E-Mail" dialog opens, which is preset with data from the "Standard Settings for Orders".
Further details on the "Default Settings for Orders" can be found in the online documentation under "System Administration / Settings".
The following properties can be set for sending the order via e-mail:
- Template: An e-mail template can be selected to be used as a frame for the subsequent text. You can add your own e-mail templates via the template management under "System Administration / Templates". A simple standard template, which only displays the text entered, is already supplied.
- From: The sender of the e-mail can be selected via a drop-down list. This is preset with the logged in user by default.
- To: One or more e-mail addresses can be entered in a text field, separated by commas. The field is prefilled with the e-mail address of the contact person stored in the order, provided that this person has been maintained and has an e-mail address.
- CC: If the "CC" button is selected, a further "CC" field appears, where e-mail addresses can also be entered, separated by commas. These will receive the e-mail in CC.
- BCC: If the "BCC" button has been selected, a further "BCC" field appears, where e-mail addresses can also be entered separated by commas. These will receive the e-mail in BCC.
- Subject: An e-mail subject can be entered. This is preset with the text "Order {orderNumber}".
- E-mail Text: The text of the e-mail can be edited using a text editor with limited formatting options. If a text block has been selected in the "Standard Settings for Orders", the text is preset with replaced placeholders and can still be edited.
- Attachments: The order pdf-document as attachment with the file name defined in the "Default Settings for Orders" is displayed.
The "Send" action sends the order to the specified recipients with the specified subject, email text and attachment. In addition, an entry is created under "Notes" which documents that the order was sent via email by the current user at the current time.
Copy Order
To copy an order, click in the detailed view of the order in the upper right corner of the master data area on the "Copy" action.
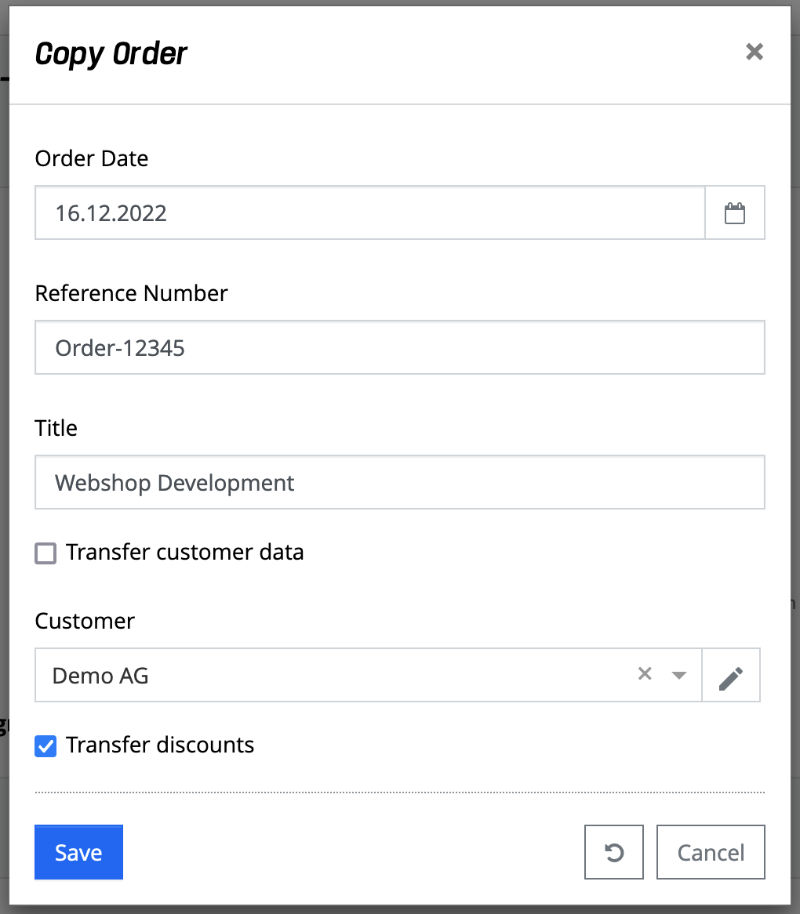
The following data must be specified to create a copy of the order:
- Order Date: A date of creation of the order can be selected from a calendar. The current date is preset.
- Reference number: A reference number can be specified manually here. This is usually a number provided by the customer.
- Title: The title of the order can be adjusted.
- Transfer customer data: If this checkbox is selected, all data of the customer belonging to the selected order will be taken over. If the checkbox is deselected, a drop-down field will appear for selecting a customer. This option does not appear for internal orders.
- Apply discounts: If this checkbox is selected, all discounts of the selected order will be applied.
For the order copy, the last version of the selected order is always copied.
The "Save" action creates a copy of the order in "Draft" status. With the action "Reset" and "Cancel" actions discard the entries and in case of the "Cancel" action the dialog is closed.
Deposit Discount
Discounts can also be stored on an order. These discounts can be applied to individual positions as well as to the entire order.
Position Discounts:
Via the action menu of the desired order item, the action "Edit Position Discount" opens the dialog of the same name. This allows the entry of a discount in the form of a percentage value or a fixed amount.
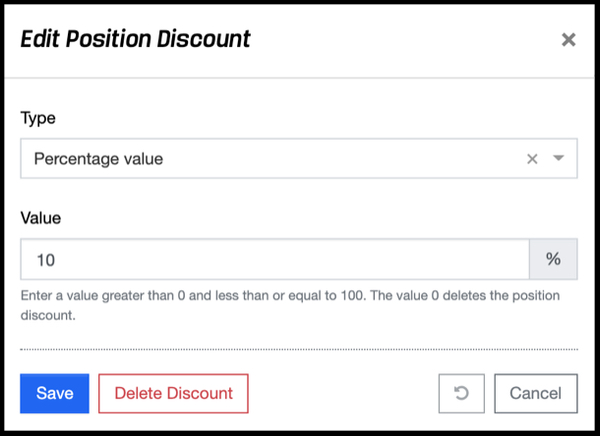
Percentage values can be > 0 and <= 100. For a fixed amount, all values > 0 can be entered. If the value is greater than the value of the position, there will be a minus value, which is equal to a credit.
You can see if a position contains a discount by the fact that on the one hand the "Label" symbol is displayed in green and on the other hand the discount is displayed in green letters below the title.
If you want to delete a position discount, you can also do this via the "Edit Position Discount" dialog. By clicking on the red "Delete Discount" button that appears next to the "Save" button as soon as a position discount exists, the discount will be removed immediately.
Total Discount:
Clicking on the "Add Discount" link under the "Totals & Discounts" area opens the "Edit total Discount" dialog. Since multiple total discounts can be specified, a descriptive name for the total discount must be specified first, e.g. "Loyalty discount". Total discounts can also be specified as a percentage or as a fixed amount.
Percentage values can be > 0 and <= 100. For a fixed amount you can enter all values > 0. If the fixed amount is greater or also the sum of discounts is greater than the offer total, there will be a minus amount, which is equal to a credit.
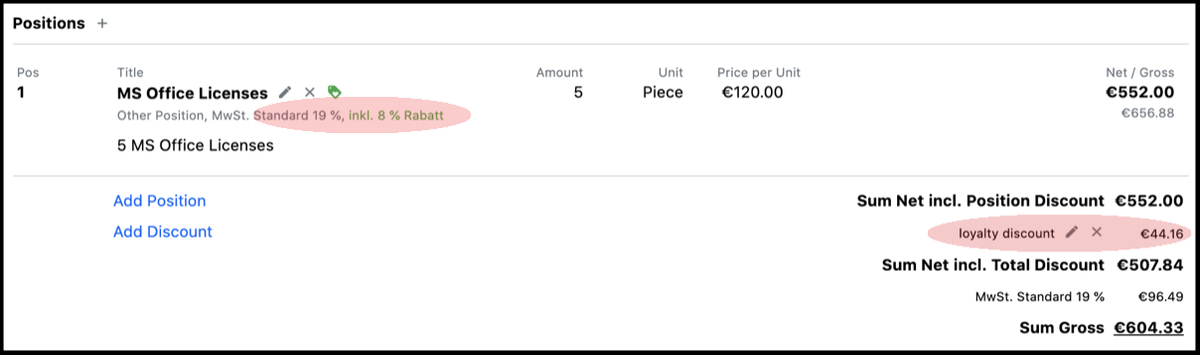
You can see whether a total discount has already been entered by the entries that appear below the "Total net". A "Total net incl. total discount" is then also displayed.
Manage Versions
Under the "Versions" tab, all versions of an order are displayed in a list. Clicking on an entry opens the selected version of the order.
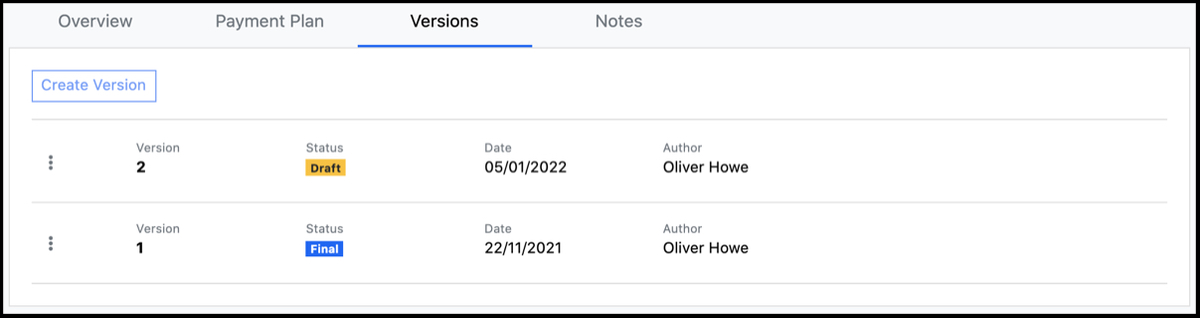
If the order status is "Final", a new version can be added by clicking the "Create Version" button. After a confirmation in the "Create Version" popup dialog, a new version of the order is created, based on the data of the current version with the status "Draft".
Via the action menu of a version (button with three dots) the most current version can be deleted as long as it is still in the "Draft" status.
Create Payment Plan
As a rule, a payment plan should already be stored in the offer and transferred to the order. If this is not the case, a payment plan can also be subsequently stored for an order if it is in "Draft" status.
A payment plan is required if you want to define the payment modalities for an order with order positions of the type "Service at fixed Price" or "Other Position". Thus, an initial payment, one or more intermediate payment and a final payment associated with certain conditions are often agreed with the customer.
One or more payment can be defined for an order via the "Payment Plan" tab.
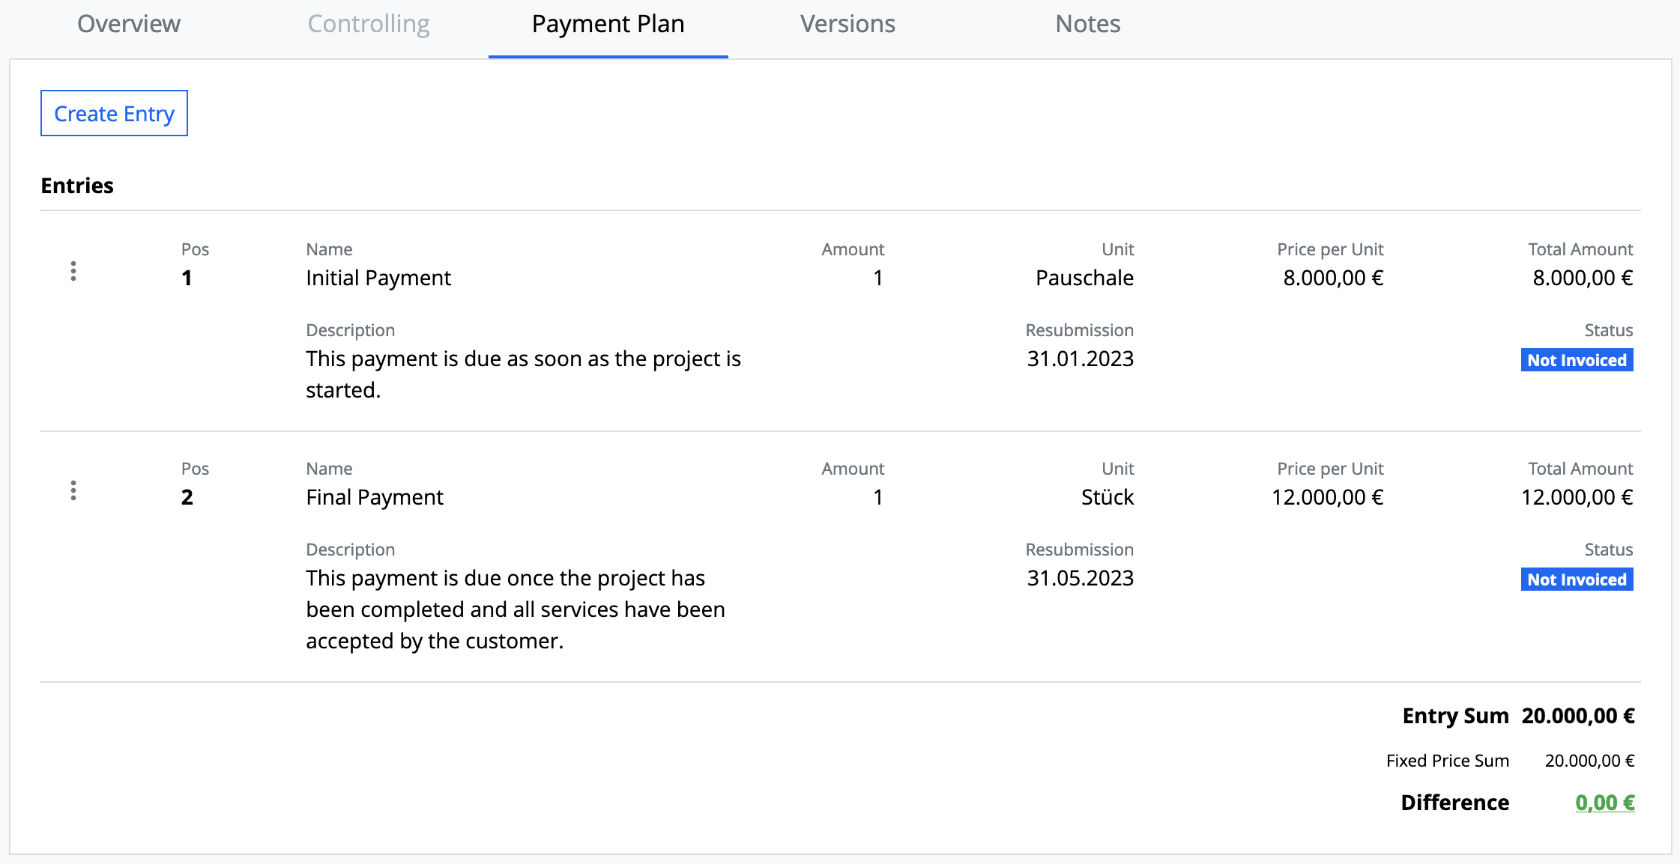
Clicking the "Create Entry" button opens the "Create Payment Plan Entry" dialog.
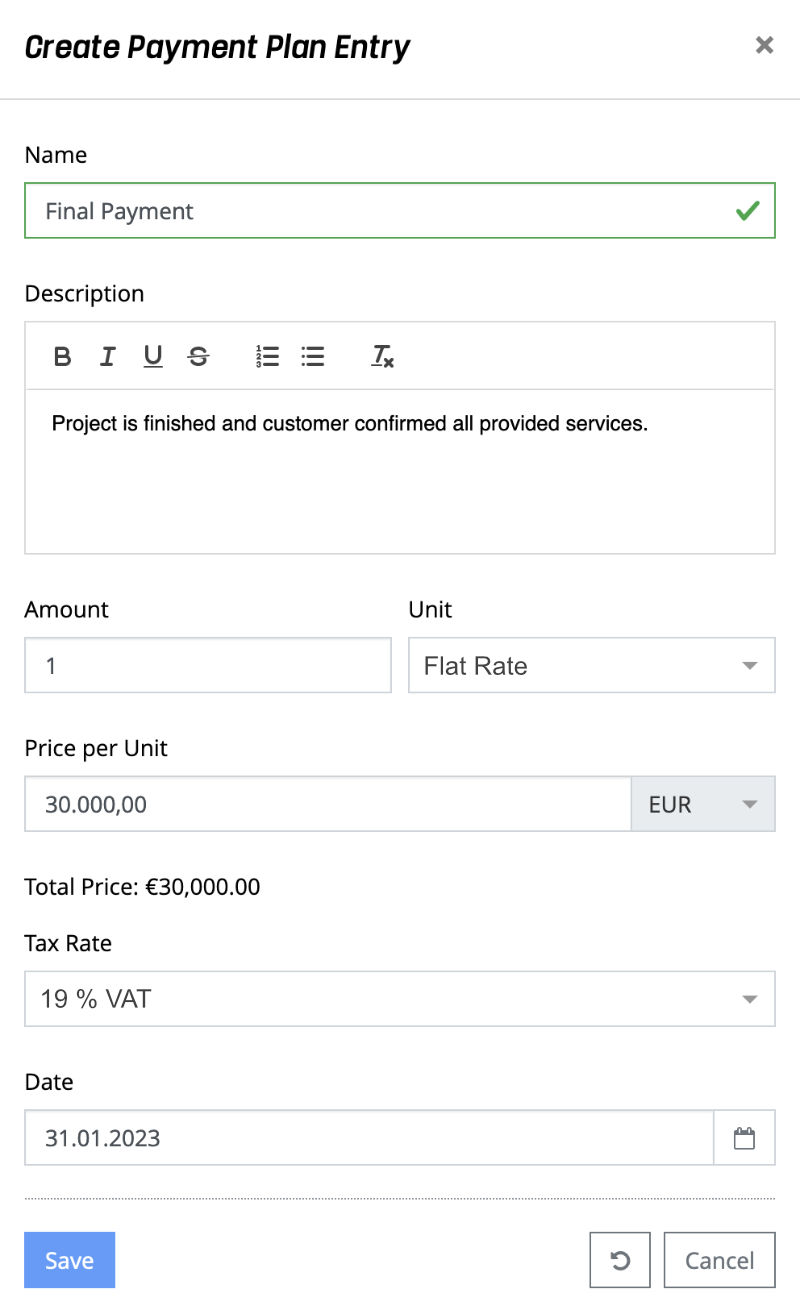
The following data must be entered for a payment plan entry:
- Name: Enter a unique name e.g. "Achievement Milestone 2".
- Description: Here you can describe details about the payment entry and fulfillment criteria.
- Amount: Set the amount. Usually a payment plan entry will have an amount of 1. But depending on the selected unit, other values may be useful.
- Unit: Select a unit from the drop-down list. Possible values are piece, hour, day, month, and flat rate.
- Price / Unit: Specify the price for the selected unit.
- Total Amount: Displays the amount that results from the quantity and price per unit.
- Tax Rate: The VAT rate for the payment amount.
- Date: The scheduled due date for the payment. The payment plan entry will appear in the service transfer under the "Payment plan" tab once the date is reached.
The "Save" action is used to save the entries. With the action "Reset" and "Cancel" the entries are discarded and in case of the action "Cancel" the dialog is closed.
Edit Notes
Notes can be added to an order, e.g. from communication via telephone or e-mails, in order to document important information chronologically. Since notes are used in many areas of foreknown, you can find a detailed description of this functionality at Getting Started / Basics / Notes
Edit Documents
Additional documents, e.g. terms and conditions or price lists, can be uploaded to an order so that it can be sent later together with the order via e-mail. To upload one or more documents for an order, select the desired order and open the "Documents" tab.
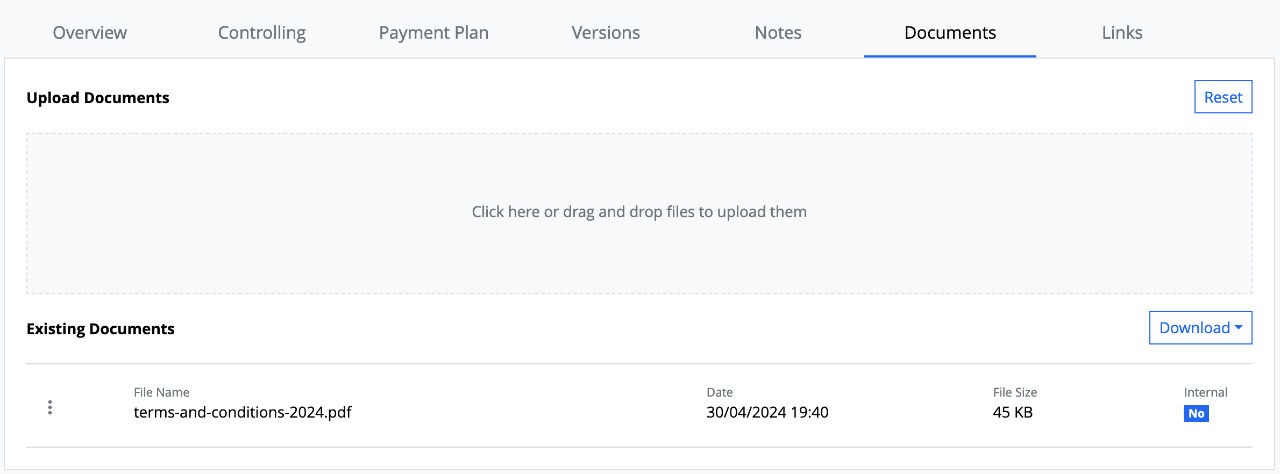
PDF documents can be added simply by drag & drop via a drop zone. All documents that have already been uploaded are listed below the drop zone. Each document has an action menu which offers the following actions:
- Download: The document is downloaded to the local computer.
- Edit: A dialog opens in which you can specify whether it is an internal or public document. Internal documents cannot be sent to the customer by e-mail.
- Delete: The document is removed from the list after confirmation.
You can also use the "Download" button above the list on the right-hand side,
- download all public documents as one PDF document.
- download all internal documents as one PDF document.
NOTE:** Only documents of the mime type "application/pdf" can be uploaded as order documents. Thereby the document must not exceed a size of 20 MB.
Manage Links
An order can be linked to another order, to an offer or to a budget through certain actions. These links are displayed and managed via the "Links" tab.
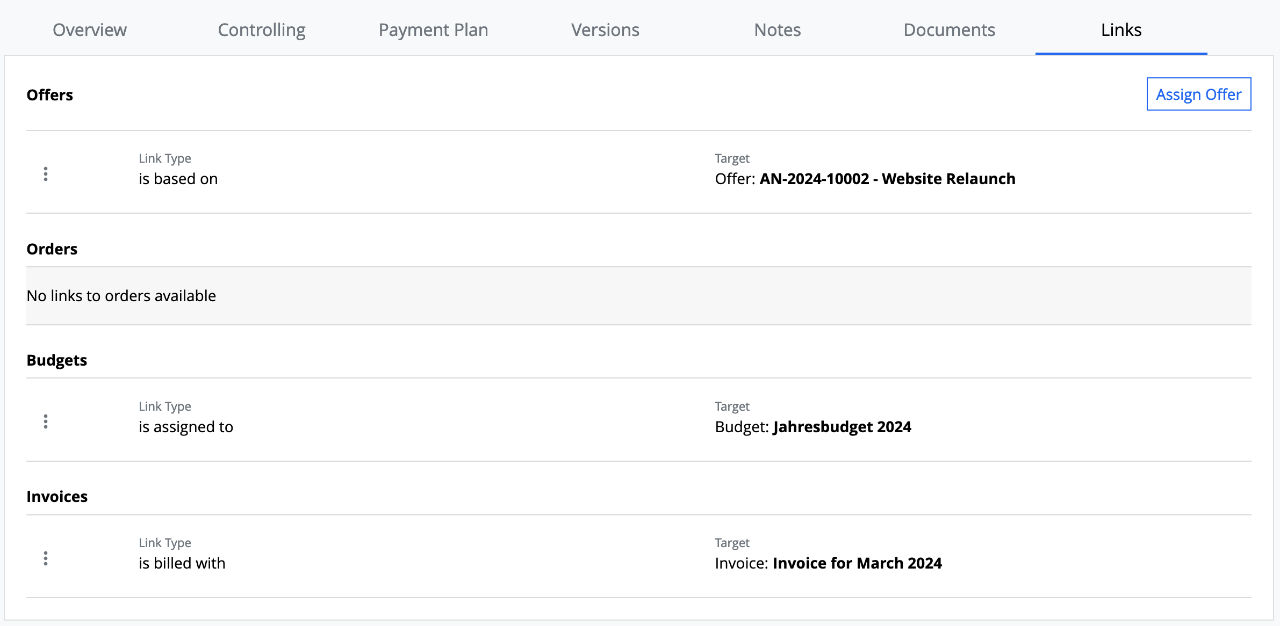
The following actions create a link:
- Copy: This action creates a new order based on the current order. This also creates the link "is copied to" to the new order on the source order and a link "is copied from" to the source order on the new order.
- Assign Offer: This action, which is located above the list of links, opens a pop-up dialog, via which an existing offer of the customer that was selected for the order can be selected and linked to the order as "is basis for". The link "based on" is displayed on the selected offer.
- Assign Budget: If an order is assigned to a budget via "Offers & Orders / Budgets", a link "is assigned to" appears for this relationship and you can jump directly to the corresponding budget.
In this way, you can see at a glance which relationships exist to an offer, order, budget, or to an invoice, and you can use the links to jump directly there.
Each link in the list has an action menu that offers the following actions:
- Open link: This action opens the linked offer, order, or budget.
- Delete link: This action deletes a link that was manually assigned to the order via "Assign Offer". Links created via "Copy" cannot be deleted.
A link can also be created on the order if the "Assign Order" action is carried out on the offer.
Controlling
In foreknown, orders play a major role not only at the beginning of a business relationship, but also during the implementation of the requirements specified in an order. By means of order-related controlling, foreknown ensures that the goals and progress of an order are always kept in view on the basis of fundamental key performance indicators (KPIs).
KPIs are not only displayed at the level of an order, but also broken down to all order positions and their service positions. In this way, you always have a good overview of which components of an order have been implemented well and less well.
This transparency means that the customer can be informed of any problems at an early stage and solutions can be found together.
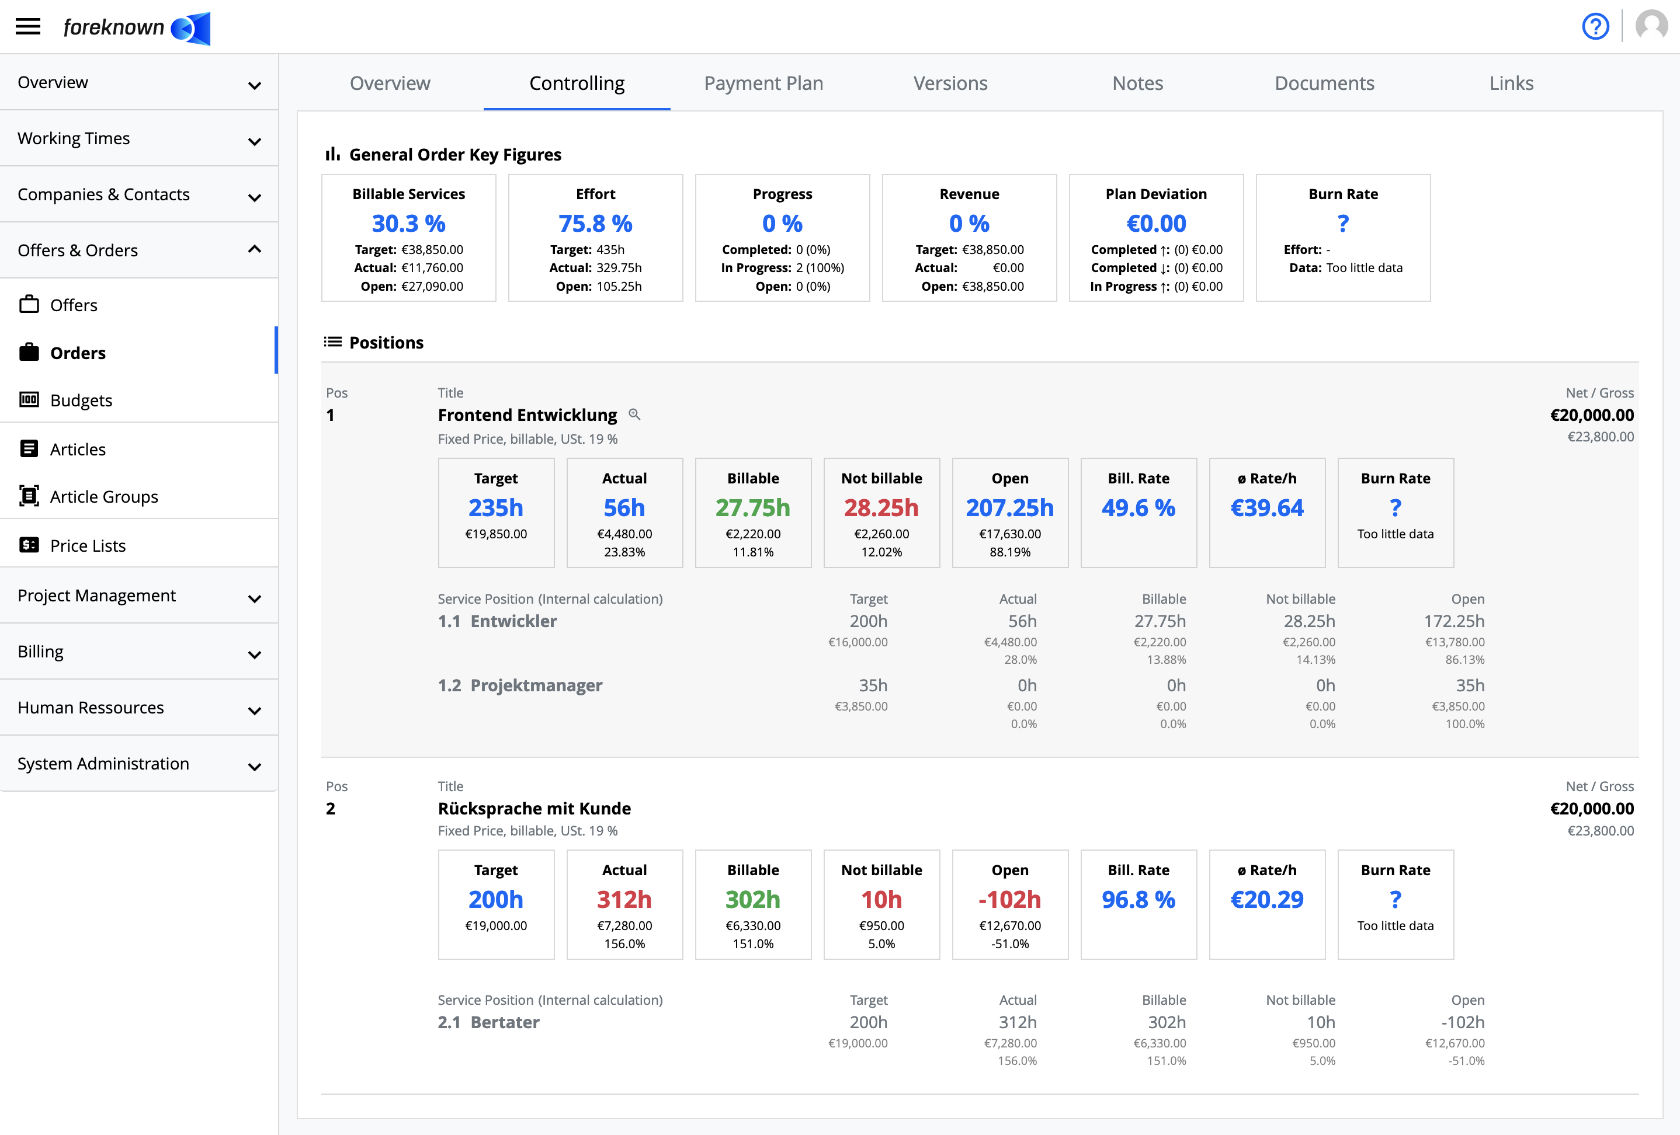
The controlling information of an order is located in a separate "Controlling" tab, which is located in the detailed view of an order directly next to the "Overview" tab. Similar to the overview, this tab also displays all order and service positions, but with the focus on displaying meaningful key figures at the various levels of an order.
KPIs on Order Level
In the "Controlling" tab, all the KPIs that clearly show the overall status of the order appear in the upper "General Order Key Figures" area. These are described in detail below.

Turnover / Budget
The KPI box "Billable Services" (or "Budget" for internal orders) displays four values, which are described below from top to bottom:
- Percentage: Percentage of the actual value in relation to the target value.
- Target: Represents the monetary order volume.
- Actual:
- Customer Order: Represents the monetary total of all billable service entries and all due additional service entries of the order.
- Internal Order: Represents the monetary total of all assigned service entries.
- Open: Represents the difference between the target and actual value.
This KPI quickly provides information on how much money of the order volume has already been consumed by invoiced and billable service and additional service entries.
Effort
The "Effort" KPI box displays four values, which are described below from top to bottom:
- Percentage: Percentage of the actual value in relation to the target value.
- Target: Represents the sum of all hours of the order specified via service entries. Efforts from fixed-price positions as well as from positions billed on a time and material basis are taken into account. Efforts that were planned with daily rates are taken into account with the number of base hours (default: 8h).
- Actual: Represents the sum of booked hours of all service entries assigned to the order.
- Open: Represents the difference between the target and actual value.
This KPI provides information on how much time of the estimated total effort of the order has already been consumed by all the assigned service entries, regardless of whether they are billable or non-billable.
Remaining Time
ATTENTION: Currently not yet supported (coming soon)
The KPI box "Remaining Time" shows four values, which are described below from top to bottom:
- Working Days: Displays the remaining working days between the current date and the end date of the order. Das Enddatum wird durch den spätesten Zieltermin aller Auftragspositionen ermittelt.
- Calendar Days: Displays the remaining calendar days between the current date and the end date of the order. The end date is determined by the latest target date of all order positions.
- Start: The start date, which results from the earliest booking date of an service entry assigned to any order position. If no service entries have been assigned to the order yet, the current date is used.
- End: The end date is determined by the latest target date of all order positions. If no target date exists, the key figure is displayed with "-".
This KPI provides information on how many working days and calendar days are still available to fulfill the order position based on the latest target date. Therefore, a target date should be assigned to all order items.
Progress
The "Progress" KPI box displays four values, which are described below from top to bottom:
- Percentage: Percentage share of the sum of monetary values of all order positions marked as "Completed" in relation to the total volume of the order.
- Completed: Number of order positions marked as "Completed". The percentage of the sum of the monetary values of all order positions marked as "Completed" in the total volume of the order is shown in parentheses.
- In Progress: Number of order positions that are not marked as "Completed" but have already been assigned service entries. The percentage share of the sum of the monetary values of these order positions in the total of the total volume of the order is shown in brackets.
- Open: Number of order positions that have not yet been assigned any service entries. In parentheses the percentage share of the sum of the monetary values of these order positions in the total volume of the order.
NOTE: Order positions in progress are not taken into account when calculating progress, even if many service entries have already been assigned to these order positions.
This KPI provides information on the percentage of the order volume that has already been implemented by order positions marked as "Completed".
Revenue
The "Billing" KPI box displays four values, which are described below from top to bottom:
- Percentage: Percentage share of the total of all service and additional service entries already invoiced (actual) of the total volume (target) of the order.
- Target: Represents the total volume of the order.
- Actual: Represents the monetary total of all invoiced service and additional service entries.
- Open: Represents the difference between the target and actual value.
This KPI provides information on the percentage of the order volume that has already been invoiced through service and additional service entries.
NOTE: This KPI is not displayed for internal orders.
Plan Deviation
The KPI box "Plan Deviation" displays four values, which are described below from top to bottom. In order to explain these values meaningfully, the following must first be clarified. Every single order position can have three states until completion. The monetary volume of an order position has either been exceeded by, fallen short of or exactly fulfilled by the sum of all assigned, billable services.
- Plan Deviation: This value represents the difference between all overruns and underruns of all order positions in monetary terms. Negative values (underruns) are displayed in green and positive values (overruns) in red.
- Completed ↑: Represents the number of order positions marked as "Completed" which have an overrun. In addition, the total of all overruns is determined for these order positions.
- Completed ↓: Represents the number of order positions marked as "Completed" which have an underrun. In addition, the total of all underruns is determined for these order positions.
- In Progress ↑: Represents the number of order positions that are not yet "Completed", but already have an overrun due to the assigned service entries. In addition, the sum of the overruns of these order positions is determined.
A positive red value means that, in total, more was posted to the order positions over the entire order, than planned. The other values in the KPI box can be used to quickly determine whether the total order remains within the estimated range by offsetting over- und underruns. In both cases, a discussion might be needed with the client.
Burn Rate
The Burn Rate KPI box displays four values, described below from top to bottom:
- Burn Rate: The Burn Rate shows you how much money is used on average per day.
- Effort: This shows you how many hours were booked on average per day.
- Base: The base shows you the number of days from which the burn rate is calculated.
- Forecast: The forecast shows you the date on which the budget is expected to be used up.
This KPI gives you an overview of the rate and time at which the budget will be used up.
General Information
Since foreknown is used to plan both internal and external orders, which in turn can be billed via a fixed price or on a time & material basis having hourly or daily rates, some conditions have to be considered. Here some general rules concerning the determination of KPIs:
- Order positions marked as "not billable" are not included in the calculation of KPIs.
- Order positions calculated with daily rates are converted into hours based on the settings of the service type (base value, lower limit, upper limit) to provide adequate values e.g. for the KPI "Effort".
- Internal orders are not billed to any customer. Therefore, KPIs such as billable and not billable hours, billing rate or average hourly rate are not relevant and are hidden.
KPIs on Order Position Level
In order to determine the cause of deviations from the plan, it is important to be able to evaluate individual order and service positions. Therefore, KPIs at these levels are also provided for an order in the "Controlling" area.
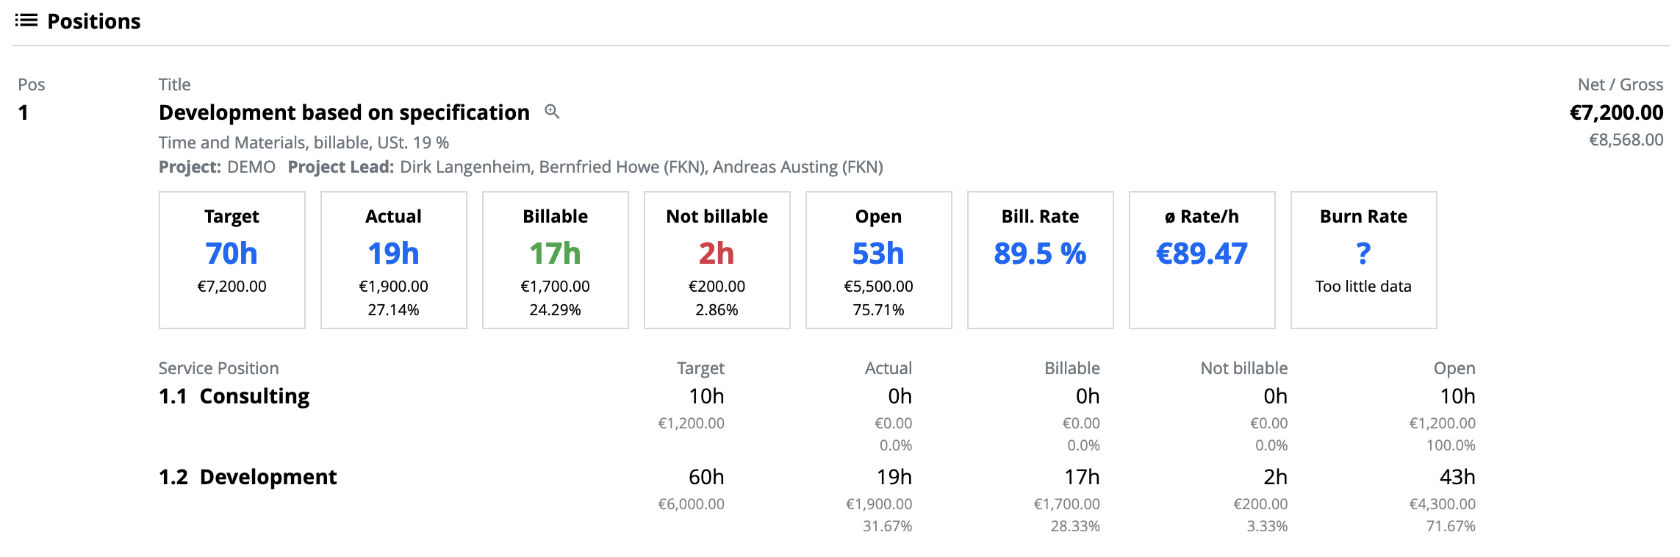
Order positions that have been "projected" show above the KPI boxes the name of the project and the names of the users assigned to the project as project managers.
Target
Type "Fixed Price" or "Time & Materials":
- This KPI represents the number of hours resulting from the sum of the target hours of all service positions, regardless of whether it is a time & material or fix price service. Daily rates are converted to hours based on the base value stored at the related service type (usually 8 hours).
- Below the hours, the monetary value is shown, which results from the sum of the monetary values of all service positions.
- This KPI is also shown proportionally at the level of service positions.
Type "Other Position":
- This KPI shows the amount specified on the order for this position. Below the amount the monetary equivalent is shown.
Actual
Type "Fixed Price" or "Time & Materials":
- This KPI represents the number of hours calculated from the sum of the booked hours that have been assigned to this order position via service entries.
- Below the hours, the monetary value is shown, which results from the sum of the monetary values of the assigned service entries.
- Again, below the monetary value, the percentage is shown in relation to the target value.
- This KPI is also shown proportionally at the level of service positions.
Type "Other Position":
- This KPI shows the quantity already assigned to this order item via additional services.
- Below the quantity, the monetary equivalent and the percentage value in relation to the target value are displayed.
Billable
Type "Fixed Price" or "Time & Materials":
- This KPI represents the number of hours that result from the sum of the billable or already billed hours that were assigned to this order position via service entries.
- Below the hours, the monetary value is shown, which results from the sum of the monetary values of the corresponding service entries.
- Again, below the monetary value, the percentage is shown in relation to the target value.
- This KPI is also shown proportionally at the level of service positions.
Type "Other Position":
- This KPI represents the value resulting from the quantity of assigned, billable additional services.
- Below the quantity, the monetary equivalent value of the additional services is shown.
- Again below the monetary value, the percentage is shown in relation to the target value.
NOTE: This KPI is not displayed for order positions of internal orders or non-billable order positions.
Not Billable
Type "Fixed Price" or "Time & Materials":
- This KPI represents the number of hours that results from the sum of the non-billable hours that have been allocated to this order position via service entries. The non-billable hours result from the difference between booked and billable hours, provided that the billable hours are less than the booked hours.
- Below the hours, the monetary equivalent of these hours is shown, which is calculated using the associated service entries.
- Again, below the monetary value, the percentage is shown in relation to the target value.
- This KPI is also shown proportionally at the level of service positions.
ATTENTION: In the case of service entries with daily rates, the monetary values of the non-billable hours are always calculated as a proportion of the daily rate. E.g. EUR 800.00 daily rate, base value: 8 hours, 4 hours cannot be billed => EUR 400
Type "Other Position":
- This KPI represents the value resulting from the quantity of assigned, non-billable additional services.
- Below the quantity, the monetary equivalent value of the additional services is shown.
- Again below the monetary value, the percentage is shown in relation to the target value.
This KPI is not displayed for order positions of internal orders or non-billable order positions.
Open
Type "Fixed Price" or "Time & Materials":
- This KPI represents the number of hours resulting from the difference between the "Target" hours and the "Billable"
hours.
- A positive, green value means that the number of hours displayed is still available and billable to the customer.
- A negative red value means that the planned hours for the order position have already been exceeded and no more hours can be billed without new agreements with the customer.
- Below the hours, the monetary equivalent of these hours is shown, which is calculated using the associated service positions.
- Again, below the monetary value, the percentage is shown in relation to the target value.
- This KPI is also shown proportionally at the level of service positions.
Type "Other Position":
- This KPI represents the quantity resulting from the difference between the "target" quantity and the booked,
billable additional services.
- A positive, green value means that the displayed quantity is still available and billable to the customer.
- A negative, red value means that the planned quantity for the order item has already been exceeded and that no further additional services should be billed to the customer without new agreements with the customer.
- Below the quantity, the monetary equivalent of the quantity is shown, calculated using the unit price.
- Again below the monetary value, the percentage is shown in relation to the target value.
Billing Rate
Type "Fixed Price" or "Time & Materials":
- This KPI shows the billing rate for an order position. This is calculated from the percentage of the hours from "Billable" to the hours from "Actual".
- This KPI is also shown proportionally at the level of service positions.
Type "Other Position":
- This KPI shows the billing rate for an order item. This is calculated from the percentage of booked, billable additional services of this order item to the target value.
ATTENTION: This KPI is not displayed for order positions of internal orders or non-billable order positions.
Average Hourly Rate
Type "Fixed Price" or "Time & Materials":
- This KPI shows the average hourly rate for an order position.
- This is calculated as follows: Monetary Value of "Billable" / Hours from "Actual"
- This KPI is not shown at the level of service positions.
Type "Other Position":
- This KPI is not displayed for this type.
ATTENTION: This KPI is not displayed for order positions of internal orders or non-billable order positions.
Burn Rate
Type "Fixed Price" or "Time & Materials":
- This kpi shows you how much budget is used on average in a day.
- Below the burn rate is the "effort". This indicates how many hours were booked per day on average.
- Below that, the "Base" is shown. This shows you how many days the Burn Rate is calculated from.
- Again, below this, the projected date, when the budget is expected to be fully consumed, is shown.
Type "Other Position":
- This KPI is not displayed for this type.