Table of Contents
Introduction
A time recording system for employees must take into account many aspects, which result from legal requirements on the one hand and individual agreements with the employees on the other.
On the one hand, according to a directive of the European Court of Justice, employees of a company should be able to ensure complete recording of presence times and breaks. On the other hand, the activities of all employees, at least those that arise in the course of customer projects, should be recorded so that they can be accounted for at a later date.
In order to meet different requirements, the time recording in foreknown offers different settings on employee level to define the type of time recording (project time, presence time or full-time). Full-time recording is the method that not only meets the legal requirements, but also ensures complete and comprehensive reporting of all the hours employee's worked for the company. You can find more information about the different types of time recording in the chapter Functions / Human Resources / Employees / Edit Contract.
Therefore, in addition to the synchronization of activities from external task management systems such as Atlassian Jira, foreknown also offers its own time recording. This gives all employees a clear overview of activities that have already been booked and also allows very simple recording of additional activities that do not link to tasks of an external system. The recording of presence times, breaks and absence times is also supported in foreknown.
The following describes how activities, presence times, breaks and absence times are recorded in foreknown and how an employee can get an overview of already booked activities. Furthermore, it is explained how a team manager can record time for his team members.
The dialog "Time recording" can be reached via the navigation area "Working hours / Time recording". The role "Contributor" is required.
Tab "Overview"
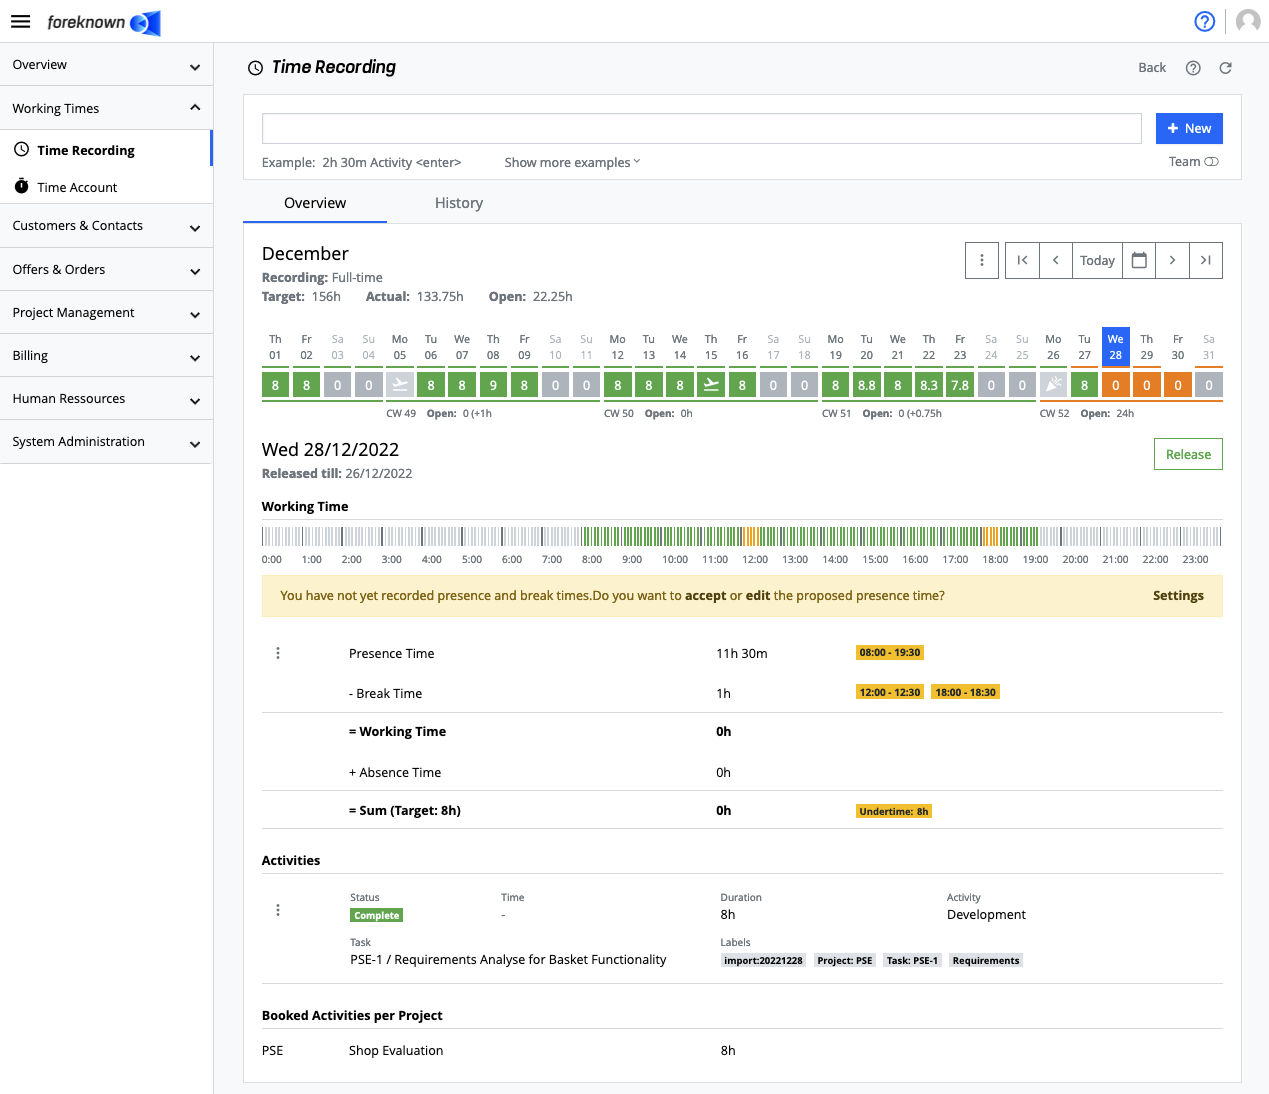
Below the area "Fast entry" the dialog offers two tabs. The first tab "Overview" provides a month-based preparation of working time and absence bookings (Navigator). Furthermore, the maintenance of presence times, breaks and absence times ([working time](#working time)) and the administration of activities for the selected day.
Navigator
The navigator displays a timeline for the current or a selected month and provides information about the completeness of the working time for an employee.
Below the display of the currently selected month is the following information:
- Recording: Shows the type of time recording of the employee. Time recording behaves differently depending on the type (project time, presence time, full-time).
- Target: Displays the employee's target working time for the selected month in hours/minutes. This takes the employee's actual availability into account based on the employee contract and calendar entries such as vacation, sickness or other absences.
- Actual: Shows the employee's already booked working time for the selected month in hours/minutes.
- Open: Displays the employee's outstanding working time for the selected month in hours/minutes. This results from the difference between target and actual working time.
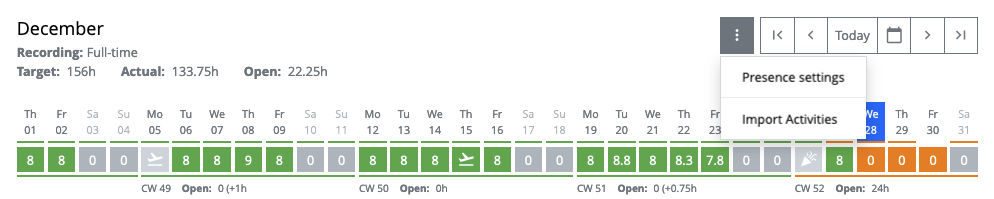
On the right side actions are offered to set the currently selected day of the month.
- Action Menu: Via the action menu (button with three dots) a drop-down menu is opened with following actions:
- Presence Settings: Opens a popup dialog which allows each employee to define presence- and break times per week day. These settings are used as proposals when entering working time for a day. If the current employee has time recording type "Project Time", this action is not available.
- Import Activities: Via the button (arrow up) the dialog "Import Activities" is opened, which enables an import of activities via an Excel sheet. See Import Activities.
- Arrow Buttons "<" and ">": With these buttons you can navigate back and forth between the days.
- Today: Via the "Today" button you jump directly to the current day.
- Calendar Symbol: The button with the calendar symbol opens a calendar that allows you to select a specific day.
The current month is displayed in the form of a timeline representing all the days of the month. Certain colors and symbols are used to represent working days, weekends, bank holidays, vacation and absence days.
- Orange Square: Represents a working day for which no working hours have been booked yet.
- Green/orange Square: Represents a working day for which working times have been booked but the target working time has not yet been reached.
- Green Square: Represents a working day for which working times have been booked that equal or exceed the target working time.
- Gray Square without Symbol: Represents the weekdays that are not working days (Saturday/Sunday).
- Gray square with different symbols: Represents days of absence due to sickness, vacation, bank holidays or other reasons.
Below the time bar, calendar weeks are represented by corresponding dashes. For each complete calendar week falling within the month, the duration of the outstanding working time (difference between target and actual working time) is displayed. If you move the mouse over a calendar week bar, the values for the actual and target working times and the open duration are displayed.
Above the duration per day, dashes are displayed in certain cases:
- Green Dash: This day has already been locked by the employee or the team manager. Changes to this day are only possible if the lock is removed again by this day. As long as the lock date of the team is older, the employee can unlock. Otherwise, the team manager must unlock for the employee until that day.
- Orange line: There are already activities for this day and the day is not yet released or locked.
Note: If you open foreknown in a browser with less than 1400px width, the timeline becomes horizontally scrollable. At the same time the week displayed below the timeline disappears.
Working Time
An employee's working time represents the time that an employee has worked for the company in fulfillment of his or her employment contract, irrespective of the kind of work performed during this time. It is calculated from the presence time minus the break times plus the absence times for vacation, sickness, or other reasons. Here a few examples for clarification:
- An employee has recorded an presence time of 9h in total and break times of 45m. This results in a working time of 8h 15m. According to the contract, 8h are to be worked. Thus, an overtime of 15m has arisen.
- An employee enters a vacation for one day. Thus, working time equals target time e.g. 8h which applies for this day.
- An employee enters a vacation for one day and a presence time of 2h, because e.g. urgent support had to be done. Thus, an overtime of 2h has arisen.
This means that for employees with the time recording type "Presence time" or "Full-time", the working time is always calculated from the presence time, breaks and absence times. For employees with the "Project Time" time recording type the working time is calculated from the sum of the booked activities.
Manage Presence-, Break- and Absence-Times
Below the monthly time bar, the "Working Time" area for a selected day is displayed first. This allows the maintenance of presence time, breaks and absence times.
The 24 hours of the selected day are displayed via a time bar. Presence times are displayed in green, break times in orange and all absence times in gray.
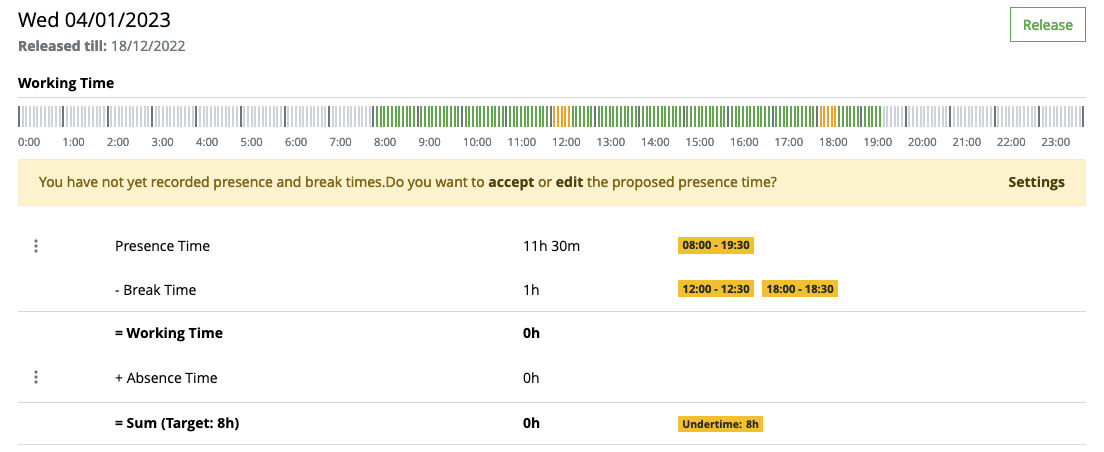
The following functions and information are displayed below the time bar:
- Notes: The following notes may appear.
- If there is a planned working time for the selected day, but no actual working time has yet been maintained a note appears with the actions of accepting a proposal for presence time and break time or of opening the "Create Presence Time" dialog. The suggested time periods are displayed as orange labels. Via the "Settings" link, the employee can enter individual default presence and break times for each day of the week via a pop-up dialog, which are then offered as a suggestion.
- Furthermore, for the time recording type "full time", a hint appears if the booked working time does not correspond to the total of the booked activities.
- Presence Time: The presence time describes the period of the day when the employee was present for work.
This period also includes possible breaks that took place during the period. Via an action menu, the following actions
can be performed:
- Apply Proposal: This action is offered if a target working time exists for the selected day, but no working time has been maintained yet.
- Edit: Opens the "Edit Presence Time" dialog, which can be used to maintain the presence time and all break times.
- Delete: This action is offered if presence and break times have already been maintained for the selected day.
- Break Times: Displays all break times that have been maintained for the selected day. The maintenance of the break times is done via the "Edit" action described under "Presence Time".
- Working Time: Displays the working time calculated from presence time minus breaks.
- Absence Time: In addition to presence times, absence times can also be stored due to vacation, sickness, overtime reduction, on-call service or other reasons. The corresponding dialogs can be opened via an action menu. Already created absences appear as labels and can be edited by clicking on the name and deleted by clicking on the "x".
- Total (target: ?h): In the last line the sum of the maintained working and absence time is displayed. Furthermore, any under- or overtime is calculated from the target working time according to the employee's contract.
As a rule, either a presence time or an absence time must be maintained for a working day for which a planned working time exists. A combination only occurs in exceptional cases when an employee e.g. takes half a day of vacation.
Book Presence and Break Time
Via the action menu of the presence and break times, the dialog "Edit Presence Time" can be opened with the action "Edit". This enables the recording of the entire presence time, which can also extend into the next day by activating the checkbox "Presence time ends the following day".
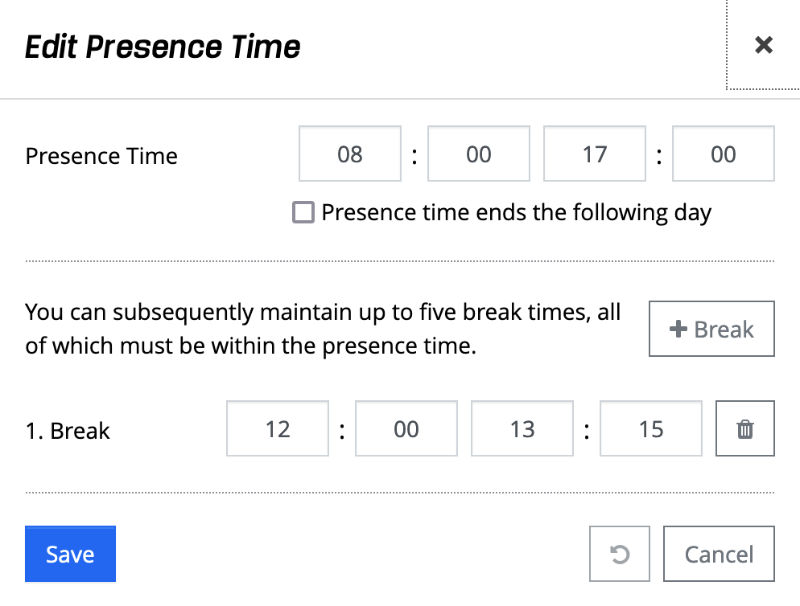
Below the presence time, up to five break times can be booked, all of which must be within the presence time.
With the action "Save" all changes to the presence and break times are saved and the table with the calculation of the working time is updated.
With the action "Delete" of the action menu all settings for the presence time will be deleted.
Release Working Time
Every employee with the time recording type "Presence Time" or "Full-Time" has the option of releasing their working times. In this way, the employee determines the date (release date) up to which the recorded working times and activities are considered complete. To release working times, the following steps are necessary:
- Selecting the day via the navigator up to which the time recording is to be released.
- Execute the action "Release". This action appears only if the current release date is before the selected day.
- This action will release all days that are after the current release date up to the selected date. It should be noted that if the time recording type is "Full-Time", the system will check for each day whether the total of the working time is the same as the sum of the booked activities. As soon as this condition is not fulfilled for a day the release is not continued and the release date for this employee is set to the last successful day.
The current release date of the employee is displayed below the date of the selected day.
Note: Setting a new release date can also be done by team managers via an action in the team controlling for all team members. Again, if the time recording type is "Full-Time", only days till the last valid day will be released. In the employee list in Team Controlling, the team release date and the release date of each individual employee is shown. See also Functions / Human Resources / Teams / Controlling.
Note: For released (therefore locked) days, no attendance, break and absence times and also no activities can be entered, changed or deleted. Consequently, no changes from external systems such as Jira will come through and lead to synchronization errors.
Note: If an employee releases working time for a day with no pre- or absence times entered, the day will be released and the planned working hours for that day will be booked as under time in the working time account.
Unlock Working Time
Every employee with the time recording type "Presence Time" or "Full-Time" has the possibility to cancel already released working times if the selected day is after the team's "release date". So, if a team manager has locked the time recording until day x, then an employee can only release and unlock working times that are after that day.
Unlocking is required if the employee subsequently makes changes to the attendance, break, and absence times or to the booked activities.
To unlock working times again, the following steps are necessary:
- Selecting the valid day via the navigator up to which the time recording is to be unlocked.
- Execute the "Unlock" action. This action only appears if the current unlock date is greater than or equal to the selected day. 3.
- This action unlocks all the already unlocked days that are on or after the selected day.
The current unlock date of the employee is displayed below the date of the selected day.
Note: The unlock date can also be executed by Team Manager via an action in Team Controlling.
Activities
Below the time bar, all booked activities are listed for a selected day.

Each booked activity of the list presents the following information:
- Action Menu: "Edit Activity" and "Delete Activity" actions are offered per booked activity.
- The "Edit Activity" action opens the popup dialog where the selected activity can be changed.
- The "Delete Activity" action opens a confirmation dialog to have the deletion process confirmed again.
- Status: The status is displayed in the form of a small icon. Currently, an activity has three statuses:
- Incomplete (Orange Label): A booked activity that has been marked as "Incomplete" does not have all mandatory information. Required properties are date, duration and activity description.
- Complete (Green Label): A booked activity that has been marked as "Complete" has all mandatory information.
- Locked (Red Label):** A locked activity can no longer be processed because the associated service has already been billed.
- Time: Displays the start time of the activity.
- Duration: The duration is displayed in hours and minutes, e.g. 2h, 4h 30m or 45m.
- Activity: This column contains the activity description.
- Task: The task assigned to the booked time is displayed here.
- Labels: Shows all labels, which have been assigned to the activity or have been derived from a task.
Booked Activities per Project
Below the booked activities, these are displayed in total for each project, so that employees can quickly see how many hours have been spent on which projects.
Recording via Fast Entry
The "Time Recording" dialog offers an input field in the upper area, which can be used to record an activity. There is a certain syntax and sequence to follow in order to be able to enter the date, an exact period or duration and an activity description.

Input Format
A working time entry consists of several components:
[day] [start time][-end time| duration] [activity description]
- [Day]: To specify the day of the activity, there are several options.
- No Specification: The date of the currently selected day will be used.
- Specify a Date: the date must be specified in the format DD.MM.YYYY.
- Relative Specification: By specifying t or t-n, where n is the number of days to be calculated back from the current date. e.g. t => today / t-1 => yesterday / t-2 => the day before yesterday
- [Start Time]: The specification of a time is optional. If a time is to be specified, it can look as follows.
- HH: e.g. 10 => 10:00 a.m.
- HH:MM: e.g. 10:30 => 10:30 a.m.
- [End Time|Duration]: The specification of an end time is only required if a start time has also been defined.
In this case, the specification of a duration is omitted. Alternatively, a duration can also be specified.
- Specification of an end time: The end time must be written directly to the start time with a hyphen.
- HH-HH: e.g. 10-11 => 10:00 1h
- HH:MM-HH: e.g. 10:30-11 => 10:00 30m
- HH:MM-HH:MM: e.g. 10:30-10:45 => 10:30 15m
- Input of a Duration: The duration must be separated from preceding inputs by a space.
If a day and a start time are not specified, the duration can be entered directly.
The duration is specified in hours and/or minutes. A maximum of 23 hours and 59 minutes can be posted to a day.
Examples:
- 1h: 1 hour
- 1h 30m: => 1 hour 30 minutes
- 90m: => 1 hour 30 minutes
- Specification of an end time: The end time must be written directly to the start time with a hyphen.
- [Activity Description]: An activity description must be recorded as the last information for each activity.
NOTE: An entry of further information such as labels or direct assignment to orders, positions and service types via this input field is currently not yet possible, but is being planned.
Examples
The time or duration can be recorded in different ways. Below are some examples that illustrate the options for recording.
- Capture two Hours for the current Day:
- 2h My activity
- 10 2h My activity (2 hours by specifying a certain time and a duration)
- 10-12 My activity (2 hours by specifying a certain from-to time)
- 10:30-12:30 My activity (2 hours by specifying a certain from-to time)
- t 2h My activity (t = today)
- 02.01.2021 2h My activity (The specified date represents the current day's date.)
- Capture two Hours for Yesterday:
- t-1 2h My activity
- 01.01.2021 2h My activity (The given date represents yesterday's date.)
Recording via Popup Dialog
Alternatively, activities can also be recorded via a popup dialog. This dialog is opened via the "+ New" button next to the input field for fast entry.
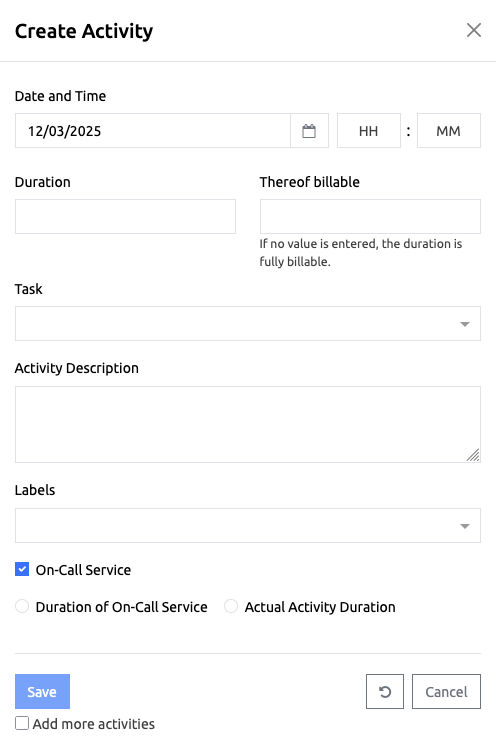
The dialog consists of the following input fields:
-
Date and Time: An input field can be used to directly enter a date in the format DD.MM.YYYY. Alternatively, a button behind the input field can be used to open a calendar dialog in order to select a specific day. Via two further fields the start time in hours and minutes can be specified optionally.
-
Duration: In this input field the duration of the activity is specified. The duration is specified in hours and/or minutes. A maximum of 23 hours and 59 minutes can be booked on one day. Examples:
- 1h => 1 hour
- 1h 30m => 1 hour 30 minutes
- 90m => 1 hour 30 minutes
-
Thereof billable: This input field is used to specify the duration of the activity that is to be billable against an order. If it is already known that only a part of the working time actually worked is billable, this can be specified directly here. The format is the same as for the duration.
-
Task: Here a task can be assigned via an Auto-Fill field.
-
Activity Description: An activity description must be stored in this input field.
-
Labels: Labels can be assigned to each activity in order to additionally identify the activity. Labels can be used to create references to projects and milestones. Furthermore, they serve to categorize working times, which can be used for later evaluations and for the rule-based transfer of working times to services. Existing labels can be selected and new labels can be assigned directly.
-
On-Call Service: If this checkbox is activated, the activity booking can be marked as part of an on-call service. A distinction is made between 2 types:
- Duration of On-Call Service: If this option is activated, the activity describes the billable duration of the on-call service and can be used for billing a customer or for determining the compensation to be paid to an employee. If a longer time is to be booked for the customer a higher value can be entered in the ‘Billable’ field above.
- Actual Activity Duration: If this option is activated, the activity describes the actual activity time within an on-call service period. This duration can be invoiced to the customer as a billable service. It also counts as working time for the employee if a ‘Project time’ time recording type has been set for the employee.
Documentation Note: Further information on using the "On-call Service" feature can be found at "Best Practice / Basics / On-Call Service"
-
Add more activities: If this button is activated, the dialog will not be closed after saving, and all fields, except the date, will be prefilled with the values of the last booking.
Via the action "Save" a new activity is created. "Cancel" closes the dialog without creating a working time entry.
Absences
The "Absences" area only appears for employees who have been assigned the "Project Work" time recording type. This is necessary because these employees do not have access to the "Working Time" area and therefore cannot maintain absences there.

The "Create" action, which is offered on the right-hand side of the area, can be used to create absences of the following types:
- Vacation: One or more days of vacation and, if applicable, half days can be recorded. These have a negative effect on the target working time.
- Sickness: One or more sick days and, if applicable, shorter periods can be entered in hours. These have a negative effect on the target working time.
- Overtime Reduction: One or more days with overtime reduction can be entered. These have a negative effect on the target working time.
- On-Call Service: Periods per day can be entered for on-call service. These do not affect the target working time.
- Other Absences: Any other absences can be entered which also have a negative effect on the target working time.
The recording dialogs differ depending on the type of absence.
Vacation
The recording of vacation note is done via the following dialog:
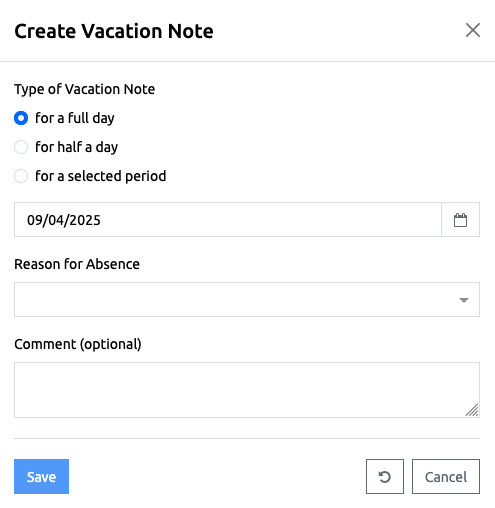
The following properties can be defined in the dialog:
- Type of Vacation Note: There are three options for entering one or more days of leave.
- for a full day: If you select this option, a vacation can be entered for a selected day.
- for half a day: If you select this option, half a day's vacation will be entered for a selected day and period of time. This option only appears for employees who have been allowed to report half days of vacation in their contract and who have not fallen below the limit value defined in the system administration settings (minimum working hours per day for half days of vacation).
- for a selected period: If this option is selected, a start and end date for the vacation can be entered
- Reason for Absence: A reason for absence can be selected from a drop-down list. The reasons for absence can be managed via the system administration.
- Comment (optional): The employee can enter an additional comment on the sick note.
Sick Leave
The recording of absences due to sickness offers the following dialog:
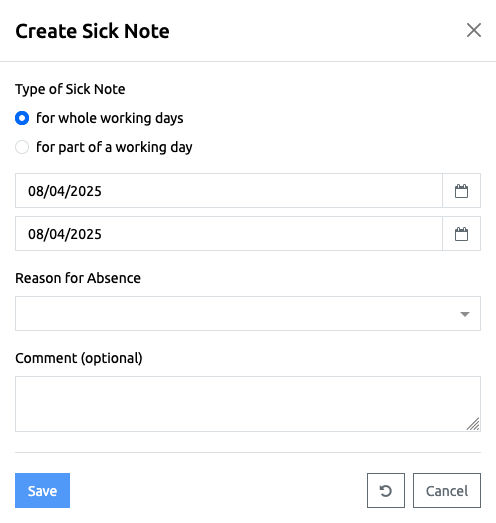
The following properties can be defined in the dialog:
- Type of Sick Note: Sick notes can be entered for whole days or for part of a working day.
- for whole working days: If this option is selected, a start and end date must be selected as the period for the sick note.
- for a part of a working day: If this option is selected, a date and a start and end time must be selected for the sick note.
- Reason for Absence: A reason for absence, which can be managed in the System Administration, can be selected from a drop-down list.
- Comment (optional): The employee can enter an additional comment on the sick note.
Other Absences
All other types of absences can be recorded via the following dialog:
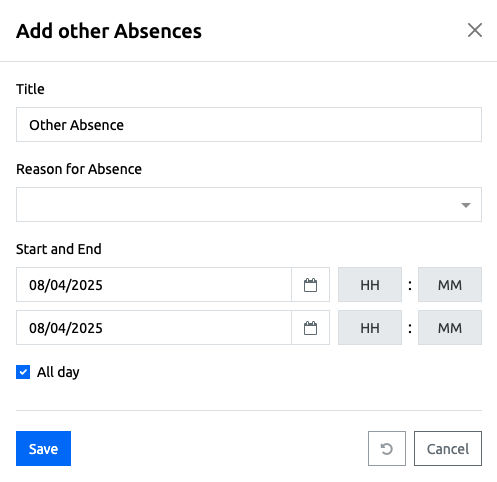
The following properties can be set in the dialog:
- Title: A title for the absence must be set here. A default value is already set.
- Reason for Absence: A reason for absence, which can be managed in the System Administration, can be selected from a drop-down list.
- Start and End: Here the start and end date can be set. If the flag "All day" is removed, a time can also be specified e.g. in order to be able to enter a half day of vacation.
- All day: If this checkbox is activated, no time can be selected and the absence always refers to the target working time according to the employee's contract.
The "Save" button is used to save the absence time. With the "Reset" and "Cancel" action the entries are discarded and in case of the "Cancel" action the dialog is closed.
Note: If absences are maintained in an external system, e.g. Personio, and this system is connected to foreknown the action "Synchronize absences" can be used to trigger a synchronization for the currently selected month and employee in order to transfer changes from the external system.
Time Recording for Team Managers
If you are a team manager, you will be offered a "Team" button above the time recording under the "New" button. If this button is activated, a drop-down field appears, which allows you to select a team member from the teams that belong to you. If an employee is selected here, the color of the heading changes to orange and the dialog shows all information of the selected employee.
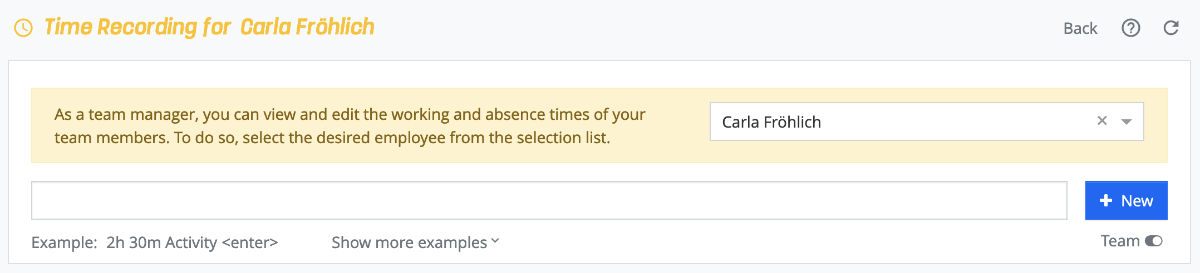
As a team manager you have the possibility to book the presence and absence times and activities for a team member.
Tab "History"
The "History" tab offers an alternative display of all activities already booked. Thereby a grouping takes place chronologically descending according to the date of entry. In this way, you can quickly get an overview of when certain activities were booked.
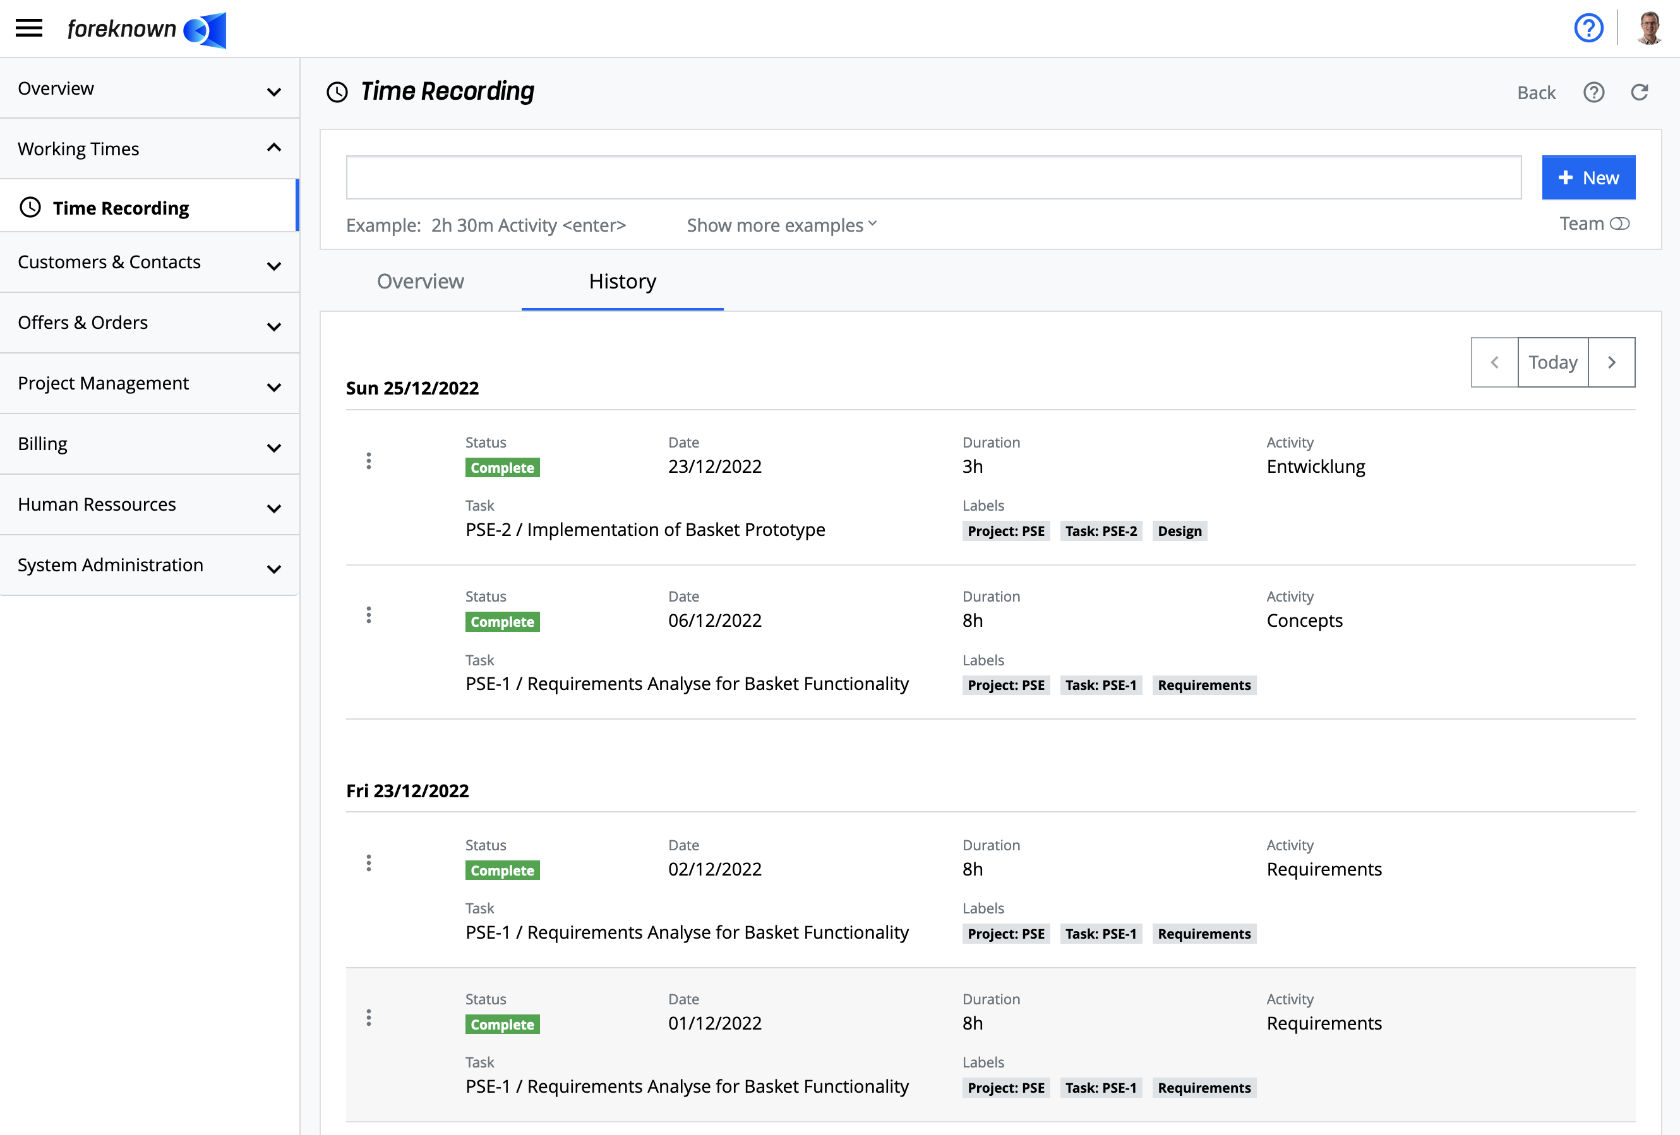
For each day on which an activity was booked (booking date, not date of the activity!) a group is formed and all booked activities are listed in the group in tabular form with the following information.
- Action Menu: "Edit Activity" and "Delete Activity" actions are offered per booked activity.
- the "Edit Activity" action opens the popup dialog "Update Activity" (see also Recording via popup Dialog)
- the "Delete Activity" action opens a confirmation dialog to have the deletion process confirmed again.
- Status: The status is displayed in the form of a small icon. Currently, an activity has three statuses:
- Incomplete (Orange label): A booked activity that has been marked as "Incomplete" does not have all mandatory information. Required properties are date, duration and activity description.
- Complete (Green Label): An activity that has been marked as "Complete" has all mandatory information.
- Locked (Red Label):** A locked activity can no longer be processed because the associated service has already been billed.
- Time: Displays the start time of the activity.
- Duration: The duration is displayed in hours and minutes, e.g. 2h, 4h 30m or 45m.
- Activity and labels: This column contains the activity description and assigned labels.
Above the table, actions can be used to scroll through the history.
- Arrow Keys "<" and ">": These actions can be used to move forwards and backwards in time in the history.
- Today: Via this action, the history jumps back to the current day.
Import of Activities
As a first step an Excel template can be downloaded via the "Download template" button. This template already contains all possible columns for the import of activities. It is important that the values in the first row may not be changed to ensure a correct assignment of the data in foreknown. However, the order of the columns can be changed and optional columns can be removed (see below).

Template
Here, an Excel template can first be downloaded via the "Download template" button. The first line of this template contains the terms required for the import. The order does not matter.

In the downloaded template you can now enter the activities as follows:
- username: Username of the corresponding employee in foreknown.
- date: Date of the activity. Format: DD.MM.YYYY e.g. 27.12.2022
- description: Activity description of the activity.
- importId: An account-wide unique id of the activity.
It is recommended to insert the date and the time, as well as an ascending sequence of numbers, so that there are no duplicates. Example: 20220623-10-1, 20220623-10-2, ...
- labels: Optional; In this column, the labels that are to be assigned to the activity can be entered.
We recommend always assigning labels to keep a better overview.
The individual labels must be separated with commas.
- durationInMinutes: Here the duration of the activity is entered in minutes.
IMPORTANT: The activity must always be entered in minutes. Example: 4 hours MUST be entered as 240 minutes.
- projectKey: Optional; project key from the associated project in foreknown.
- taskKey: Optional; task key from the associated task in foreknown.
Once you have entered all the activities in the Excel table, you can save them and return to the "Import Activities" dialog.
Import Overview
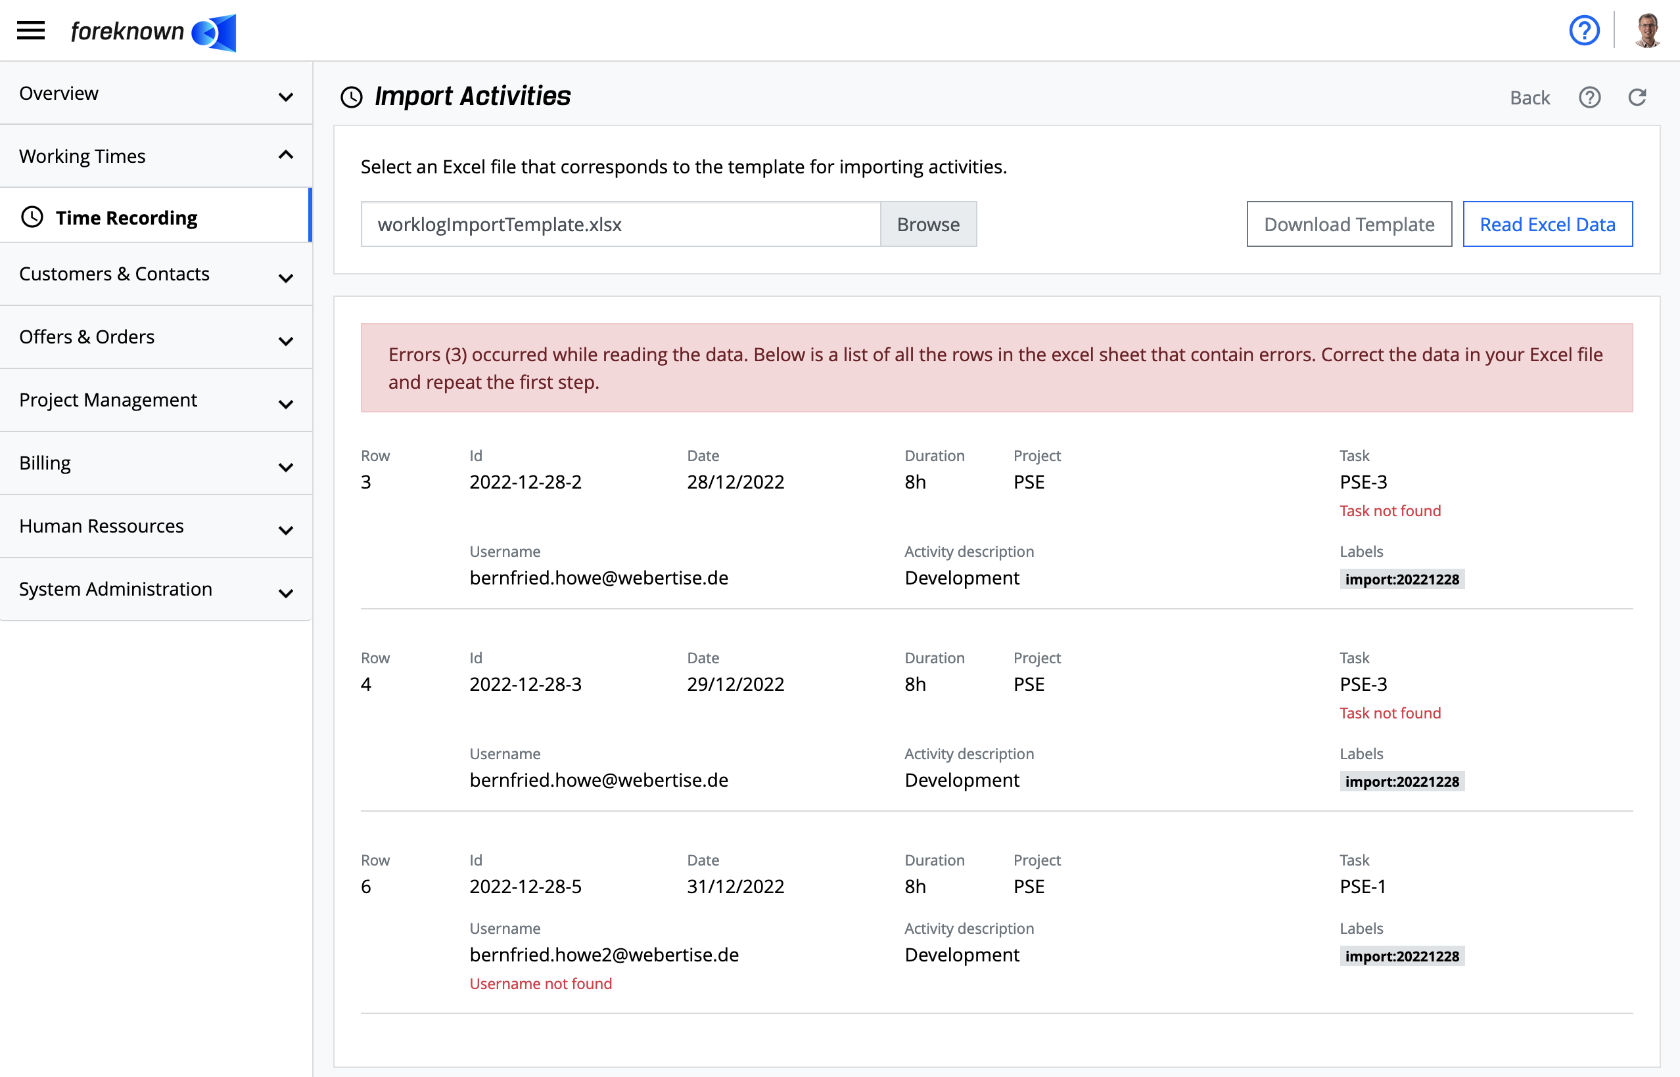
In the "Import Activities" dialog, you can use the "Browse" button to select the Excel file and "Read Excel Data" in order to load the data into foreknown.
If everything has been entered correctly in the Excel sheet, you will see an overview of the data to be imported and the "Perform Import" button. By clicking on this button, all activities will now be imported into foreknown.
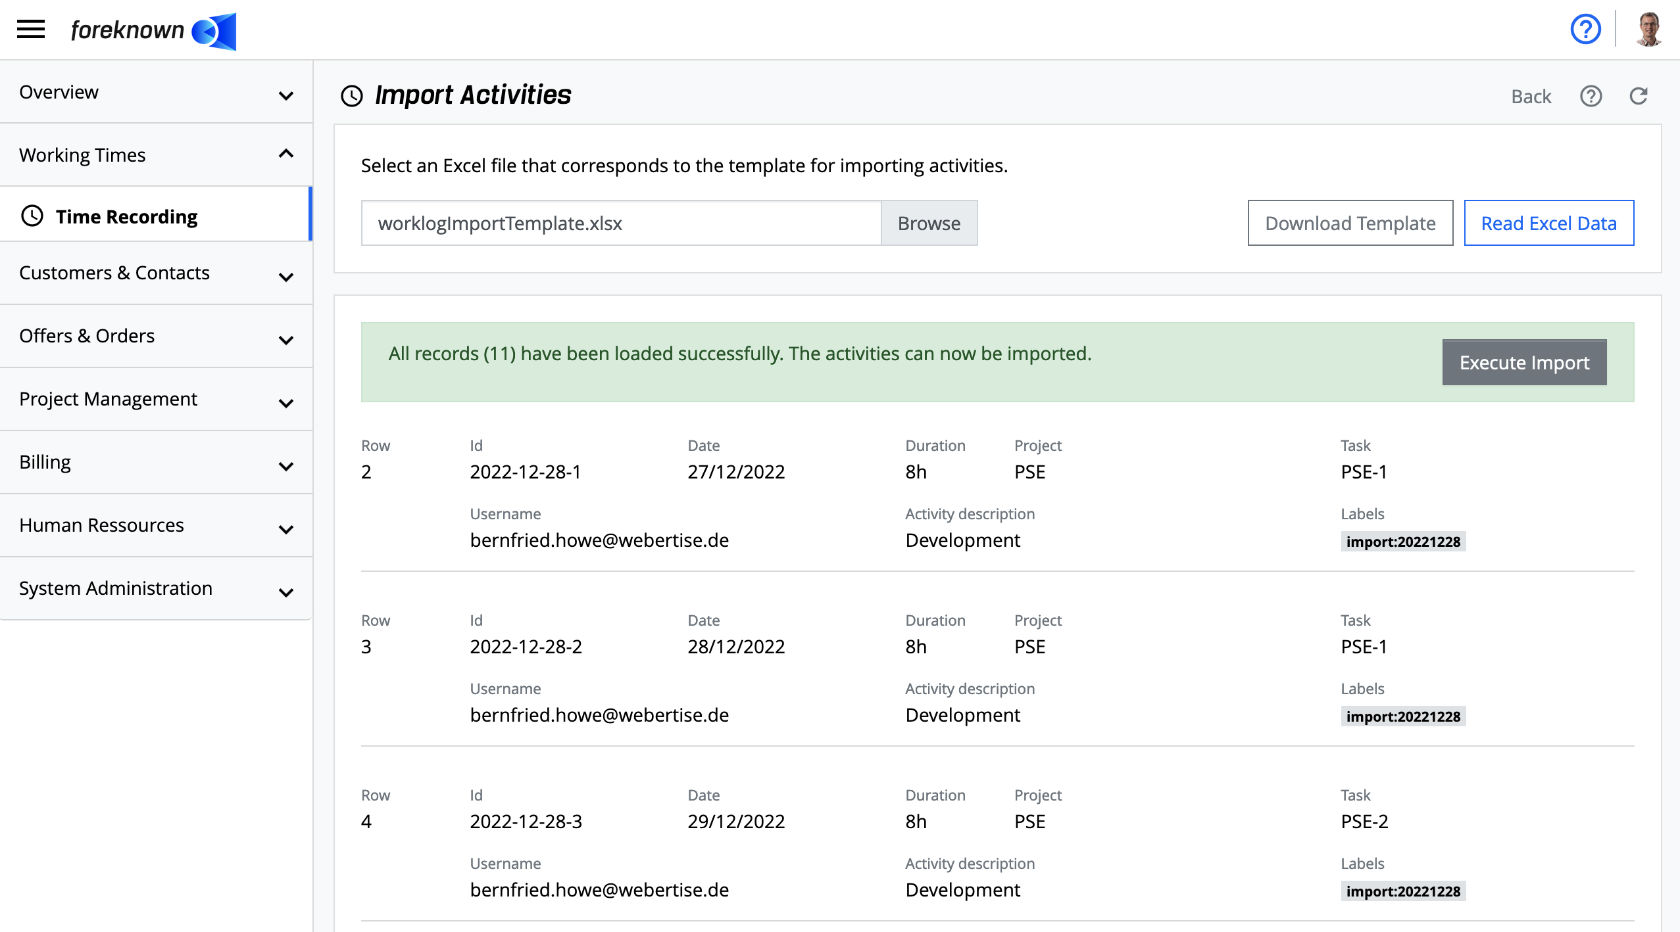
Error during Import
If an error was identified in one of the activities, such as a wrong abbreviation or a wrong username, this will be displayed after loading the data. The exact line as well as the type of error is listed to ensure that it can be corrected in the excel file quickly.