Table of Contents
Introduction
In the section "Human Resources / Teams" you will see a list of all the teams to which you have access rights. With a click on a team in the list you will get to the detailed view. Here you can edit the master data of the team and manage the list of team members.
Access to this area is only possible for persons with the role "HR Manager" and "Team manager". A "HR Manager" always receives all teams in the list view, a "Team Manager" receives only the teams in which he/she is assigned to with role "Team Manager".
Search Team
In the upper area of the "Team" dialog is the search field and the "+ New" button (see also Create Team). Below this area all already created teams are displayed in form of a scrollable, sortable and filterable list.
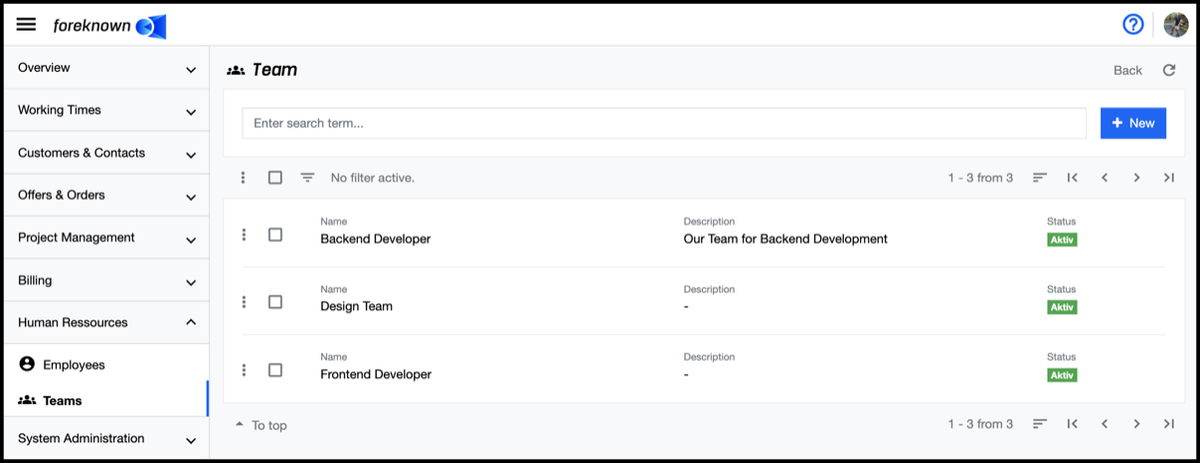
If you enter a search term in the input field, the list will only show the teams that contain the entered search term in the name. In this way, individual teams can be found and edited quickly.
Filter Teams
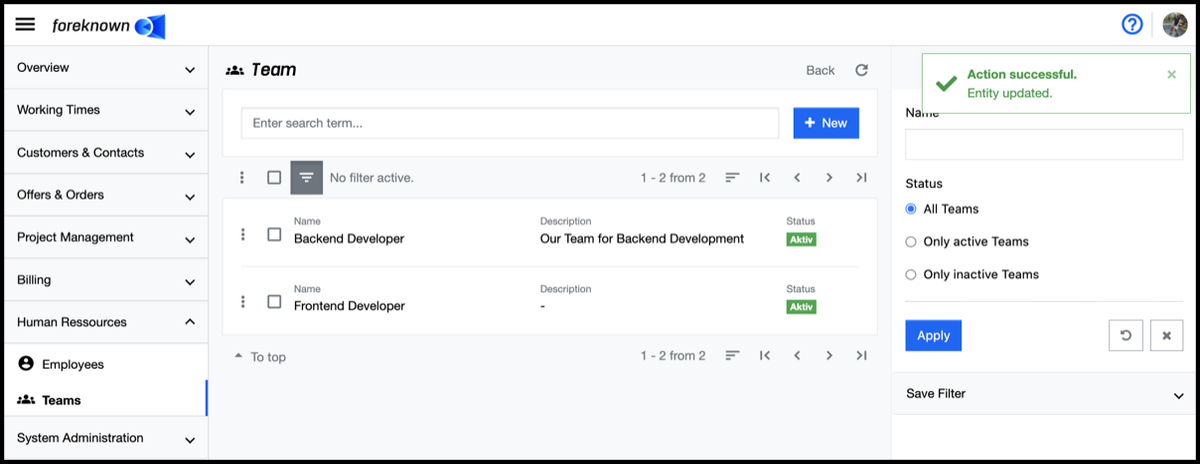
The team management offers the following filter settings:
- Name: Any element in the name.
- Status: Only the teams with the selected status will be displayed.
The "Apply" action displays all teams in the list that match the filter criteria. The action "X" removes all filter settings and the list shows all teams again. The "Reset" action (symbol: arrow in a circle) discards all changes that may have been made to a saved filter.
For general information on the filter options, see also the chapter Basics: Filter.
Create Team
To create a new team, click on the "+ New" button located at the top right of the search box. This button opens the popup dialog "Create team".
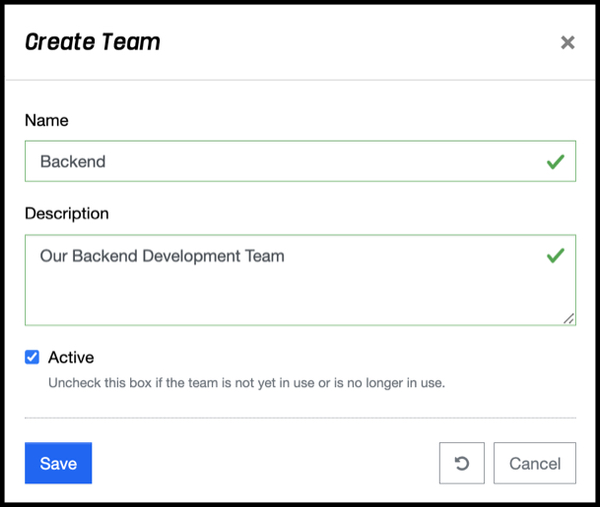
- Name: A unique name should be chosen here.
- Description: Here the activities and tasks can be described in more detail.
- Active: Leave this checkbox deactivated only if the team is no longer in use.
NOTE: Only active teams are displayed in dashboards or other overview pages.
With the creation of a team, the current user is automatically assigned to the team with the role "Team Manager". Furthermore, an authorization group with the name and description of the team is created and the current user is assigned to the permission group with the role "Team manager" and "Employee".
HINTS:
- When managing team members, it is always ensured that the current team manager who is editing the team cannot > be removed or inactivated, so that he/she can continue to edit the team. To remove her-/himself from a team, > another team manager must be added, who will then take over this task.
- Since the name of the team is also used as the name for the associated authorization group, it must be ensured that > this name has not yet been assigned to another authorization group. If this is the case, the team- or the > authorization group name must be changed.
- The authorization group receives an assignment with the role "Employee" for each member. In this way the > authorization group can simply be assigned to a project, for example, so that all team members in this project > are automatically authorized as "employees".
With the action "Save" a new team is created. With the action "Reset" and "Cancel" the entries are discarded and in case of the action "Cancel" the dialog is closed.
Edit Team
A team can be edited either via the action menu with the action "Edit Team" or in the detail view with the pencil icon in the top right corner. The "Update Team" dialog will open.
Here you will see all properties of the team (see also Create Team)
The "Save" action will save the changes to the team. With the action "Reset" and "Cancel" the entries are discarded and in case of the action "Cancel" the dialog is closed.
A team can be deleted by opening the action menu and then the action "Delete Team". A pop-up dialog opens, which must be confirmed with action "Delete".
Members
To get to the overview of the members assigned to the team, the detailed view must be opened by clicking on the corresponding team. Here the overview can be found in the lower half of the dialog.
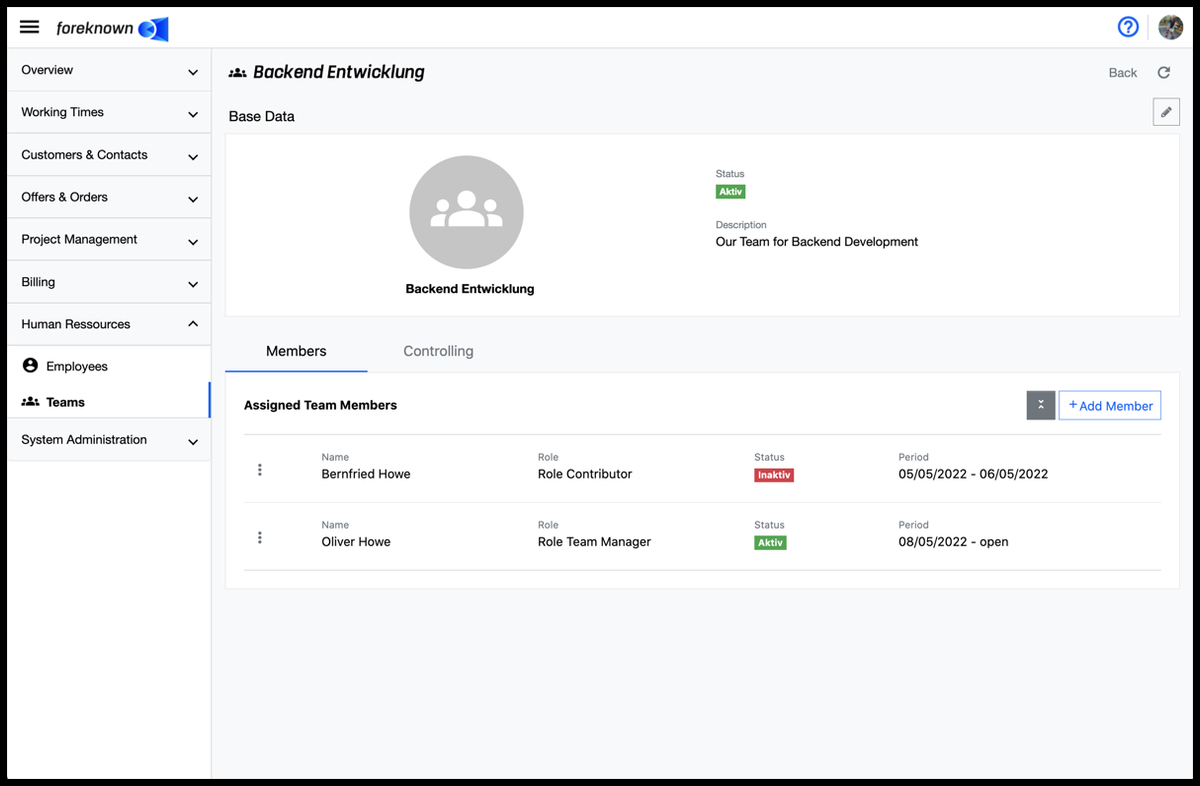
In the list
- the name of the employee,
- the role (ROLE_CONTRIBUTOR: means employee)
- the status (active or inactive; results from the validity period)
- the validity period to which the membership has been restricted
is displayed. At the beginning of each line there is the action menu (three dots) through which a team member can be edited or removed.
Above the list there is a button to show and hide the inactive team members and next to it there is a "+ Add member" button to add a new member to the team.
Add Member
To add a member to the team, the "+ Add member" button above the list must be clicked. This will open the "Add member" dialog:
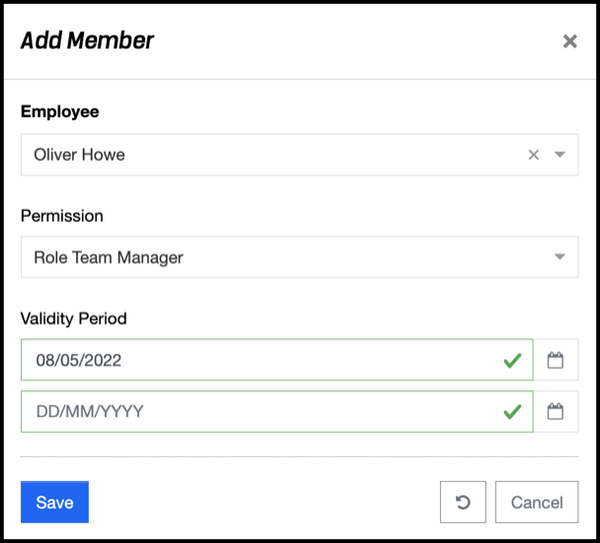
The following properties can/must be specified for adding:
- Employee: Here an employee must be selected via an auto-fill field.
- Validity period: Here a start time must be selected, from which the team member is active. Furthermore, the end date from which the team member is inactive again can be selected here.
With the action "Save" a new team member is added. With the action "Reset" and "Cancel" the entries are discarded and in case of the action "Cancel" the dialog is closed.
Edit Member
To edit a team member, you need to click on the action menu and then select "Edit Member". The "Edit member" dialog will open. Here, all attributes from the "Add Member" dialog can be edited, except for the Employee.
If you want to remove a team member, this can be done via the action menu and the action "Remove Member". A dialog will open which has to be confirmed with action "Remove".
Management
The "Management" tab is located below the master data. Here you can define who is allowed to access the team with the authorization of a team manager. Initially, only the team managers with a current validity period are visible in the list.
If you also want to display managers with a validity period in the future or past, you have to click on the "Show inactive" button next to the "Add manager" button in the upper right corner.
Add Manager
To add a manager, click on the "Add manager" button in the upper right corner. The dialog of the same name will open.
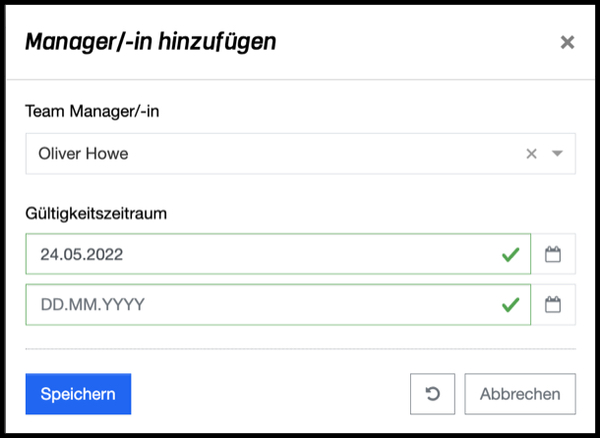
The following properties can/must be specified for adding:
- Team Manager: Here a team manager must be selected from an auto-fill select field.
- Valid period: A start date and an end date must be specified here. If no end date is specified, the assignment is valid indefinitely.
The "Save" action adds a new team manager to the list. With the "Reset" and "Cancel" action the changes will be discarded and in case of the "Cancel" action the dialog will be closed.
Edit Manager
To edit a team manager, click on "Edit" in the action menu. Thereupon the "Edit Manager" dialog opens, in which the start and end date can be changed.
With the action "Save" the changes will be applied. With the action "Reset" and "Cancel", the changes are discarded and in the case of the "Cancel" action, the dialog is closed.
Remove Manager
To remove a team manager from the team, click on "Remove" in the action menu. In the popup dialog, you need to confirm by clicking the "Remove" button.
NOTE: Removing a manager from a team has no effect on Team Controlling. Only employee values are used in Team Controlling. In order for a team manager to be included in the team controlling the team manager must also be assigned as a member to the team.
Controlling
Team controlling enables a team manager to query all important key figures for the team, broken down to each individual team member for a selected period. These KPIs are used to assess the status of a team, uncover problems and take required action.
For example, the following insights can be gained:
- What is the level of completeness of time recording? In order to be able to generate up-to-date evaluations and complete invoices it is important that all employees record their working hours promptly.
- How much capacity does my team have? By calculating the net capacity taking into account all absence times it is possible to determine what a team can actually accomplish for a given period of time.
- What is the capacity utilization of my team? As a team manager, you should always keep an eye on whether the team or individual team members are under- or overloaded.
- How efficient is my team? The invoicing and order rates, which can also be evaluated against planned figures per employee, make it easy to see whether the team is providing the desired billable services.
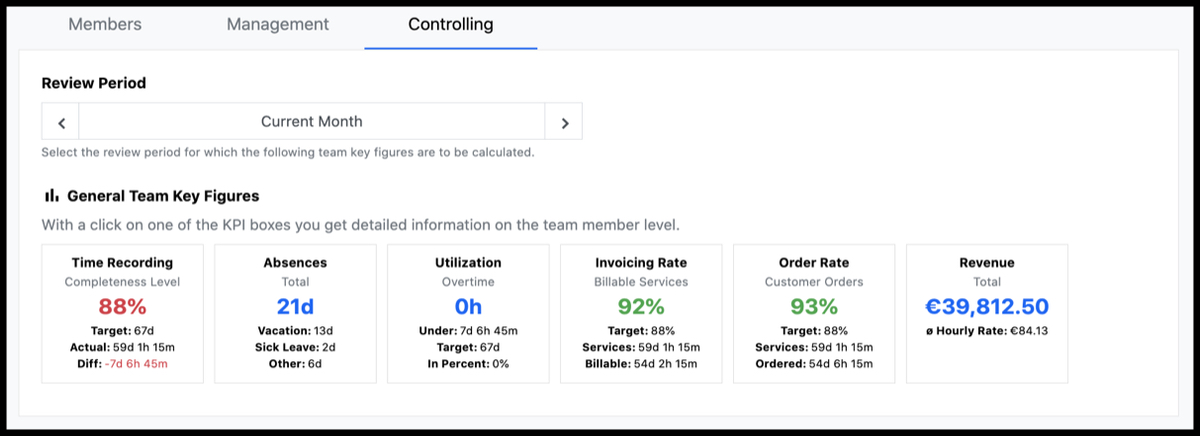
The controlling of a team can be found in the detailed view under the tab "Controlling". Here, the key figures at team level for the current month are displayed first. It should be noted that only team members and their services are used for the calculation of the KPIs. The period for the calculation of the KPIs can be set freely. If you select one of the predefined time periods, e.g. Current week, Current month, you can use the navigation (maintenance keys) to switch to the respective upstream or downstream period.
IMPORTANT: If you select a period whose end date is in the future, target values for days are included, for which no actual values can exist yet. To perform more precise evaluations, the end date should be set to the current day using "Individual period" if necessary.
Time Recording
The following key figures are displayed in the "Time Recording" KPI box:
- Completeness Level in percent: Shows the percentage of hours already recorded (actual) by the team compared to the net capacity (target) of the team.
- Target: Shows the net capacity of the team, i.e. the sum of the working hours recorded in the employee contracts minus all absences from bank holidays, vacations, sick Leave, overtime deductions and other absences.
- Actual: Displays the sum of all working times recorded in the selected period for all team members.
- Diff: Shows the difference between target and actual.
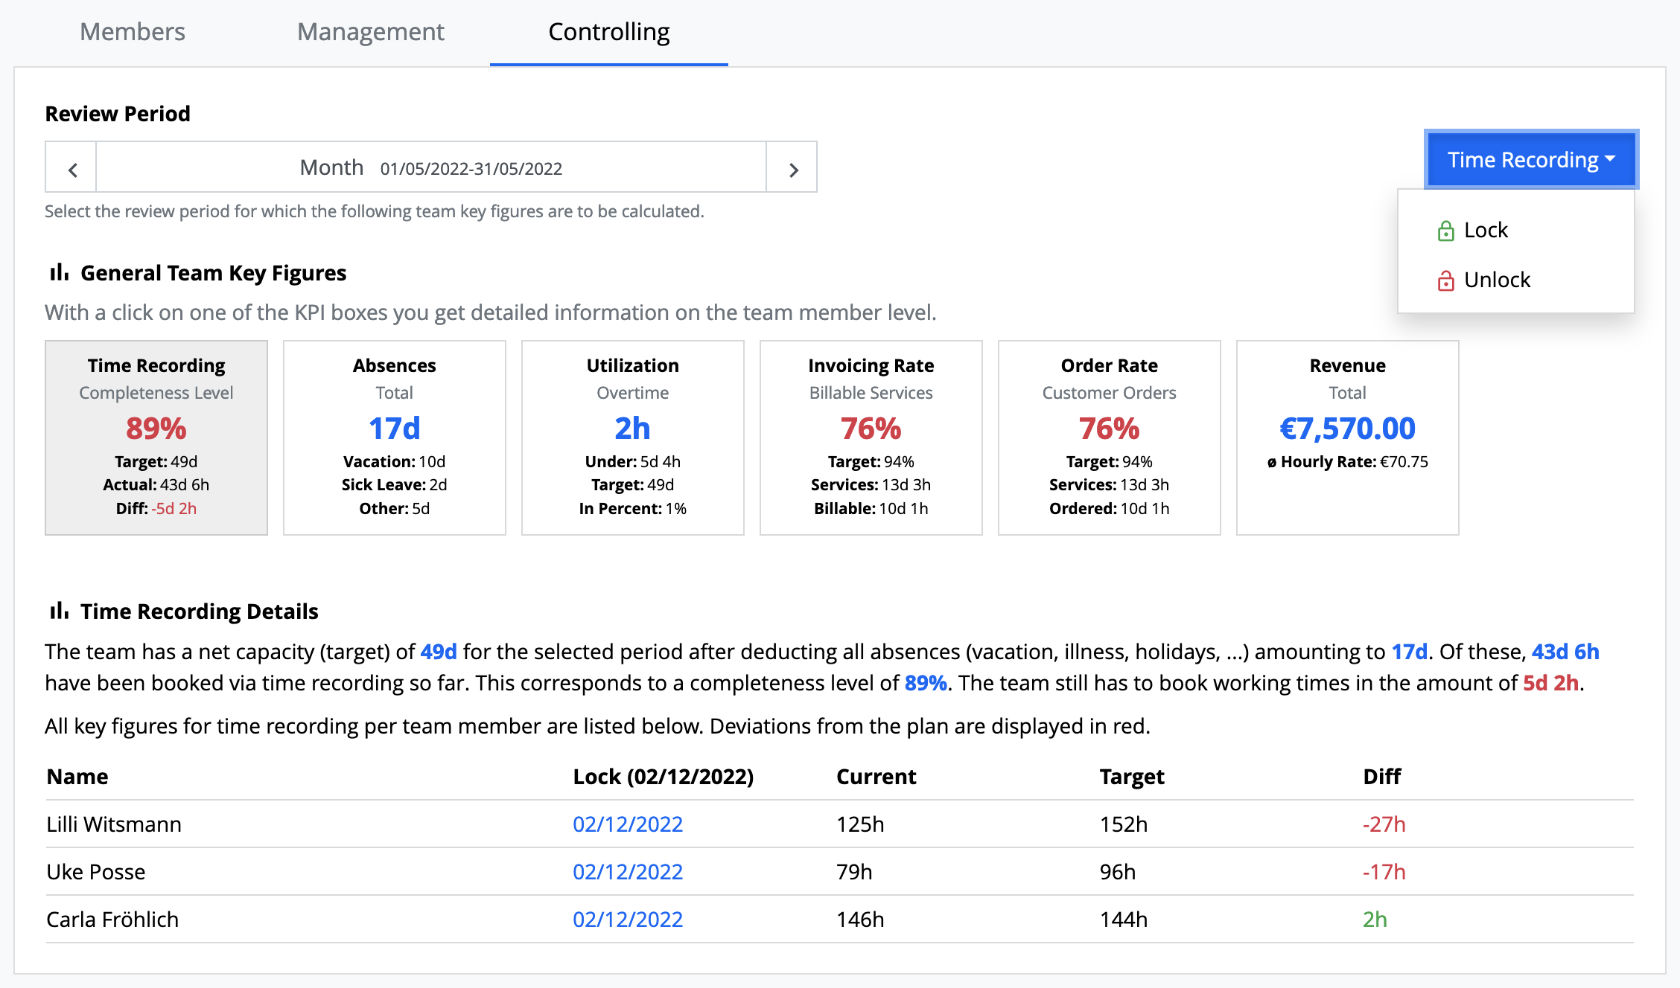
Clicking on the KPI box opens the detailed view with further explanations and a tabular representation of the KPIs per employee. In this way, for example, employees can be identified whose working times have not yet been fully maintained.
Furthermore, the team manager is offered a drop-down menu "Time Recording". This menu offers the possibility to set a date for all employees of the team until which the time recording will be locked.
Lock Time Recording
This action opens a popup dialog to select a date until which a time recording lock is set for all team members. The following points have to be considered:
- A workday for which there is a lock on time recording can no longer be adjusted by the employee or the team manager. Only an unlocking of the affected workday allows a subsequent adjustment.
- For employees with a "full-time" time recording, a lock can only be set for a workday if the sum of the working times for the workday is the same as the sum of the activity bookings. Once the first incompletely posted workday is identified, the lock for the employee will be set to that day and all subsequent days will not be locked.
- Employees can release their own workdays regarding time recording, so that an employee lock date can be after the team lock date.
The current lock date for the team appears in the table in the "Lock" column header. The employee's lock date is displayed in the column, as this can differ from the lock date of the team for the above-mentioned reasons. Thus, it can be quickly recognized whether the lock could not be set for individual employees by the desired date and the employee still has some actions to do.
Unlock Time Recording
The Team Manager can perform the "Unlock" action to unlock a previously set lock until a desired day. The desired date is selected via a popup dialog. Afterwards, all workdays of all team members up to and including the selected day will be unlocked and can be edited by the employee or team manager again.
In order to reset the lock date for an individual employee of the team, the team manager has to switch to the time recording dialog with the desired employee and can then use the "Unlock" action to set the lock for another day. The date in the "Lock" column is already a link to the employee's time recording dialog.
Absences
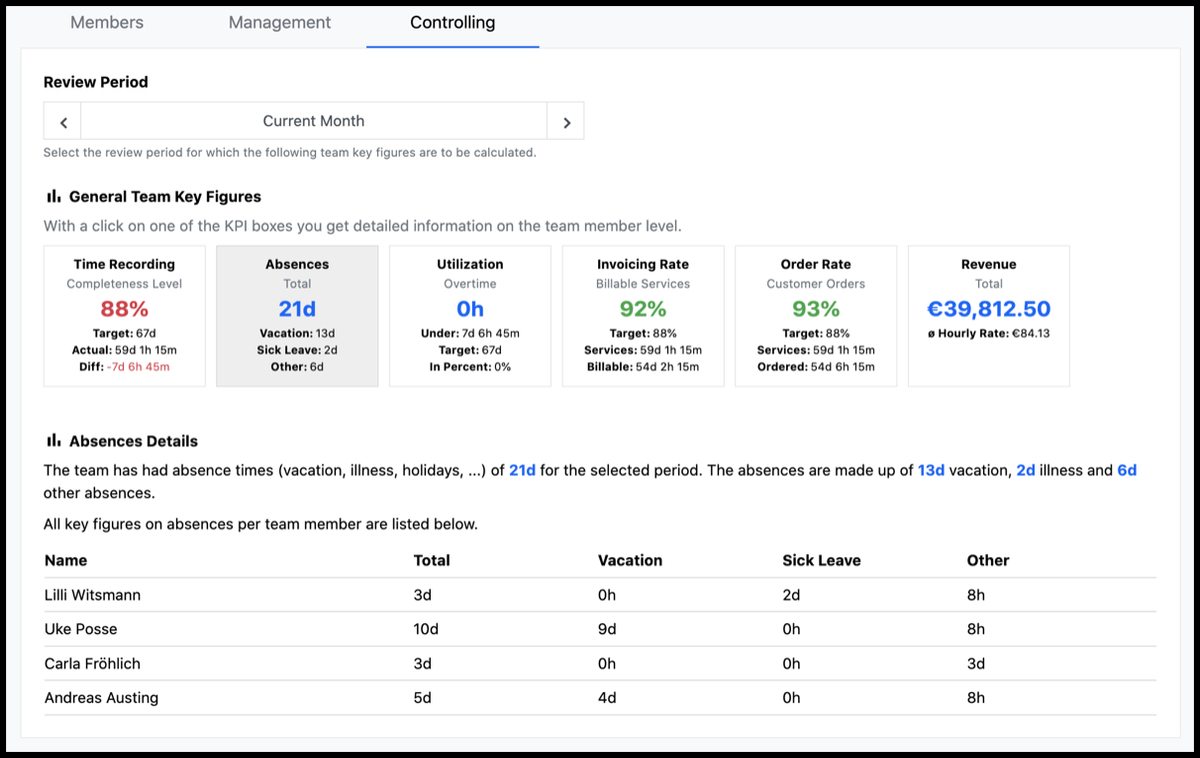
The following key figures are displayed in the "Absences" KPI box:
- Total absences in hours: Shows the sum of all absences of the team in days/hours.
- Vacation: Shows the sum of all absences of the team due to vacation in days/hours.
- Sick Leave: Shows the sum of all absences of the team due to sick Leave in days/hours.
- Other: Shows the sum of all other absences of the team e.g. overtime reduction, parental leave, ... in days/hours.
Clicking on the KPI box opens the detailed view with further explanations and a tabular representation of the KPIs per employee. In this way, it can be determined which individual employees are not available in the selected period.
Utilization
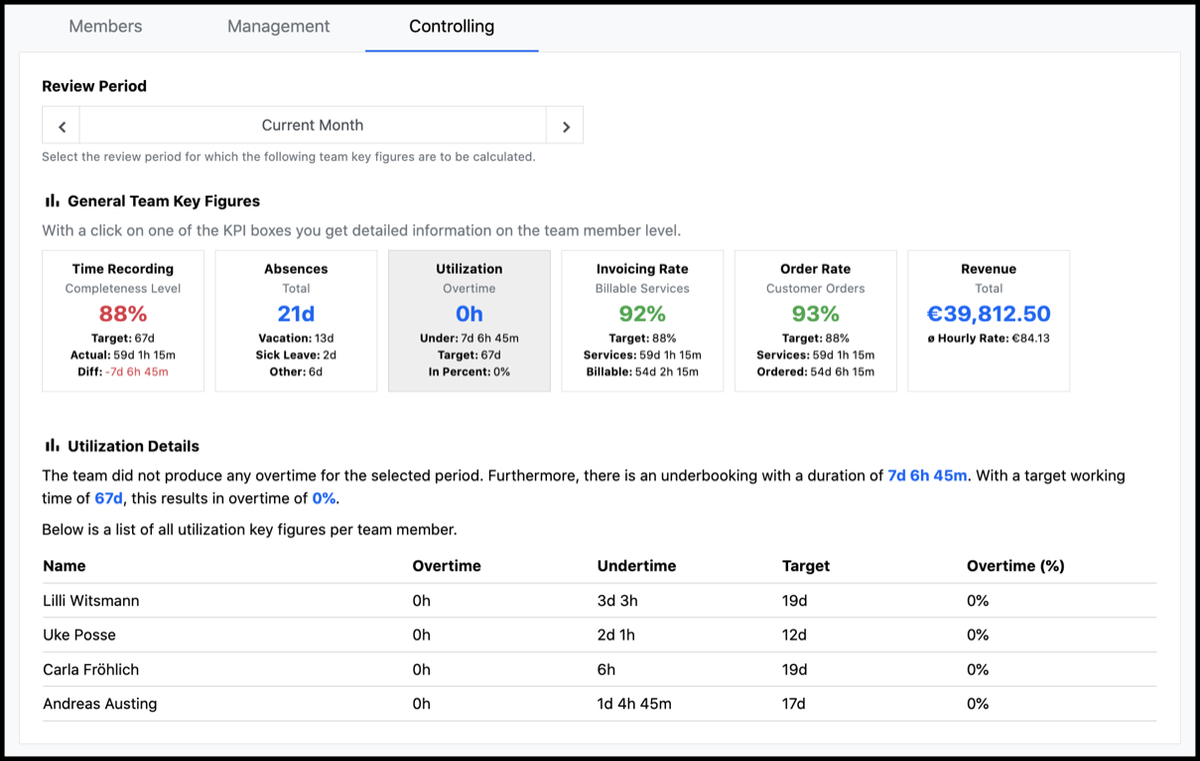
The following key figures are displayed in the "Utilization" KPI box:
- Overtime: Shows the sum of overtime hours worked by employees in the selected period.
- Undertime: Shows the sum of all undertime hours that have been worked by employees in the selected period.
- Target: Shows the net capacity of the team, i.e. the sum of the working hours defined in the employee contracts minus all absences from bank holidays, vacations, sick leave, overtime deductions, and other absences.
- Overtime as a percentage: Displays the percentage of overtime hours to net capacity (target).
NOTE: In order to obtain reliable values for these key figures, an observation period should be chosen in which a complete recording of working hours has already taken place.
Clicking on the KPI box opens the detailed view with further explanations and a tabular representation of the KPIs per employee. In this way, it is possible to determine which individual employees in the overtime or absences during the selected period.
Invoicing Rate
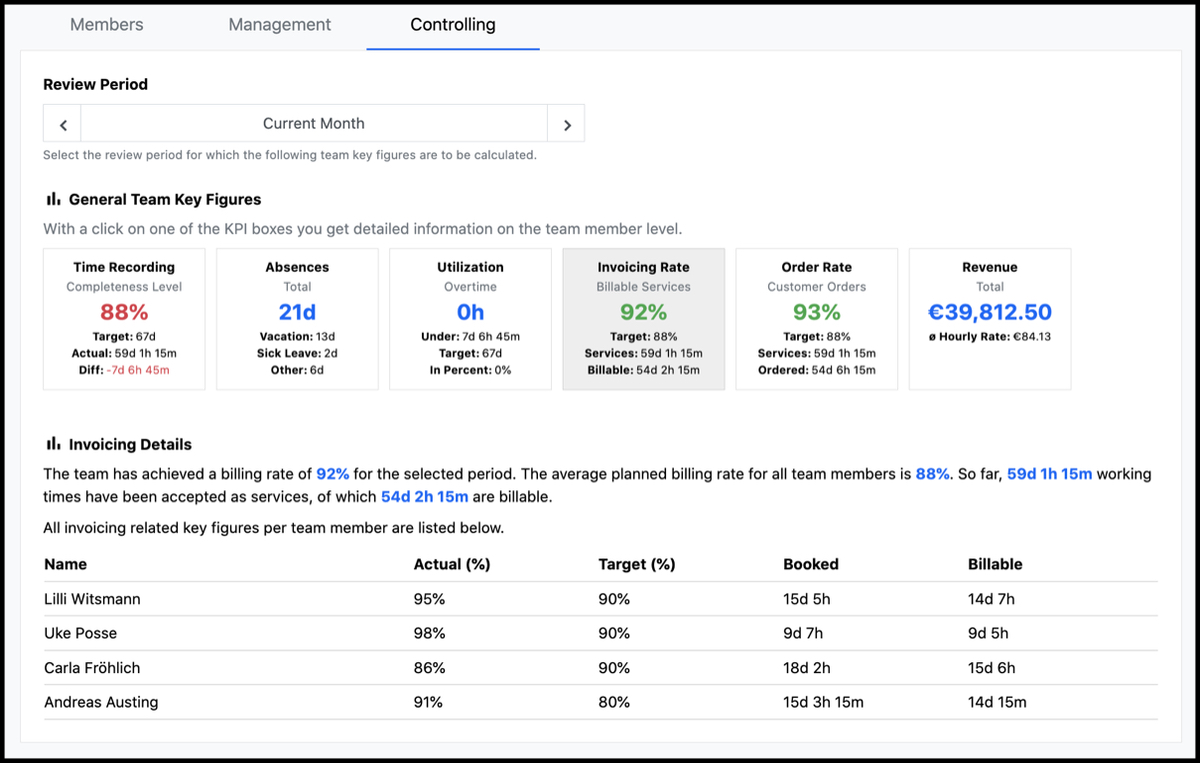
The following key figures are displayed in the "Invoicing Rate" KPI box:
- Invoicing rate: Shows the percentage of billable services of the total recorded services of the team.
- Target: Displays the average value of the planned invoicing rate from the contracts of all employees in the team.
- Services: Displays the total of all recorded services of the team in hours/days.
- Billable: Displays the total of all billable services of the team in hours/days.
NOTE: The billing rate should not exceed the planned order rate, otherwise this would only be fulfilled with overtime of the team. The planned order rate is also calculated from the planned values per employee on the contract.
Clicking on the KPI box opens the detailed view with further explanations and a tabular representation of the KPIs per employee. In this way, it can be determined where the individual employees are with regard to the plan invoicing rate stored in the employee contract.
Order Rate

The following key figures are displayed in the "Order Rate" KPI box:
- Order Rate (sales orders): Displays the percentage of services that were assigned to billable order items as a percentage of the team's total services.
- Target: Displays the average value of the planned order rate from the contracts of all employees on the team.
- Services: Displays the total of all the team's recorded services in hours/days.
- Ordered: Displays the total of all the team's services that have been assigned to billable order items of customer orders in hours/days.
Clicking on the KPI box opens the detailed view with further explanations and a tabular representation of the KPIs per employee. In this way, it can be determined where the individual employees are with regard to the planned customer order rate stored in the employee contract.
Revenue
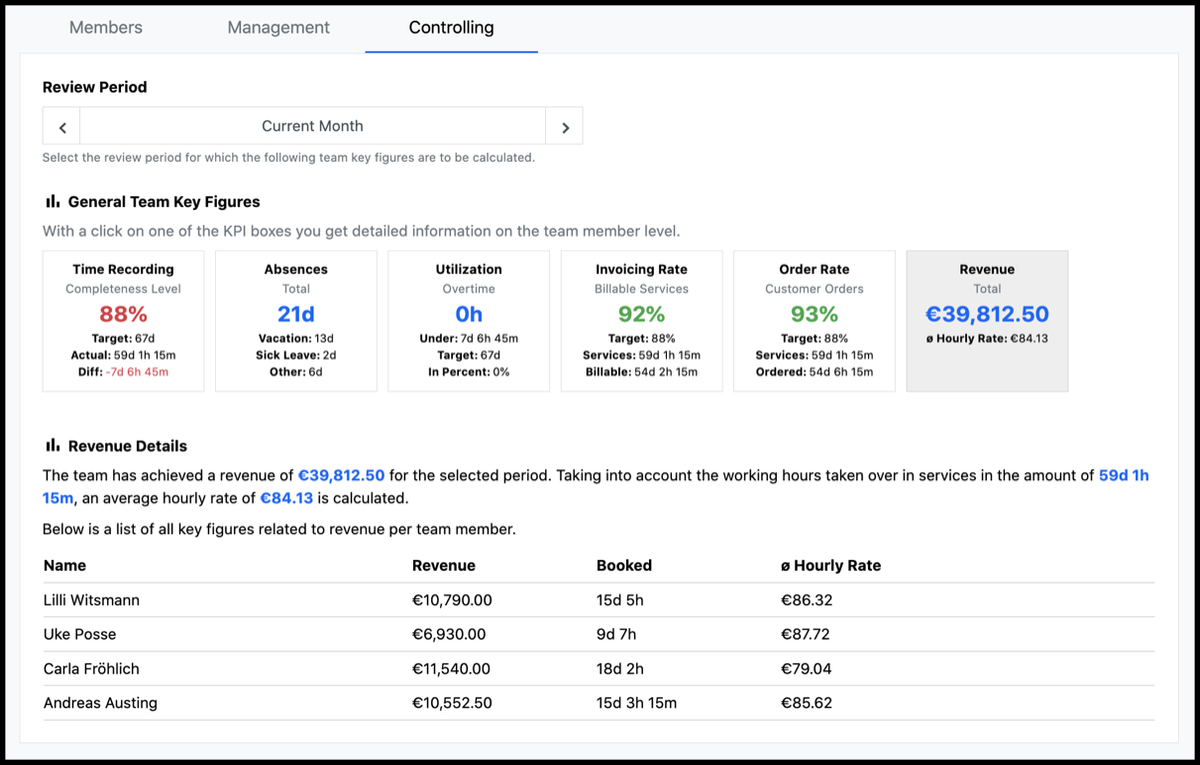
The following key figures are displayed in the "Revenue" KPI box:
- Revenue (total): Shows the monetary equivalent of all billable services of the team recorded for the selected period. These services can be billed already or are not yet billed.
- ø Hourly Rate: Displays the average hourly rate calculated from the total revenue and the duration of the team's recorded services of the team.
Clicking on the KPI box opens the detailed view with further explanations and a tabular representation of the KPIs per employee. In this way, it is possible to determine what contribution each individual team member has made to the total revenue and what the average hourly rate for the employee results.